Crispy Vegetable & Feta Fritters

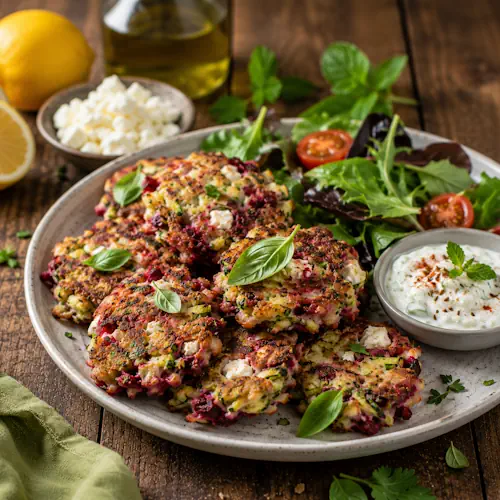
Crispy Vegetable Fritters served with cucumber yogurt dip and mixed leaf salad on a rustic wooden table.

Crispy Vegetable & Feta Fritters

Crispy Vegetable & Feta Fritters combine fresh courgette, beetroot, herbs, and creamy feta into light, golden fritters that are perfect for lunch, a light dinner, or a vegetarian side dish. Served with a refreshing cucumber and yogurt dip, they deliver fresh Mediterranean-inspired flavors in every bite.
Couverts4 servings
Preparation 20 minutes
Preparation time:13 minutes
Total time 33 minutes
estimated costs pp $2.10 per person
Deel op Facebook Print Recipe

Equipment

  • Box grater
  • chopping board,
  • Frying pan
  • Large mixing bowl
  • spatula

Ingredients

  • 1 egg yolk
  • 1 large courgette grated
  • 2 cooked fresh beetroots peeled and grated
  • 2 spring onions sliced
  • 2 tablespoons chopped mint
  • 2 tablespoons chopped parsley
  • 2 tablespoons olive oil
  • 2 tablespoons rice flour
  • 100 g feta cheese crumbled
  • Grated zest of 1 lemon
  • Mixed leaf salad to serve
  • Basil leaves for garnish
  • Salt and black pepper

Optional Cucumber Yogurt Dip

  • ยผ cucumber grated and squeezed dry
  • 1 garlic clove crushed
  • 1 teaspoon toasted cumin seeds
  • 200 ml fat-free Greek yogurt
  • Pinch of paprika
  • Salt and black pepper

Instructions

  • Grate the courgette and beetroot.
  • Slice the spring onions.
  • Combine the courgette, lemon zest, spring onions, parsley, mint, feta, rice flour, and egg yolk in a large bowl.
  • Season with salt and black pepper.
  • Fold in the grated beetroot gently to create a marbled mixture.
  • Heat a little olive oil in a frying pan over medium heat.
  • Drop spoonfuls of the mixture into the pan.
  • Flatten each fritter slightly.
  • Cook for 1 to 2 minutes per side until golden brown.
  • Transfer to a warm plate.
  • Repeat with the remaining mixture, adding more oil as needed.
  • Mix all the dip ingredients together if serving the yogurt sauce.
  • Garnish with fresh basil leaves.
  • Serve immediately with the cucumber yogurt dip and mixed leaf salad.

Notes & Wine Advice

Recipe Notes

Squeeze as much moisture as possible from the grated courgette before mixing to help the fritters become crisp and golden.
Fold the beetroot into the mixture gently to keep the beautiful marbled appearance.
The cucumber yogurt dip can be prepared a few hours in advance and kept refrigerated until serving.
Serve the fritters warm with a fresh salad for lunch, brunch, or a light vegetarian dinner.

Wine Advice

A chilled Sauvignon Blanc pairs beautifully with the fresh herbs and tangy feta.
For a refreshing alternative, enjoy a glass of Rosรฉ alongside these crispy fritters.

Nutrition values

Calories: 207 kcal | koolhydraten: 10 g | Eiwitten: 8 g | Vet: 15 g | Verzadigd vet: 5 g | Natrium: 360 mg | Suiker: 6 g
————————————————————————————————–
Course; Cheese / Vegetables
Cuisine; Mediterranean
Season: Spring / Summer
Occasions Brunch / Lunch / Picnic / Weekend

About This Recipe

Crispy Vegetable & Feta Fritters are a fresh and colorful vegetarian dish that combines grated courgette, beetroot, fragrant herbs, and creamy feta cheese into crisp golden patties. Light yet satisfying, these fritters are perfect for brunch, lunch, or a simple evening meal. Their vibrant color and Mediterranean-inspired flavors make them just as suitable for a casual family meal as they are for picnics or buffet tables.

Why You’ll Love These Vegetable Fritters

This beetroot feta fritters recipe is quick to prepare and uses wholesome ingredients that create plenty of flavor with very little effort. Fresh herbs brighten every bite, while feta adds a delicious creamy, salty contrast to the naturally sweet beetroot. If you enjoy easy vegetarian dishes, explore our Vegetable Recipes, Cheese Recipes, Vegetarian Recipes, Brunch Recipes, and Mediterranean Recipes.

Making Beetroot Feta Fritters

Grated courgette, herbs, lemon zest, feta, and rice flour create the base of these flavorful fritters. The grated beetroot is folded in gently to preserve its beautiful marbled appearance before the mixture is pan-fried until crisp and golden. Serve them immediately for the best texture, accompanied by a cool cucumber yogurt dip that perfectly balances the warm fritters.

Serving Suggestions

Crispy Vegetable & Feta Fritters are delicious with mixed salad leaves, roasted vegetables, grilled chicken, or smoked salmon. They also make an excellent vegetarian starter, picnic dish, or buffet favorite. Leftover fritters can even be tucked into wraps or sandwiches for an easy lunch the following day.

Storage Tips

Store leftover fritters in an airtight container in the refrigerator for up to three days. Reheat them in a frying pan, oven, or air fryer to restore their crispy exterior before serving. For additional food storage recommendations, visit the FDA Food Safety website.

Crispy Vegetable & Feta Fritters are an easy vegetarian recipe that delivers colorful presentation, fresh Mediterranean flavors, and crisp texture in every delicious bite.
Mini Smoked Trout Quiches

Mini Smoked Trout Quiches

Couverts4
Deel op Facebook Print Recipe

Ingredients

  • ยฝ tablespoon rapeseed oil
  • 400 g baby spinach leaves
  • 6 large eggs
  • 100 ml semi-skimmed milk
  • 3 tablespoons grated Parmesan cheese
  • 2 tablespoons finely chopped chives
  • 150 g hot-smoked trout fillets flaked
  • 4 cherry tomatoes halved
  • salt and pepper

Instructions

  • Line 8 holes of a muffin tin with 15 cm squares of greaseproof paper.
  • Heat the oil in a frying pan, add the spinach and cook briefly until wilted.
  • Remove from the heat.
  • Beat together the eggs, milk and cheese in a jug and season to taste, then stir in the chives and trout.
  • Divide the spinach between the muffin cases, then pour in the egg mixture.
  • Top each one with half a cherry tomato.
  • Bake in a preheated oven, 180ยฐC (350ยฐF), Gas Mark 4, for 12โ€“15 minutes until just set.

Notes & Wine Advice

For smoked trout baked eggs,

brush 4 ramekins with melted butter, then add 50 g flaked hot-smoked trout fillet to each dish. Carefully break 2 eggs into each ramekin, top with 2 tablespoons grated Cheddar cheese and season. Place the ramekins in a roasting tin with enough boiling water to come three-quarters of the way up the sides of the dishes. Bake in a preheated oven, 200ยฐC (400ยฐF), Gas Mark 6, for 8โ€“9 minutes until the cheese has melted and the egg is cooked but still soft.
Calories per serving 244

Nutrition values

Calories: 295 kcal
————————————————————————————————–
Course; Fish / Quiche

Chicken With Mango Salsa

Chicken With Mango Salsa

Couverts4
Deel op Facebook Print Recipe

Ingredients

  • 1 large mango peeled, stoned and diced
  • 1 small red onion diced
  • 1 red chilli deseeded and finely diced
  • large bunch of parsley chopped
  • 2 tablespoons olive oil
  • juice of ยฝ lime
  • 4 boneless skinless chicken breasts, about 150 g each
  • 2 garlic cloves halved
  • pepper

Instructions

  • Mix together the mango, red onion, chilli, parsley, 1 tablespoon of the oil and the lime juice in a bowl.
  • Set aside.
  • Place the chicken breasts between 2 sheets of nonstick baking paper or clingfilm and flatten with a rolling pin or mallet.
  • Rub with the cut garlic, sprinkle with pepper and drizzle with the remaining oil.
  • Heat a large griddle pan over a medium-high heat and cook the chicken for 3โ€“4 minutes on each side until cooked through.
  • Serve with the salsa.

Notes & Wine Advice

For chicken & mango toasts,

spread 4 slices of gluten-free wholemeal bread with 1 tablespoon gluten-free mango chutney each, then top each one with 3โ€“4 spinach leaves, a few coriander leaves and 50 g sliced ready-cooked chicken. Sprinkle over 75 g grated Cheddar cheese and cook under a preheated grill for 3โ€“4 minutes until bubbling and golden.
Calories per serving 294

Nutrition values

Calories: 265 kcal
————————————————————————————————–
Course; Chicken / Main Course
Diets; Gluten-Free

Mediterranean Squid

Mediterranean Squid

Couverts4
Deel op Facebook Print Recipe

Ingredients

  • 1 tablespoon olive oil
  • 1 red onion diced
  • 1 garlic clove sliced
  • 75 g pitted black olives
  • 1 red chilli deseeded and finely sliced
  • pinch of paprika
  • 400 g can chopped tomatoes
  • 400 g can butter beans rinsed and drained
  • 600 g squid cleaned and sliced into rings
  • grated rind of 1 lemon
  • small handful of parsley chopped
  • salt and pepper
  • lemon wedges to serve

Instructions

  • Heat the oil in a large pan, add the onion and garlic and fry for 3โ€“4 minutes until softened.
  • Add the olives, chilli and paprika and cook for a further 1 minute.
  • Stir in the tomatoes and simmer for 12 minutes.
  • Add the butter beans and season well.
  • Bring to the boil, then add the squid, cover and simmer for 5โ€“6 minutes until the squid is cooked through and tender.
  • Sprinkle with the lemon rind and chopped parsley and serve with lemon wedges.

Notes & Wine Advice

For salt & pepper squid,

mix together 85 g gram flour, 85 g rice flour, 2 tablespoons crushed Sichuan peppercorns, 2 teaspoons cracked black pepper and 1 teaspoon sea salt in a bowl. Heat about 7 cm vegetable oil in a deep pan or wok to 180โ€“190ยฐC (350โ€“375ยฐF), or until a cube of gluten-free bread browns in 30 seconds. Cut 400 g cleaned squid into rings, then coat in the seasoned flour and deep-fry in batches for about 2โ€“3 minutes until golden. Remove with a slotted spoon and drain on kitchen paper, sprinkling with a little more salt. Serve sprinkled with a few chopped spring onions and a dipping sauce.
Calories per serving 232 (not including dipping sauce)

Nutrition values

Calories: 257 kcal
————————————————————————————————–
Course; Fish / Main Course
Diets; Gluten-Free

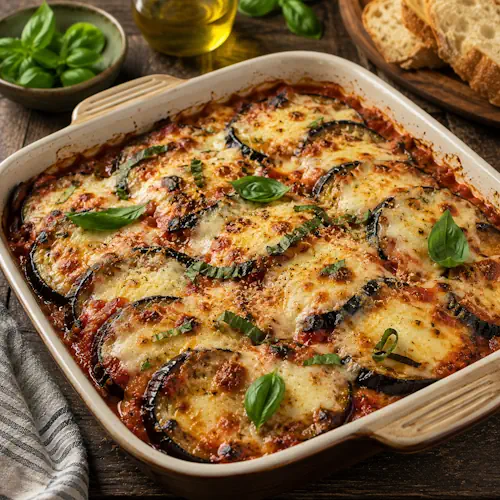
Italian Aubergine Cheese Bake

Golden baked aubergine layered with rich tomato sauce, melted mozzarella and Parmesan, garnished with fresh basil in a rustic oven dish.

Italian Aubergine Cheese Bake

Tender grilled aubergine layered with a homemade tomato and basil sauce, mozzarella and Parmesan, then baked until golden and bubbling. A comforting Italian-inspired vegetarian casserole that makes a satisfying main course or vegetable dish.
Couverts4
Total time 50 minutes
estimated costs pp $2.35
Deel op Facebook Print Recipe

Equipment

Ingredients

  • 2 large aubergines sliced
  • 1 handful basil torn
  • 1 garlic clove crushed
  • 150 g mozzarella cheese roughly chopped
  • 3 tablespoons olive oil divided
  • 1 small onion finely chopped
  • 4 tablespoons Parmesan cheese grated
  • 400 g plum tomatoes canned
  • Black pepper to taste
  • Salt to taste

Instructions

  • Heat 1 tablespoon of the olive oil in a saucepan over medium heat. Add the garlic and onion and cook for 3โ€“4 minutes until softened.
  • Add the plum tomatoes and torn basil. Bring to the boil, reduce the heat and simmer for 15 minutes to make the tomato sauce.
  • Meanwhile, brush the aubergine slices on both sides with the remaining 2 tablespoons olive oil.
  • Heat a griddle pan until hot and cook the aubergine for 1โ€“2 minutes on each side, until tender and lightly browned.
  • Spoon a little tomato sauce into the bottom of an ovenproof baking dish.
  • Arrange half of the aubergine over the sauce and scatter with half of the mozzarella and Parmesan. Season with salt and black pepper.
  • Repeat with the remaining tomato sauce, aubergine and cheeses, finishing with cheese on top.
  • Bake in a preheated oven at 200ยฐC (400ยฐF), Gas Mark 6, for 20โ€“25 minutes, until golden and bubbling.
  • Allow to stand briefly before serving.

Notes & Wine Advice

Serving Advice

Serve the aubergine bake hot with a fresh Salad. Gluten-free crusty bread can also be served alongside when desired. The combination of aubergine, tomato and melted cheese makes the dish substantial enough for a Main Course.

Recipe Notes

Grilling the aubergine before assembling the casserole gives it extra flavour and helps remove some moisture. Cook the slices until tender and lightly browned before layering them with the tomato sauce and cheese.

Aubergine, Chilli & Chicken Variation

Prepare the tomato sauce as above, adding 1 deseeded and finely sliced red chilli with the garlic and onion. Cook the aubergine as directed, then layer 300 g torn cooked Chicken between the aubergine layers. Bake at 200ยฐC until golden and bubbling. This variation contains approximately 382 calories per serving according to the original recipe.

Storage Advice

Allow leftovers to cool before transferring them to an airtight container. Refrigerate for up to 3 days. Reheat thoroughly in the oven until piping hot. The texture is generally better when reheated in the oven rather than the microwave.

Wine Advice

A Merlot works well with the roasted aubergine, tomato sauce and melted cheese. For a white wine, a Chardonnay is a good match for the mozzarella and Parmesan.

Nutrition values

Serving: 320 gr | Calories: 300 kcal | koolhydraten: 20 g | Eiwitten: 14 g | Vet: 20 g | Verzadigd vet: 8 g | Natrium: 480 mg | Suiker: 11 g
————————————————————————————————–

About Italian Aubergine Cheese Bake

Italian Aubergine Cheese Bake combines grilled aubergine, tomato, basil, mozzarella and Parmesan in a simple layered Casserole. The ingredients are closely associated with Italian cooking, where aubergine is frequently paired with tomatoes, herbs and cheese. The result is a comforting vegetarian dish with soft vegetables, a rich tomato sauce and a golden cheese topping.

Preparing the Tomato Sauce

The sauce starts with onion and garlic gently cooked in olive oil. Once softened, canned plum tomatoes and fresh basil are added and simmered for around 15 minutes. This short cooking time allows the tomatoes to reduce slightly and gives the garlic, onion and basil time to flavour the sauce.

The sauce should remain moist enough to surround the aubergine during baking. If it becomes extremely thick while simmering, a small splash of water can be added before assembling the casserole.

Why Grill the Aubergine First?

Aubergine contains a considerable amount of moisture and has a sponge-like texture that readily absorbs oil. Grilling the slices before assembling the bake softens them, encourages browning and helps concentrate their flavour.

Brush the slices lightly with olive oil rather than pouring oil directly into the pan. A hot griddle produces browned marks quickly while helping the aubergine cook without becoming unnecessarily oily.

Building the Layers

Begin with a little tomato sauce in the bottom of the baking dish. This prevents the first layer of aubergine from drying out or sticking. Half of the aubergine is then covered with mozzarella and Parmesan before the process is repeated.

Finishing with cheese on top ensures the bake develops a golden, bubbling surface in the oven. Roughly chopped mozzarella creates soft melted pockets, while Parmesan contributes a stronger savoury flavour.

Mozzarella and Parmesan

The two cheeses perform different jobs. Mozzarella melts smoothly and adds creaminess, while Parmesan has a firmer texture and more concentrated flavour. Together they give the dish both richness and a browned surface.

Because both cheeses naturally contain salt, season the individual layers cautiously. It is easier to add seasoning at the table than to correct an overly salty finished dish.

A Vegetarian Main Course

This bake contains no meat or fish and works well as a Vegetarian dinner. The aubergine provides the substantial vegetable base, while mozzarella and Parmesan add protein and richness.

Serve it with a simple Salad for contrast. A fresh green salad or tomato-based salad works particularly well because the casserole itself is warm, soft and rich.

Italian and Mediterranean Flavours

Aubergine, tomatoes, olive oil, basil and cheese are familiar ingredients throughout Mediterranean cooking. Their combination gives this recipe a straightforward flavour profile without requiring many spices or complicated preparation.

The dish is particularly close in spirit to other baked Italian aubergine recipes, although this version keeps the preparation relatively simple with only a few layers and a basic tomato sauce.

Chicken and Chilli Variation

The original recipe also suggests a heartier variation using cooked chicken and fresh red chilli. The chilli is cooked with the onion and garlic, while pieces of chicken are layered between the aubergine.

This changes the dish from a vegetarian casserole into a poultry-based meal and increases both the protein and calorie content. The basic tomato, aubergine and cheese structure remains unchanged.

Preparing Ahead

The tomato sauce and grilled aubergine can both be prepared before assembling the dish. Once layered, the casserole can be kept refrigerated for a short period before baking.

If it goes into the oven directly from the refrigerator, allow a little additional cooking time so the centre becomes thoroughly hot. The cheese should be melted and bubbling before serving.

Storage and Reheating

Leftovers keep well because the tomato sauce prevents the aubergine from drying out. Refrigerate them promptly in a covered container and use within about 3 days.

For reheating, an oven gives the best result because it heats the layers while refreshing the melted cheese on top. Heat until thoroughly hot throughout before serving.

Food Safety

Keep mozzarella and Parmesan refrigerated before use and cool leftovers promptly after the meal. Wash the aubergines, basil and other fresh produce before preparation. For current guidance on safe preparation, storage and reheating of food at home, consult the U.S. Food and Drug Administration food-safety information.

Italian Aubergine Cheese Bake is a straightforward way to turn familiar Vegetables into a warm and satisfying meal. Tender aubergine, basil-scented tomato sauce and melted cheese give the dish plenty of flavour while keeping the ingredient list pleasantly uncomplicated.

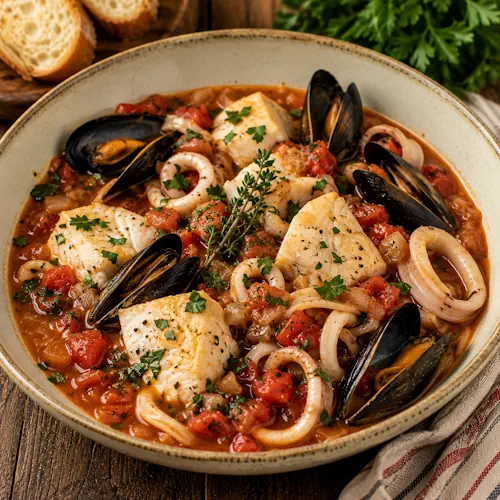
Provenรงal Seafood Stew

Provenรงal fish stew with cod, mussels and squid in a rich tomato broth with garlic, shallots, thyme and fresh parsley.

Provenรงal Seafood Stew

A rustic French seafood stew with tender white fish, mussels and squid simmered in a tomato, garlic and thyme broth. Fresh parsley adds a bright finish to this Mediterranean-inspired main course.
Couverts4
Total time 20 minutes
estimated costs pp $6.50
Deel op Facebook Print Recipe

Equipment

  • chopping board,
  • Knife
  • large saucepan
  • Wooden spoon

Ingredients

  • 500 g cod or haddock fillet skinless and cut into pieces
  • 300 ml fish stock gluten-free
  • 3 garlic cloves chopped
  • 300 g mussels live, scrubbed and debearded
  • 1 tablespoon olive oil
  • 2 tablespoons parsley chopped, for garnish
  • Pepper to taste
  • 3 shallots thinly sliced
  • Salt to taste
  • 200 g squid cleaned and sliced into rings
  • 400 g tomatoes canned and chopped
  • 1 tablespoon tomato purรฉe
  • 1 thyme sprig

Instructions

  • Heat the olive oil in a large saucepan. Add the shallots and garlic and cook for 3โ€“4 minutes until softened.
  • Add the chopped tomatoes, tomato purรฉe and thyme and cook for another 4โ€“5 minutes.
  • Pour in the fish stock and bring to the boil. Add the mussels, fish and squid, cover and cook for 5โ€“6 minutes until the mussels have opened and the fish is cooked through.
  • Discard any mussels that remain closed after cooking.
  • Season with salt and pepper, divide between four bowls and garnish with chopped parsley before serving.

Notes & Wine Advice

Serving Advice

Serve this Provenรงal seafood stew immediately while the fish and shellfish are hot and tender. It works beautifully as a Main Course with gluten-free crusty bread for soaking up the tomato and fish broth.

Seafood Advice

Check the mussels carefully before cooking and discard any that do not close when tapped. After cooking, discard any mussels that remain closed. Cod and haddock both work well, so choose whichever firm white fish is freshest and readily available.

Storage Advice

This Seafood stew is best eaten freshly cooked. If necessary, cool leftovers promptly, refrigerate in a covered container and use within 1 day. Reheat gently until thoroughly hot to avoid overcooking the fish and squid.

Hot & Sour Fish Soup Variation

For a spicy variation, simmer 850 ml gluten-free fish stock with 1 teaspoon coriander seeds and a 2.5 cm piece of peeled and sliced fresh ginger for 5 minutes. Add 1 tablespoon gluten-free fish sauce, 2 thinly sliced red chillies and 3 thinly sliced garlic cloves and simmer for another 2 minutes. Add 300 g raw peeled king prawns and 200 g cod or haddock, cut into pieces, and cook gently for 5โ€“6 minutes. Finish with 2 sliced spring onions, the juice of 1 lime and 2 tablespoons chopped coriander.

Wine Advice

A fresh Sauvignon Blanc is a good match for this stew. Its freshness and acidity complement the tomato broth, mussels and delicate white fish without overwhelming the seafood.

Nutrition values

Serving: 1 bowl | Calories: 234 kcal | koolhydraten: 10 g | Eiwitten: 37 g | Vet: 6 g | Verzadigd vet: 1 g | Natrium: 620 mg | Suiker: 5 g
————————————————————————————————–

About Provenรงal Seafood Stew

Provenรงal Seafood Stew is a light but satisfying combination of white fish, mussels and squid cooked in a tomato-based broth scented with garlic and thyme. The ingredients reflect the straightforward Mediterranean character associated with cooking in southern France, where seafood, tomatoes, olive oil and fresh herbs frequently share the same pot.

A Mixture of Fish and Shellfish

The combination of three different types of seafood gives this dish much of its character. Cod or haddock provides substantial pieces of tender white fish, mussels contribute their distinctive shellfish flavour and squid adds another texture. Together they make the stew more interesting than a dish prepared with only one type of Fish.

Because seafood cooks quickly, it is added only after the tomato broth has developed its flavour. Five to six minutes of covered cooking should be sufficient for the fish to cook through, the squid to become tender and the mussels to open.

The Provenรงal Tomato Base

Shallots and garlic are gently softened in olive oil before chopped tomatoes, tomato purรฉe and thyme are added. Cooking the tomatoes briefly before adding the stock helps concentrate their flavour and creates a richer base for the stew.

Fish stock then turns this mixture into a light broth. It should remain loose enough to ladle into bowls rather than becoming a thick tomato sauce.

Cooking the Mussels Safely

Fresh mussels need a little attention before they go into the pan. Scrub the shells, remove the beards and check that open mussels close when tapped. Any that remain open should be discarded.

During cooking, the process is reversed: properly cooked mussels should open. Discard any shells that remain firmly closed after cooking rather than trying to force them open.

Choosing the White Fish

Cod and haddock are both suitable because their mild flavour works well with tomatoes, garlic and shellfish. Cut the fillet into reasonably large pieces so it does not completely break apart while simmering.

A firm white fish is particularly useful in a Stew because it retains its shape while still becoming tender enough to flake easily with a fork.

Keeping the Squid Tender

Squid can become tough when handled poorly, but this recipe uses a short cooking time. Cleaned squid rings are added at the same time as the fish and mussels and cook quickly in the covered pan.

Avoid extending the cooking time unnecessarily once the fish is done and the mussels have opened. The seafood is at its best when served straight from the pan.

Simple Mediterranean Flavours

There is deliberately little seasoning beyond garlic, thyme, tomato, salt and pepper. This keeps the flavour of the seafood at the centre of the dish rather than hiding it beneath heavy spices or sauces.

Fresh parsley added immediately before serving brings colour and a clean herbal note to the finished bowls. A little gluten-free bread alongside is useful for enjoying the remaining broth.

A Light Main Course

Despite containing three types of seafood, the stew remains relatively light because it contains no cream, butter or heavy thickener. The tomato and fish-stock broth provides plenty of flavour without making the dish overly rich.

This makes Provenรงal Seafood Stew suitable for a relaxed family dinner as well as a more leisurely weekend meal. Served in generous bowls, it needs very little accompaniment to become a complete Main Course.

From Everyday Dinner to Special Occasion

The preparation is uncomplicated, but the combination of mussels, squid and white fish gives the finished dish a more festive appearance than an everyday fish soup. That makes it equally useful for casual dinners and special occasions.

Most importantly, the recipe depends on short, careful cooking rather than complicated technique. Once the tomato broth is ready, the seafood needs only a few minutes before the stew can go directly from the pan to the table.

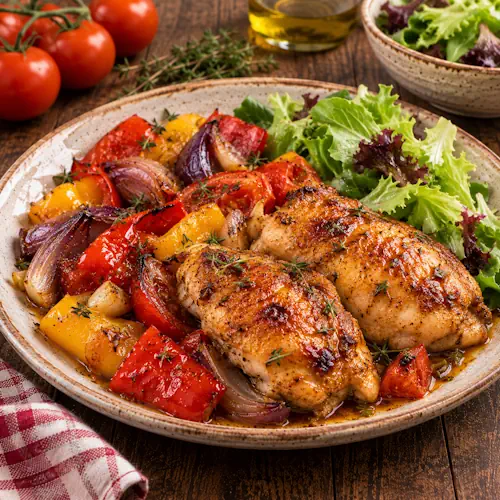
Chicken With Peppers

Oven-roasted chicken thighs with sweet red and yellow peppers, tomatoes, red onion, garlic and thyme, finished with smoked paprika and balsamic vinegar.

Chicken With Peppers

Tender roasted chicken thighs with sweet red and yellow peppers, tomatoes, red onion, garlic and thyme, finished with smoked paprika and balsamic vinegar. An easy oven-baked chicken dinner packed with Mediterranean-style flavours.
Couverts4
Total time 1 hour 15 minutes
estimated costs pp $3.50
Deel op Facebook Print Recipe

Equipment

Ingredients

  • 1 tablespoon balsamic vinegar
  • 4 boneless skinless chicken thighs about 300 g total
  • 4 garlic cloves crushed
  • 2 tablespoons olive oil
  • 1 red pepper cored, deseeded and chopped
  • 2 red onions cut into thick wedges
  • 1 teaspoon smoked paprika
  • 1 small bunch thyme leaves only
  • 6 tomatoes quartered
  • 1 yellow pepper cored, deseeded and chopped

Instructions

  • Preheat the oven to 180ยฐC (350ยฐF), Gas Mark 4.
  • Place the tomatoes, red onions, red pepper, yellow pepper, garlic, thyme, smoked paprika, olive oil and balsamic vinegar in a large roasting tin. Toss everything together until evenly coated.
  • Arrange the chicken thighs on top of the vegetables. Roast for about 1 hour, turning the chicken and basting it occasionally with the juices from the roasting tin, until the chicken is golden and completely cooked through.
  • Serve immediately with a crisp green salad.

Notes & Wine Advice

Serving

Serve Chicken With Peppers hot from the oven, with plenty of the roasted tomatoes, peppers and red onions spooned alongside the chicken. Drizzle some of the flavourful juices from the roasting tin over each serving. A crisp green salad is an ideal fresh accompaniment. For a more substantial meal, serve with roasted potatoes, rice or gluten-free bread to soak up the juices.

Storage

Allow any leftover chicken and vegetables to cool before storing them in an airtight container in the refrigerator for up to 2 days. Reheat thoroughly until piping hot throughout before serving. Reheating in the oven helps the chicken and roasted vegetables retain their texture better than reheating in the microwave. Only reheat leftovers once.

Variation

For chicken and red pepper open sandwiches, spread 4 slices of gluten-free bread with 1 teaspoon pesto each. Top each slice with 1 roasted red pepper, ยฝ sliced ready-cooked chicken breast and a few rocket leaves. Sprinkle with freshly ground black pepper, drizzle with balsamic glaze and serve immediately.

Wine Advice

A Pinot Noir is an excellent match for Chicken With Peppers. Its fresh acidity and soft red-fruit character complement the roasted tomatoes and sweet peppers, while its subtle earthy character works beautifully with the thyme and smoked paprika. Pinot Noir is also light enough not to overpower the chicken, while its freshness balances the sweet and tangy balsamic vinegar.

Food Safety

Make sure the chicken is completely cooked before serving. The thickest part of each chicken thigh should reach an internal temperature of 74ยฐC (165ยฐF). Avoid allowing raw chicken or its juices to come into contact with foods that will be eaten without further cooking, and wash utensils, boards and work surfaces thoroughly after preparing raw poultry.

Nutrition values

Serving: 1 serving | Calories: 241 kcal | koolhydraten: 15 g | Eiwitten: 20 g | Vet: 12 g | Verzadigd vet: 3 g | Natrium: 120 mg | Suiker: 8 g
————————————————————————————————–
Cuisine; European
Season: Autumn / Spring / Summer
Occasions Family Dinner

About Chicken With Peppers

Chicken With Peppers is a colourful and uncomplicated oven-baked dish that combines juicy chicken thighs with tomatoes, red and yellow peppers, red onions, garlic and fresh thyme. Everything cooks together in one roasting tin, allowing the flavours of the chicken and vegetables to mingle as they roast. The result is a comforting main course with plenty of flavour but relatively little hands-on preparation.

The combination of chicken and peppers is particularly successful because each ingredient brings something different to the dish. The chicken provides richness, while the peppers become noticeably sweeter as they roast. Tomatoes soften and release their juices, creating the beginnings of a naturally flavourful sauce in the bottom of the roasting tin. Red onions add another layer of sweetness, and garlic and thyme provide the savoury, aromatic background.

Why Roasting Everything Together Works

Cooking all the main ingredients in the same roasting tin is more than simply a convenient way to reduce washing up. As the chicken thighs roast, their juices run into the vegetables underneath. At the same time, the tomatoes release moisture and the peppers and onions slowly soften and caramelise. These juices combine with the olive oil, balsamic vinegar, garlic, thyme and smoked paprika to create a light but intensely flavoured coating for both the chicken and vegetables.

Smoked paprika plays an important role in the finished flavour. It adds warmth and a gentle smoky quality without making the dish particularly hot or spicy. This works especially well with the sweetness of the roasted peppers. Balsamic vinegar provides the contrast, bringing acidity and a subtle sweetness that prevents the roasted flavours from becoming too heavy.

Turning and basting the chicken occasionally during roasting helps coat it with the seasoned juices from the tin. It also encourages even browning and keeps the surface moist while the chicken cooks. Boneless, skinless chicken thighs are particularly suitable because they remain succulent during the relatively long roasting time and absorb plenty of flavour from the other ingredients.

Serving and Adapting Chicken With Peppers

The original recipe keeps the serving suggestion simple with a crisp green salad. This is a good choice because the fresh leaves provide contrast to the warm, sweet roasted vegetables. If you prefer a more substantial dinner, roasted potatoes, rice or gluten-free bread are excellent additions. They are particularly useful for soaking up the tomato-rich juices left in the roasting tin.

You can also adjust the vegetables according to what you have available. Courgette, aubergine or additional peppers can work well, although adding vegetables with a high water content may increase the amount of liquid in the roasting tin. Keep the vegetables in reasonably large pieces so they retain some texture during the hour in the oven.

Leftovers can be turned into another meal rather than simply reheated. The original recipe suggests combining cooked chicken with roasted red pepper, pesto, rocket and balsamic glaze on gluten-free bread. The cold chicken and peppers can also be added to a salad or used as a filling for a sandwich or wrap.

If you enjoy straightforward chicken dishes that can be prepared without complicated techniques, explore our Chicken Recipes collection for more ideas.

Choosing and Preparing the Ingredients

Using ripe tomatoes and firm, sweet peppers makes a noticeable difference because much of the character of this dish comes directly from the vegetables. Cutting the peppers into substantial pieces prevents them from disappearing into the sauce during roasting, while thick wedges of red onion retain some structure and develop attractive caramelised edges.

Fresh thyme works particularly well because its earthy aroma can withstand the long cooking time. Strip the leaves from the stems before adding them to the roasting tin so they distribute evenly through the vegetables. The garlic should be crushed so that its flavour blends into the olive oil and vegetable juices rather than remaining concentrated in individual pieces.

The chicken thighs should be arranged on top of the vegetables rather than buried underneath them. This exposes the chicken to the dry heat of the oven so that it can brown properly while still allowing the juices to drip onto the vegetables below. If the chicken thighs vary greatly in size, check the largest pieces carefully before serving.

Food Safety When Cooking Chicken

Raw poultry needs careful handling in the kitchen. Keep raw chicken and its juices away from salad ingredients and other foods that will not receive further cooking. Use clean utensils and preparation surfaces, and wash anything that has been in contact with raw poultry before using it for cooked food.

The chicken must be completely cooked before serving. Check the thickest part of the largest thigh and make sure it reaches an internal temperature of 74ยฐC (165ยฐF). A digital food thermometer is the most reliable way to check this. You can read more about safe food preparation and storage in the FDA Food Safety at Home guidance.

Chicken With Peppers is ultimately a simple recipe built around ingredients that work naturally together. Sweet roasted peppers and onions, juicy tomatoes, tender chicken, aromatic thyme and smoky paprika create plenty of depth without requiring a complicated sauce. The splash of balsamic vinegar pulls those flavours together, giving you an easy oven dinner that is colourful, versatile and equally suitable for a family meal or a relaxed dinner with friends.

Steak with Creamy Butter Beans

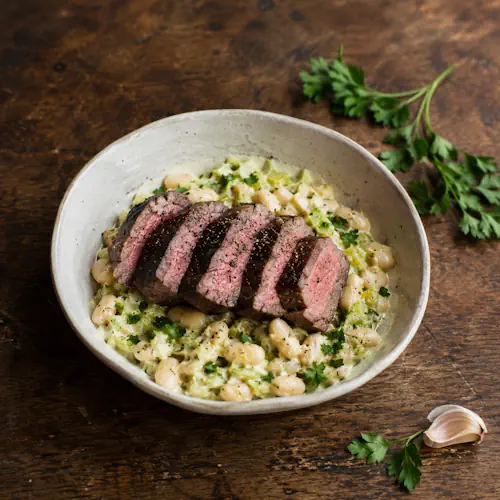
Sliced seared steak served over creamy butter beans, leeks and parsley.

Steak with Creamy Butter Beans

Tender seared fillet steak served over creamy butter beans with soft leeks, garlic, parsley and natural yogurt. A satisfying beef dinner with plenty of protein and a rich but fresh flavour.
Couverts4
Total time 35 minutes
estimated costs pp $6.00
Deel op Facebook Print Recipe

Equipment

  • Frying pan
  • griddle pan
  • Knife
  • Wooden spoon

Ingredients

  • 400 g butter beans canned, rinsed and drained
  • 2 tablespoons extra virgin olive oil
  • 4 fillet steaks about 150 g each
  • 2 garlic cloves finely chopped
  • 2 large leeks trimmed, cleaned and finely sliced
  • 1 tablespoon natural yogurt
  • 1 tablespoon olive oil
  • Small bunch parsley chopped
  • Salt and pepper to taste
  • Water as needed

Instructions

  • Heat the olive oil in a frying pan, add the leeks and garlic and sautรฉ over low heat for 12 to 15 minutes, until soft.
  • Add the butter beans and enough water just to cover them, then simmer for 8 to 10 minutes, until the beans are very soft.
  • Meanwhile, heat a griddle pan until very hot and cook the fillet steaks to your preferred doneness.
  • Transfer the steaks to a plate and leave them to rest.
  • Stir the parsley, natural yogurt and extra virgin olive oil into the beans and season with salt and pepper.
  • Slice the rested steaks into large pieces.
  • Divide the creamy butter beans between four plates, top with the steak and serve immediately.

Notes & Wine Advice

Serving Suggestions

Serve the sliced steak immediately over a generous bed of creamy butter beans. The combination of Beef and beans makes this substantial enough for a complete Main Course. A simple green salad or steamed vegetables can be added alongside.

Recipe Notes

Cook the leeks slowly over low heat so they become soft and sweet without browning too quickly. Simmer the butter beans until very tender, as their soft texture is what gives the finished mixture its creamy character.
Allow the steaks to rest after cooking before slicing them into large pieces. This helps retain their juices and gives you time to finish the creamy beans.

Variation

For spicy beans on toast, sautรฉ 1 chopped leek and 1 chopped red pepper in 1 tablespoon olive oil for 5 minutes. Add two rinsed and drained 400 g cans butter beans, 2 tablespoons gluten-free tomato ketchup, ยฝ tablespoon gluten-free Worcestershire sauce and 3 tablespoons water. Simmer for 10 to 12 minutes, then add parsley and flaked almonds. Serve over 4 slices of toasted gluten-free bread. This variation contains approximately 310 calories per serving.

Storage Advice

Store leftover steak and creamy beans separately in airtight containers in the refrigerator and use within 2 days. Reheat the beans gently until thoroughly hot. Steak is best served freshly cooked, as reheating can change its texture and doneness.

Wine Advice

A medium-bodied Merlot pairs well with the tender beef and creamy butter beans. A fuller Cabernet Sauvignon is another good choice, particularly if the fillet steaks are cooked medium or medium-rare.

Nutrition values

Serving: 290 gr | Calories: 270 kcal | koolhydraten: 16 g | Eiwitten: 34 g | Vet: 9 g | Verzadigd vet: 3 g | Natrium: 210 mg | Suiker: 3 g
————————————————————————————————–

About Steak with Creamy Butter Beans

Steak with Creamy Butter Beans combines tender fillet Beef with a simple mixture of butter beans, slowly softened leeks, garlic, parsley and natural yogurt. Rather than serving the steak with potatoes or another traditional accompaniment, the creamy beans provide a hearty base with plenty of texture and flavour.

Cooking the Leeks Slowly

The recipe begins by gently cooking finely sliced leeks and garlic in olive oil. A low heat and relatively long cooking time of 12 to 15 minutes allow the leeks to soften thoroughly without becoming heavily browned.

As the leeks cook, their flavour becomes milder and sweeter. Garlic adds a savoury background that works with both the beans and the beef.

Making the Butter Beans Creamy

Rinsed and drained butter beans are added directly to the softened leeks. Enough water is added to just cover them before they are simmered for another 8 to 10 minutes.

Cooking the beans until very soft is intentional. Their naturally creamy texture becomes even more pronounced and creates a substantial base for the steak without requiring a heavy cream sauce.

Cooking the Fillet Steak

While the beans simmer, a griddle pan is heated until very hot. The fillet steaks are then cooked to the preferred level of doneness.

Fillet steak is naturally tender and requires relatively little preparation. After cooking, allow the steaks to rest before slicing. Resting helps retain the meat juices rather than losing them immediately onto the chopping board.

Finishing the Creamy Beans

Natural yogurt, extra virgin olive oil and chopped parsley are stirred through the beans just before serving. The yogurt adds creaminess and a slight tang without making the dish excessively rich.

Extra virgin olive oil gives the beans additional richness, while parsley provides a fresh herbal finish. Taste before serving and adjust the salt and pepper as needed.

Serving as a Main Course

Slice the rested steaks into large pieces and arrange them over the creamy beans. This creates a straightforward Main Course in which the beans effectively replace a more traditional potato or rice accompaniment.

A green vegetable or simple salad works well alongside if you want to add freshness without making the meal considerably heavier.

Why Beef and Butter Beans Work Together

Butter beans have a mild flavour and soft texture, so they provide a useful contrast to seared steak. Their creaminess also works particularly well with the juices released by the sliced beef.

Leeks, garlic and parsley keep the bean mixture savoury but relatively light, allowing the flavour of the fillet steak to remain prominent.

Spicy Beans on Toast Variation

The original recipe includes a meat-free variation using butter beans with leek, red pepper, tomato ketchup and gluten-free Worcestershire sauce. Parsley and flaked almonds are added before the beans are spooned over gluten-free toast.

This variation contains approximately 310 calories per serving. Because it includes almonds, its dietary and allergen classifications differ from those of the main steak recipe.

Preparing and Storing

The creamy bean mixture can be prepared shortly before the steaks are cooked and kept warm over very low heat. If it thickens too much, add a small splash of water before serving.

Leftovers should be cooled promptly and refrigerated. Store the steak separately when possible so the beans can be reheated thoroughly without overcooking the meat.

Food Safety

Keep raw beef refrigerated until needed and use clean utensils and preparation surfaces. Cooking preferences for whole steaks can vary, but extra care is appropriate when serving people who are at increased risk from foodborne illness.

For current information about safe meat preparation and storage, consult the U.S. Food and Drug Administration food-safety information.

Steak with Creamy Butter Beans is a simple way to pair tender fillet steak with a hearty bean accompaniment. Soft leeks, garlic, yogurt, parsley and olive oil turn the butter beans into a creamy base that makes the dish satisfying without relying on a heavy sauce.

Thai Chicken Sesame Patties

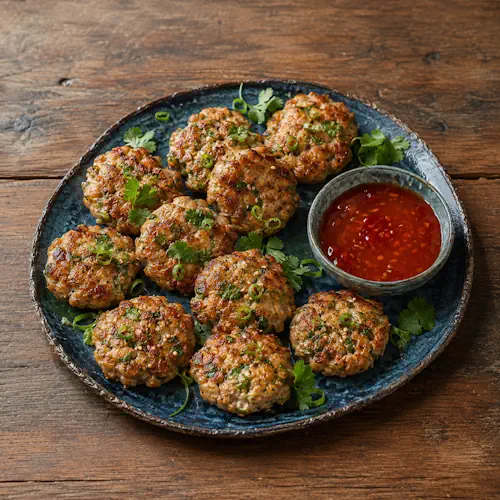
Golden sesame chicken patties with coriander, spring onion and sweet chilli dipping sauce.

Thai Chicken Sesame Patties

Juicy Thai-style chicken patties flavoured with toasted sesame seeds, fresh coriander, spring onions, ginger and soy sauce. Served with sweet chilli dipping sauce, these golden patties are aromatic, savoury and gently spicy.
Couverts4
Total time 1 hour 25 minutes
estimated costs pp $3.25
Deel op Facebook Print Recipe

Equipment

  • chopping board,
  • Food processor
  • Frying pan, large and nonstick
  • Knife

Ingredients

  • 15 g coriander plus extra for garnish
  • 1 egg white
  • 3.5 cm fresh root ginger peeled and finely grated
  • 500 g chicken minced
  • 1 tablespoon sesame oil
  • 3 tablespoons sesame seeds
  • 1 tablespoon soy sauce light and gluten-free
  • 4 spring onions
  • Spring onion curls for garnish, optional
  • 1 tablespoon sunflower oil
  • 8 tablespoons Thai sweet chilli dipping sauce gluten-free, to serve

Instructions

  • Heat a nonstick frying pan over medium-low heat and dry-fry the sesame seeds for 2 minutes, stirring frequently, until golden and toasted.
  • Set the sesame seeds aside to cool slightly.
  • Place the spring onions and coriander in a food processor and process until finely chopped, or chop them finely with a knife.
  • Transfer to a bowl and combine with the minced chicken, toasted sesame seeds, gluten-free soy sauce, ginger and egg white.
  • Divide the mixture into 20 equal portions and, using wet hands, shape them into slightly flattened patties.
  • Refrigerate the patties for 1 hour, or longer if convenient.
  • Heat the sesame oil and sunflower oil in a large frying pan.
  • Cook the patties for about 10 minutes, turning once or twice, until golden and completely cooked through.
  • Arrange on a serving plate and garnish with extra coriander and spring onion curls, if desired.
  • Serve hot with the Thai sweet chilli dipping sauce.

Notes & Wine Advice

Serving Suggestions

Serve the Thai Chicken Sesame Patties hot with gluten-free Thai sweet chilli dipping sauce. They work well as a Appetizer or Snack, while a larger portion with stir-fried vegetables makes an easy Main Course.

Recipe Notes

Wet your hands before shaping the chicken mixture to prevent it from sticking. Chilling the patties for at least 1 hour helps them firm up and makes them easier to handle during cooking.
Toast the sesame seeds before adding them to the mixture. This simple step develops their flavour and gives the patties a more pronounced sesame character.

Variation

For the baby leaf stir-fry variation, heat 2 teaspoons sesame oil in a frying pan. Add 250 g ready-prepared baby leaf and baby vegetable stir-fry ingredients and cook for 2 to 3 minutes. Stir in 2 tablespoons gluten-free light soy sauce and 1 tablespoon gluten-free Thai sweet chilli dipping sauce. This accompaniment contains approximately 54 calories per serving.

Storage Advice

Keep uncooked patties refrigerated until needed. Cooked patties should be cooled promptly and stored in an airtight container in the refrigerator for up to 2 days. Reheat thoroughly before serving.

Wine Advice

A fresh Riesling works particularly well with the ginger, coriander and sweet chilli sauce. A crisp Sauvignon Blanc is another good choice and complements the fresh herbs and lightly spicy Thai flavours.

Nutrition values

Serving: 210 gr | Calories: 286 kcal | koolhydraten: 18 g | Eiwitten: 30 g | Vet: 11 g | Verzadigd vet: 2 g | Natrium: 720 mg | Suiker: 13 g
————————————————————————————————–

About Thai Chicken Sesame Patties

Thai Chicken Sesame Patties combine minced Chicken with toasted sesame seeds, fresh coriander, spring onions, ginger and gluten-free soy sauce. The small patties are fried until golden and served with Thai sweet chilli dipping sauce, creating a dish with savoury, aromatic, sweet and mildly spicy flavours.

Toasting the Sesame Seeds

The recipe begins by dry-frying the sesame seeds in a nonstick pan. Toasting them for approximately 2 minutes develops their naturally nutty flavour and gives them a more noticeable presence in the finished patties.

Stir them frequently because sesame seeds are small and can darken quickly. Once golden, remove them from the pan and set them aside while the remaining ingredients are prepared.

Preparing the Chicken Mixture

Spring onions and coriander are finely chopped in a food processor before being combined with the minced chicken. A knife can be used instead when a food processor is unavailable.

Fresh ginger, gluten-free light soy sauce, toasted sesame seeds and egg white complete the mixture. The egg white helps bind the ingredients without adding a heavy texture.

Shaping the Patties

The mixture is divided into 20 portions, producing five small patties per serving. Wet hands make the relatively sticky chicken mixture much easier to shape.

Flatten each portion slightly rather than making round meatballs. The increased surface area helps the patties cook evenly and creates more golden exterior during frying.

Why the Patties Need Chilling

Once shaped, the patties are refrigerated for at least 1 hour. This resting period helps them become firmer and reduces the chance of them breaking when transferred to the frying pan.

They can be chilled for longer when preparing the recipe ahead, making them useful for a Party where some of the preparation needs to be completed in advance.

Cooking the Chicken Patties

A combination of sesame oil and sunflower oil is used for frying. Sesame oil reinforces the flavour already provided by the toasted seeds, while sunflower oil provides additional cooking fat.

Cook the patties for approximately 10 minutes, turning them once or twice. Because they contain minced poultry, the centres need to be completely cooked before serving.

Serving with Sweet Chilli Sauce

Thai sweet chilli dipping sauce provides sweetness, acidity and mild heat. Serve it separately so each person can add as much as preferred.

Extra coriander leaves and spring onion curls make a simple garnish. For a more substantial meal, combine the patties with vegetables, rice or another suitable Side Dish.

Thai Flavours

Ginger, coriander, spring onions, sesame and sweet chilli sauce give these patties their Asian character, while the original recipe specifically identifies them with Thailand. The flavours are distinctive without requiring a long list of spices.

The small size also makes the patties flexible. They can be served as finger food, an appetiser or as part of a larger dinner.

Baby Leaf Stir-Fry

The original recipe suggests a quick vegetable stir-fry as an accompaniment. Ready-prepared baby leaves and vegetables are cooked briefly in sesame oil and finished with gluten-free soy sauce and Thai sweet chilli dipping sauce.

This provides a simple vegetable side that uses many of the same flavours as the chicken patties and contains approximately 54 calories per serving.

Food Safety

Minced chicken must be cooked thoroughly because harmful bacteria can be present throughout the meat. Keep raw chicken refrigerated, prevent it from coming into contact with ready-to-eat ingredients and wash hands and utensils carefully after handling it.

For current guidance on safely preparing and cooking poultry, consult the U.S. Food and Drug Administration food-safety information.

Thai Chicken Sesame Patties are a versatile Poultry recipe that combines juicy minced chicken with toasted sesame, ginger and fresh herbs. Served with sweet chilli sauce, they work equally well as small party bites or as the centre of a complete meal.

Lime Chilli Baked Halibut

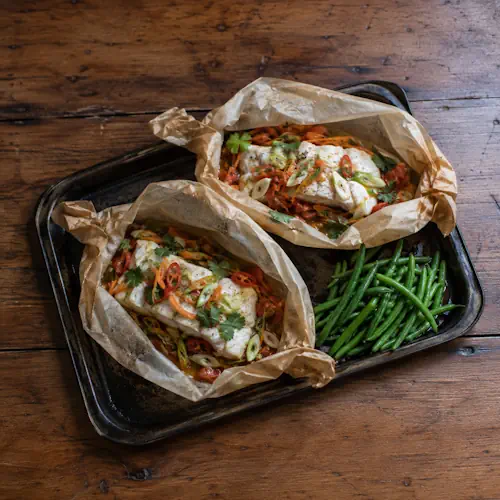
Halibut baked in parchment with tomatoes, spring onions, lime, coriander and green beans.

Lime Chilli Baked Halibut

Tender halibut fillets baked in individual parcels with tomatoes, spring onions, chilli, garlic and carrots. Lime juice, gluten-free soy sauce and fresh coriander create a fresh, aromatic sauce while keeping the fish moist.
Couverts4
Total time 30 minutes
estimated costs pp $6.25
Deel op Facebook Print Recipe

Equipment

  • Baking paper, nonstick
  • Baking sheet
  • Knife
  • oven

Ingredients

  • 2 carrots peeled and cut into julienne strips
  • Few coriander sprigs
  • 2 garlic cloves sliced
  • 4 halibut fillets about 150 g each
  • 2 limes juiced
  • 1 red chilli deseeded and sliced
  • Salt and pepper to taste
  • 2 tablespoons soy sauce gluten-free
  • 4 spring onions sliced
  • 4 tomatoes chopped
  • Steamed green beans to serve

Instructions

  • Preheat the oven to 220ยฐC (425ยฐF), Gas Mark 7.
  • Place each halibut fillet on a large piece of nonstick baking paper.
  • Divide the chopped tomatoes and spring onions evenly over the four fillets.
  • Divide the chilli, garlic, carrots, lime juice, gluten-free soy sauce and coriander between the fish and season with salt and pepper.
  • Fold and seal the baking paper around each fillet to form four parcels.
  • Transfer the parcels to a baking sheet.
  • Bake for 15 minutes, or until the halibut is cooked through.
  • Carefully open the parcels and serve immediately with steamed green beans.

Notes & Wine Advice

Serving Suggestions

Serve the halibut immediately after opening the parcels, spooning the tomato, lime and cooking juices over the fish. Steamed green beans make a simple accompaniment, while rice can be added for a more substantial Main Course.

Recipe Notes

Seal the baking-paper parcels carefully so the steam remains trapped inside during cooking. This gentle method helps keep the Fish moist while allowing it to absorb the flavours of lime, chilli, garlic, coriander and soy sauce.
The original ingredient list contains a typo reading โ€œ4 to matoesโ€; this has been interpreted as 4 tomatoes.

Variation

For Thai-style halibut, fry 6 chopped spring onions briefly in ยฝ tablespoon olive oil, then add 2 tablespoons red Thai curry paste. Stir in 200 ml gluten-free fish stock and 400 ml coconut milk and simmer for 5 minutes. Add four 150 g halibut fillets, cover and cook for 6 to 8 minutes. Serve over 150 g wilted spinach and sprinkle with 2 tablespoons toasted sesame seeds. This variation contains approximately 427 calories per serving.

Storage Advice

Halibut is best served immediately after cooking. Cool leftovers promptly, transfer them to an airtight container and refrigerate for up to 1 day. Reheat gently until thoroughly hot, as excessive reheating can dry out the fish.

Wine Advice

A fresh Sauvignon Blanc pairs particularly well with the lime, coriander and chilli. A crisp Pinot Grigio is another suitable choice for the delicate halibut and fresh vegetables.

Nutrition values

Serving: 300 gr | Calories: 227 kcal | koolhydraten: 12 g | Eiwitten: 35 g | Vet: 5 g | Verzadigd vet: 1 g | Natrium: 620 mg | Suiker: 7 g
————————————————————————————————–

About Lime Chilli Baked Halibut

Lime Chilli Baked Halibut combines tender white fish with tomatoes, spring onions, carrots, garlic and chilli in individual baking-paper parcels. Lime juice and gluten-free soy sauce provide the seasoning, while fresh coriander adds an aromatic finish. Cooking everything together in the Oven traps steam around the fish and produces a light sauce from the vegetable and citrus juices.

Why Bake Halibut in Parcels?

Halibut is a lean, firm white fish that can become dry when exposed to intense heat for too long. Baking it inside a sealed parcel creates a moist cooking environment. Steam released by the vegetables and lime remains around the fillet rather than escaping into the oven.

This method also has the advantage of keeping each serving together. Every parcel contains one halibut fillet and its share of vegetables, herbs and seasoning.

Preparing the Vegetables

Tomatoes and spring onions are divided between the four halibut fillets. The carrots are cut into thin julienne strips so they can soften during the relatively short cooking time.

Sliced garlic and red chilli provide stronger flavours, while fresh coriander adds a lighter herbal character. Deseeding the chilli reduces some of its heat without removing its flavour completely.

Lime and Soy Sauce

Fresh lime juice provides acidity that works particularly well with Seafood. Gluten-free soy sauce contributes saltiness and savoury depth, so additional salt should be added carefully.

As the parcels cook, the lime juice, soy sauce and juices released by the tomatoes combine naturally around the halibut. There is therefore no need to prepare a separate sauce.

Sealing the Parcels

Use pieces of nonstick baking paper large enough to fold comfortably around the fish and vegetables. Bring the edges together and seal them securely so steam cannot escape too quickly.

Place the completed parcels on a baking sheet before transferring them to the oven. Be careful when opening them after cooking because hot steam will escape from inside.

Cooking the Halibut

The parcels bake at 220ยฐC for approximately 15 minutes. The exact cooking time can vary according to the thickness of the halibut fillets.

The fish should be opaque and separate easily when tested. Avoid extending the cooking time unnecessarily, as halibut has relatively little fat and can lose moisture when overcooked.

Serving the Dish

Steamed green beans are suggested as the accompaniment and keep the meal light. Rice or additional Vegetables can be added when a larger meal is wanted.

The parcels can be opened at the table or just before plating. Spoon the aromatic liquid collected inside each parcel over the fish rather than discarding it.

Thai-Style Variation

The original recipe also includes a richer Thai-style variation. Halibut is gently cooked in a sauce made with red Thai curry paste, gluten-free fish stock and coconut milk, then served over wilted spinach.

Toasted sesame seeds finish that version and provide additional texture. Because sesame is included, the dietary and allergen classifications of the variation differ from those of the main recipe.

Storing Leftovers

Freshly cooked halibut has the best texture when eaten immediately. If leftovers remain, cool them promptly and store them covered in the refrigerator.

Reheat the fish gently and only until thoroughly hot. Repeated or prolonged heating can make the halibut noticeably firmer and drier.

Food Safety

Keep raw halibut refrigerated until preparation and prevent contact between raw fish and ingredients that will be eaten without further cooking. Wash hands, knives and preparation surfaces thoroughly after handling raw seafood.

For current guidance about selecting, storing and preparing seafood safely, consult the U.S. Food and Drug Administration food-safety information.

Lime Chilli Baked Halibut is a light Fish dinner that relies on a simple parcel-cooking technique for both flavour and moisture. Fresh vegetables, citrus, chilli and coriander give the mild halibut plenty of character without hiding the flavour of the fish itself.