Pumpkin Soup with Coconut Milk and Ginger

Pumpkin Soup with Coconut Milk and Ginger

Deel op Facebook Print Recipe

Ingredients

Instructions

  • Heat a dash of olive oil in a large soup pot.
  • Sauté the onion, garlic, and ginger until they are soft.
  • Add the pumpkin cubes and sauté briefly.
  • Sprinkle the curry powder over the vegetables and stir well.
  • Pour the vegetable broth and coconut milk into the pot.
  • Bring to a boil and simmer until the pumpkin is tender.
  • Puree the soup with an immersion blender until smooth.
  • Season with salt and black pepper.
  • Serve the pumpkin soup in bowls, garnished with pumpkin seeds and coconut flakes.
————————————————————————————————–
Course; Soup
Diets; Vegetarian

Stuffed Mini Quiches with Salmon and Spinach

Stuffed Mini Quiches with Salmon and Spinach

Deel op Facebook Print Recipe

Ingredients

Instructions

  • Preheat the oven to 180°C.
  • Roll out the puff pastry and cut it into circles slightly larger than the muffin cups.
  • Line the muffin cups with the puff pastry.
  • Distribute the smoked salmon, chopped spinach, and red onion over the puff pastry bottoms.
  • In a bowl, whisk the eggs and add the cream, grated Gruyère cheese, salt, and pepper.
  • Mix well.
  • Pour the egg mixture over the filling in the muffin cups.
  • Bake the mini quiches in the preheated oven for 15-20 minutes or until they are golden brown and firm.
  • Garnish with fresh dill for an extra festive touch.

Notes & Wine Advice

Serve warm as a delicious Christmas lunch.
————————————————————————————————–
Course; Fish / Lunch / Quiche

Mince Pie Cheesecake

Mince Pie Cheesecake

Delight your taste buds with a festive twist on a classic dessert. This Mince Pie Cheesecake combines the creamy goodness of cheesecake with the rich and spiced flavors of traditional mince pies. It’s a perfect treat for the holiday season!
Deel op Facebook Print Recipe

Ingredients

Serves: 8-10 / Prep: 30 mins / Chill: 4 hrs or overnight

For the Base:

For the Cheesecake Filling:

For the Mince Pie Layer:

  • 400 g mincemeat store-bought or homemade
  • 1 tbsp brandy or rum optional

For Decoration:

  • Additional whipped cream
  • Grated chocolate or orange zest

Instructions

Step 1: Prepare the Base

  • Mix the crushed digestive biscuits with melted butter.
  • Press the mixture into the base of a springform cake tin.
  • Chill in the refrigerator while preparing the filling.

Step 2: Make the Cheesecake Filling

  • In a large mixing bowl, beat the cream cheese until smooth.
  • Gradually add the icing sugar, vanilla extract, and orange zest, continuing to beat until well combined.
  • Gently fold in the whipped double cream until the mixture is smooth and airy.

Step 3: Assemble the Cheesecake

  • Remove the chilled base from the refrigerator.
  • Spread a layer of the cream cheese mixture over the base.

Step 4: Add the Mince Pie Layer

  • Spoon the mincemeat evenly over the cream cheese layer.
  • If desired, mix the mincemeat with brandy or rum for extra flavor.

Step 5: Final Layer and Decoration

  • Top the mincemeat layer with the remaining cream cheese mixture.
  • Smooth the top with a spatula.
  • Refrigerate the cheesecake for at least 4 hours or overnight to set.

Step 6: Serve and Decorate

  • Once set, carefully remove the cheesecake from the tin.
  • Pipe or spread additional whipped cream on top.
  • Garnish with grated chocolate or orange zest for a festive touch.

Step 7: Enjoy the Festive Treat!

    Notes & Wine Advice

    Slice and serve this Mince Pie Cheesecake to your guests, savoring the delightful combination of creamy cheesecake and spiced mincemeat flavors. It’s a perfect dessert for holiday celebrations!
    ————————————————————————————————–
    Course; Cake / Cheese / Pie

    Pressure-Cooked Citrus Christmas Pudding

    Pressure-Cooked Citrus Christmas Pudding

    Deel op Facebook Print Recipe

    Equipment

    • pressure cooker

    Ingredients

    Serves: 8-10 Prep: 30 mins Cook: 2 hrs Plus: Overnight soaking

    Instructions

    Step 1: Prepare the Fruit Mixture

    • In a large bowl, combine the mixed dried fruit, chopped dried figs, orange zest, lemon zest, and the juices of both orange and lemon.
    • Pour the brandy or dark rum over the fruit mixture.
    • Cover the bowl and let it soak overnight.

    Step 2: Prepare the Pudding Batter

    • In a separate large mixing bowl, cream together the softened unsalted butter and dark brown sugar until light and fluffy.
    • Beat in the eggs, one at a time.
    • Sift in the self-raising flour, mixed spice, ground cinnamon, and ground nutmeg.
    • Fold the dry ingredients into the butter-sugar mixture until well combined.
    • Add the soaked fruit mixture to the batter and mix thoroughly.

    Step 3: Assemble and Pressure-Cook

    • Grease a heatproof pudding basin with butter.
    • Spoon the pudding batter into the prepared basin.
    • Cover the basin with a double layer of greased baking parchment and foil, securing them tightly with string.
    • Place the basin on a trivet inside the pressure cooker.
    • Add water to the pressure cooker, ensuring it reaches halfway up the sides of the basin.
    • Seal the pressure cooker and cook the pudding on high pressure for 2 hours.

    Step 4: Serve

    • Release the pressure carefully and open the cooker.
    • Remove the pudding and let it cool slightly before turning it out onto a serving plate.

    Step 5: Flaming (Optional)

    • If desired, warm some brandy or dark rum and carefully ignite it.
    • Pour the flaming liquid over the pudding for a dramatic presentation.

    Step 6: Final Touches

    • Dust the pudding with icing sugar just before serving.

    Step 7: Enjoy

    • Serve this pressure-cooked citrus Christmas pudding warm, and delight in the festive flavors!

    Notes & Wine Advice

    Ensure that the pressure cooker is used according to its safety instructions.
    ————————————————————————————————–
    Course; Dessert / Fruit

    Pistachio Tiramisu

    Pistachio Tiramisu

    Delight your guests with a pistachio-infused twist on traditional tiramisu. This exquisite dessert features a luscious pistachio cream filling and a decadent pistachio topping. Perfect for impressing your dinner party guests
    Deel op Facebook Print Recipe

    Ingredients

    Serves: 8 / Prep: 35 mins / Chilling Time: At least 3 hrs

    • 3 eggs separated
    • 100 g caster sugar
    • 250 g mascarpone
    • 2 tbsp marsala or coffee liqueur
    • 150 ml double cream
    • 5 tbsp pistachio cream spread
    • 1 tbsp melted pistachio spread for decorating
    • 200 ml strong black coffee made with 1½ tbsp instant coffee granules, cooled
    • 75 ml amaretto
    • 300 g savoiardi sponge fingers
    • 25 g regular or slivered pistachios roughly chopped

    Instructions

    Step 1: Prepare the Tin

    • Line the base and sides of a deep 20cm loose-bottomed square tin with baking parchment.
    • Add strips of parchment that hang over the sides of the tin to help lift the tiramisu out.

    Step 2: Prepare the Mascarpone Mixture

    • Using an electric whisk, beat the egg yolks and sugar together until pale, thick, and doubled in volume.
    • Add the mascarpone and marsala, whisking again for about 3 mins to combine.

    Step 3: Prepare the Cream Mixture

    • In a separate bowl, whisk the cream and 3 tbsp of pistachio spread together until the mixture just holds its shape.
    • Fold this into the mascarpone mixture.
    • Clean the beaters and whisk the egg whites to stiff peaks in a third bowl.
    • Fold the whipped egg whites into the pistachio-mascarpone mixture.

    Step 4: Assemble the Tiramisu

    • Whisk the coffee, amaretto, and 2 tbsp of pistachio spread together in a shallow dish.
    • Briefly dip the sponge fingers into the coffee mixture on both sides.
    • Arrange the soaked sponge fingers in a single layer in the base of the tin.
    • Spoon over a third of the pistachio-mascarpone filling.
    • Repeat the process twice, alternating between the sponge fingers and filling.

    Step 5: Chill

    • Chill the tiramisu for 3-4 hrs, or overnight.

    Step 6: Final Touches

    • Transfer the tiramisu to a serving plate.
    • Drizzle the melted pistachio spread in a criss-cross pattern.
    • Sprinkle the slivered pistachios around the edge.

    Step 7: Serving

    • Serve this indulgent pistachio tiramisu and enjoy the delightful fusion of flavors.

    Notes & Wine Advice

    Storage:
    The tiramisu will keep chilled for up to two days.
    ————————————————————————————————–
    Course; Dessert
    Cuisine; European / Italian

    Pumpkin and Pecan Tart with Maple Syrup

    Pumpkin and Pecan Tart with Maple Syrup

    Deel op Facebook Print Recipe

    Ingredients

    For the Pastry:

    • 250 g plain flour plus extra for dusting
    • 125 g cold butter cut into chunks
    • 50 g caster sugar
    • 1 whole nutmeg for grating
    • 2 eggs plus 1 egg yolk (freeze the extra white to use in another recipe)

    For the Filling:

    Topping:

    Instructions

    Step 1: Prepare the Pastry

    • In a food processor, blitz the flour and cold butter until the mixture resembles fine breadcrumbs.
    • Pulse in the caster sugar and a few gratings of nutmeg.
    • Pulse in the egg yolk and enough cold water (about 1 tbsp) to create a firm dough.
    • Alternatively, rub the butter into the flour in a large bowl using your fingertips, then stir in the sugar, nutmeg, egg yolk, and water.
    • Tip the dough into a bowl, cover, and chill for at least 20 mins.

    Step 2: Roll and Line

    • Roll the chilled pastry out on a lightly floured surface until it’s slightly larger than a 22cm fluted loose-bottomed tart tin.
    • Use the pastry to line the tin.
    • Prick the base all over using a fork, then chill for 20 mins.

    Step 3: Pre-bake the Pastry

    • About 5 mins before the pastry has finished chilling, preheat the oven to 180C/160C fan/gas 4.
    • Remove the pastry from the fridge, then line with a piece of baking parchment and fill with baking beans or uncooked rice or lentils.
    • Bake for 12 mins, then remove the beans and parchment and bake for another 8-10 mins until the pastry is lightly golden.

    Step 4: Prepare the Filling

    • In a bowl, combine the pumpkin purée, 2 eggs, light brown soft sugar, cinnamon, ginger, and soft cheese.
    • Grate in about ½ tsp nutmeg, mix well, then pour the filling into the pastry case.

    Step 5: Bake the Tart

    • Bake for 30 mins until the filling is lightly set with a slight wobble in the middle.
    • Arrange the pecans over the filling in concentric circles.
    • Brush over the maple syrup.
    • Return to the oven for a further 15 mins until the pecans are lightly golden and the filling is set.

    Step 6: Cooling and Serving

    • Leave the tart to cool completely in the tin before removing and serving.
    • The tart will keep chilled for up to three days.
    • Enjoy!
    ————————————————————————————————–
    Course; Dessert / Nuts / Tarts

    Flavour-Bomb Roast Turkey & Gravy

    Flavour-Bomb Roast Turkey & Gravy

    Deel op Facebook Print Recipe

    Ingredients

    For the Flavoured Butter:

    For the Turkey:

    • 5-6 kg oven-ready turkey with the neck and giblets
    • 2 onions roughly chopped
    • 2 carrots roughly chopped
    • 1 lemon reserved from making the flavoured butter, halved
    • 1 head of garlic halved
    • Small bunch of rosemary sprigs reserved from the butter, above
    • 2 tbsp sunflower oil

    For the Gravy:

    • 2 tbsp plain flour
    • Large glass red or white wine
    • 1 tbsp soy sauce
    • 600 ml chicken or turkey stock

    Instructions

    Step 1: Make Flavoured Butter

    • Mash all the butter ingredients together in a bowl with salt and pepper.
    • Cover and refrigerate until needed.
    • It can be stored for up to three days chilled or frozen for a month.

    Step 2: Prep Turkey

    • Loosen the skin of the turkey, especially over the breast, by pushing your hand beneath it.
    • Season the turkey, including under the skin, with 1-2 tbsp flaky sea salt.
    • Place the turkey in a roasting tin, breast-side up, and chill, uncovered, for at least 12 hours, up to 48 hours.

    Step 3: Preheat Oven

    • Remove the turkey from the fridge at least 1 hour before cooking.
    • Preheat the oven to 200C/180C fan/gas 6.

    Step 4: Roasting the Turkey

    • Remove the turkey from the tin and add onions, carrots, turkey neck, and giblets to the tin.
    • If available, use a roasting rack or ovenproof cooling rack and place the turkey on top.
    • Put lemon halves, garlic, and rosemary in the turkey cavity.
    • Spoon flavoured butter under the turkey skin and rub it over the breast meat and down to the legs.
    • Tie wings and legs together using butcher’s string.
    • Drizzle half the oil over the turkey and rub it all over.
    • Roast for 1 hour, then drizzle with the remaining oil and return to the oven for another 1 hour.

    Step 5: Check Temperature & Rest

    • Check the turkey’s temperature with a probe thermometer.
    • The thickest part of the breast should be about 65C, and the thickest part of the thigh should be 75C.
    • Let the turkey cool for 10 minutes, remove lemon and garlic, and transfer to a board to rest for at least 20 minutes.

    Step 6: Make Gravy

    • If the roasting tin is flameproof, put it on a medium heat; otherwise, transfer contents to a pan.
    • Add flour, stir to make a paste, then stir in wine and soy sauce.
    • Sizzle for about 5 minutes until it’s a thick paste.
    • Stir in stock and turkey resting juices, simmer for 5 minutes, stirring continuously.
    • Strain the gravy into a jug or another pan to reheat when needed.

    Step 7: Carve & Serve

    • Carve the turkey and serve with your choice of sides or carve at the table.
    • Enjoy your flavour-packed roast turkey!
    ————————————————————————————————–
    Course; Turkey

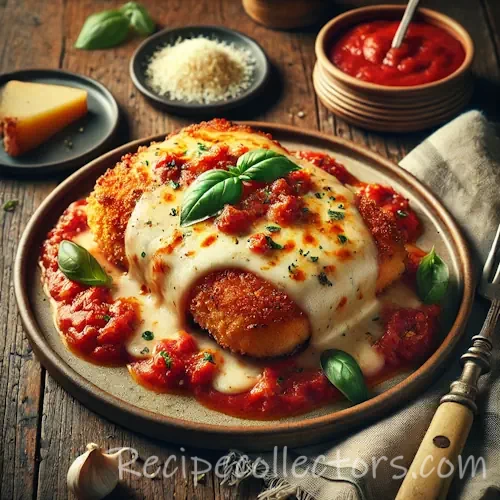
    Air Fryer Chicken Parmesan

    Air Fryer Chicken Parmesan on rustic wooden table

    Air Fryer Chicken Parmesan

    Deel op Facebook Print Recipe

    Ingredients

    Yields: 4 servings / Prep Time: 10 mins Total Time: 50 mins

    Instructions

    • Carefully butterfly the chicken by cutting in half widthwise all the way through to create 4 thin pieces of chicken; season both sides with salt and black pepper.
    • Place flour in a shallow bowl; season with a large pinch of salt and a few grinds of black pepper.
    • In another shallow bowl, beat eggs to blend.
    • In a third shallow bowl, combine panko, Parmesan, oregano, red pepper flakes, and garlic powder.
    • Working one at a time, coat the chicken in flour, shaking off any excess.
    • Dip into eggs, letting excess drip off, then finally dip into the panko mixture, gently pressing to adhere and ensuring both sides of the chicken are well-coated.
    • Working in batches if necessary, in an air fryer basket, arrange chicken in a single layer.
    • Cook at 400°F, turning once, for 5 minutes per side.
    • Top the chicken with marinara and mozzarella.
    • Continue to cook at 400°F until the cheese is melted and golden, about 3 minutes more.
    • Divide the chicken among plates.
    • Garnish with parsley.
    ————————————————————————————————–
    Course; Air fryer / Cheese / Chicken

    Cast-Iron Skillet Prime Rib Roast and Gravy

    Cast-Iron Skillet Prime Rib Roast and Gravy

    Deel op Facebook Print Recipe

    Ingredients

    Prep: 15 mins | Cook: 3 hrs | Additional: 15 mins Servings: 8

    Instructions

    • Preheat the oven to 275 degrees F (135 degrees C).
    • Rub the beef roast with sea salt and black pepper.
    • Heat a large cast-iron skillet over medium-high heat; sear the roast on all sides in the hot skillet, 2 to 3 minutes per side.
    • Turn the roast so the ribs and fat side are facing up.
    • Roast the prime rib in the preheated oven for 45 minutes; scatter onion quarters around the roast and continue cooking until an instant-read meat thermometer inserted into the thickest part of the meat reads 130 degrees F (54 degrees C) for rare, about 2 more hours.
    • Remove the roast from the skillet, wrap the meat in aluminum foil, and let it rest for 15 to 20 minutes to allow juices to reabsorb into the meat.
    • Leave the onion pieces in the skillet.
    • Pour drippings from the skillet into a bowl and skim off excess grease.
    • Return degreased drippings to the skillet with onion pieces, place over medium heat, and melt butter in the drippings.
    • Whisk flour into the mixture to make a paste, 1 to 2 minutes.
    • Stir red wine into the flour paste until smooth.
    • Mix beef stock into pan gravy until smooth; stir thyme sprigs into the gravy.
    • Reduce heat to low and simmer gravy until thickened, 5 to 8 minutes.
    • Strain the gravy, discard onion pieces and thyme, and serve with prime rib.

    Notes & Wine Advice

    Nutrition Facts (Per Serving):

    • Calories: 562.2
    • Protein: 27.6g (55% DV)
    • Carbohydrates: 7.9g (3% DV)
    • Fat: 45.2g (70% DV)
    • Cholesterol: 110.1mg (37% DV)
    • Sodium: 557.5mg (22% DV)
    ————————————————————————————————–
    Course; Beef

    Indulgent Rocky Road Treats

    Indulgent Rocky Road Treats

    Deel op Facebook Print Recipe

    Ingredients

    Prep: 5 mins | Cook: 5 mins | Additional: 2 hrs | Servings: 24

    Instructions

    • Line a 9 x 13 inch pan with wax paper.
    • In a microwave-safe bowl, microwave chocolate and butter until melted.
    • Stir occasionally until the chocolate is smooth.
    • Stir in condensed milk.
    • Combine peanuts and marshmallows; stir into the chocolate mixture.
    • Pour into the prepared pan and chill until firm.
    • Cut into squares.

    Notes & Wine Advice

    Nutrition Facts (Per Serving):

    • Calories: 283.6
    • Protein: 5.5g (11% DV)
    • Carbohydrates: 36.3g (12% DV)
    • Fat: 14.1g (22% DV)
    • Cholesterol: 8.1mg (3% DV)
    • Sodium: 53.3mg (2% DV)
    ————————————————————————————————–
    Course; Candy