In a medium bowl, stir together the rolled oats, finely chopped hazelnuts, and salt.
In a large saucepan, combine the sugar, milk, cocoa powder, and unsalted butter.
Bring the mixture to a boil over medium heat, stirring constantly.
Stir in the chocolate-hazelnut spread and vanilla extract.
Remove the saucepan from the heat and mix in the oat mixture until everything is well combined.
Shape the chocolate mixture into 1-inch balls.
If the mixture is too soft and doesn’t hold its shape well, allow it to sit for a few minutes to firm up.
Place the formed balls on a large cookie sheet.
Cover them loosely with plastic wrap and chill for about 1 hour or until they are firm.
Notes & Wine Advice
Tip:
If the chocolate mixture starts to set up as you’re forming the balls, you can heat the mixture in the microwave for 30 seconds to make it more pliable.Storage:
To store these delightful Chocolate Hazelnut Oat Bites, layer them between sheets of waxed paper in an airtight container and keep them in the refrigerator for up to 3 days. Enjoy
Line a 9-inch square baking pan with foil, allowing the foil to overhang the edges.
This will make it easier to lift the bars out later.
For the crust, in a medium saucepan, combine the egg, 1/2 cup of butter, unsweetened cocoa powder, granulated sugar, and vanilla extract.
Cook and stir over medium-low heat until the butter is melted, and the mixture just starts to bubble.
Remove from heat.
Stir in the crushed graham crackers and finely chopped pistachios.
Press this crumb mixture firmly into the prepared pan.
For the filling, in a medium bowl, beat the softened 1/4 cup of butter, pistachio instant pudding mix, and half-and-half with an electric mixer on medium speed until well combined.
Gradually add the powdered sugar, beating until the filling is smooth and creamy.
Spread this filling over the crust.
Cover and refrigerate for at least 1 hour, or until it’s firm.
For the topping, in a small saucepan, melt the bittersweet chocolate and 1/4 cup of butter over low heat, stirring until smooth.
Spread this chocolate topping over the filling and sprinkle the coarsely chopped pistachios on top.
Cover and refrigerate for an additional 2 hours, or until everything is firm.
Using the foil overhang, lift the uncut bars out of the pan.
Cut into bars.
Notes & Wine Advice
Storage:To store these delicious Pistachio Delight Bars, layer them between sheets of waxed paper in an airtight container and keep them in the refrigerator for up to 3 days. Enjoy!
In a medium saucepan, combine the egg, 3/4 cup of unsalted butter, granulated sugar, and 1/4 cup of milk.
Cook and stir over medium heat until the mixture comes to a full boil.
Remove from heat and stir in the toasted pecans and graham cracker crumbs.
Allow this mixture to cool for 30 minutes.
Line a cookie sheet with foil.
Place six of the graham cracker rectangles side by side on the prepared cookie sheet to create a 10×7-inch rectangle.
Spread the filling over the graham crackers, then top with the remaining six graham cracker rectangles.
Cover the bars lightly with plastic wrap and chill for at least 4 hours or until the filling is firm.
For the icing, in a small bowl, beat 1 tablespoon of softened unsalted butter until smooth.
Gradually whisk in the powdered sugar and enough of the 2 to 3 teaspoons of milk to reach a thick drizzling consistency.
Drizzle the icing over the bars and let it stand until the icing is set.
Cut the chilled bars into 24 servings (1 bar each).
Notes & Wine Advice
Storage:
Layer the bars between sheets of waxed paper in an airtight container. Store in the refrigerator for up to 2 days or freeze for up to 3 months.Enjoy your Nutty Graham Cracker Bars!
Line a 13×9-inch baking pan with foil, allowing the foil to extend over the edges.
This will make it easier to lift the bars out of the pan.
For the Crust:
In a food processor, combine the peanut butter sandwich cookies and salt.
Cover and process until fine crumbs form.
Add the melted butter and pulse just until the mixture is combined.
Press the crumb mixture into the bottom of the prepared pan.
For the Peanut Butter Layer:
In a large bowl, beat the powdered sugar, 1 1/3 cups of peanut butter, softened butter, and heavy cream with a mixer on low to medium speed until smooth.
Stir in the finely crushed peanuts in the crunchy sugar coating.
Carefully spread this peanut butter mixture over the crust in the pan.
For the Chocolate Topping:
In a small heavy saucepan, cook and stir the semisweet chocolate chips and 1/2 cup of peanut butter over low heat until they are melted and smooth.
Spread the chocolate-peanut butter mixture over the layers in the pan.
Sprinkle the top with additional coarsely crushed peanuts for extra texture and decoration.
Chill and Serve:
Cover the pan and chill it for 1 hour or until the bars are set.
Use the foil to lift the uncut bars out of the pan, then cut them into individual bars.
Notes & Wine Advice
Storage:Layer the bars between sheets of waxed paper in an airtight container. You can store them in the refrigerator for up to 1 week.These Candy Crunch Peanut Butter Bars offer a perfect balance of sweet and nutty flavors with a chocolatey finish. Enjoy making and sharing these delightful treats!
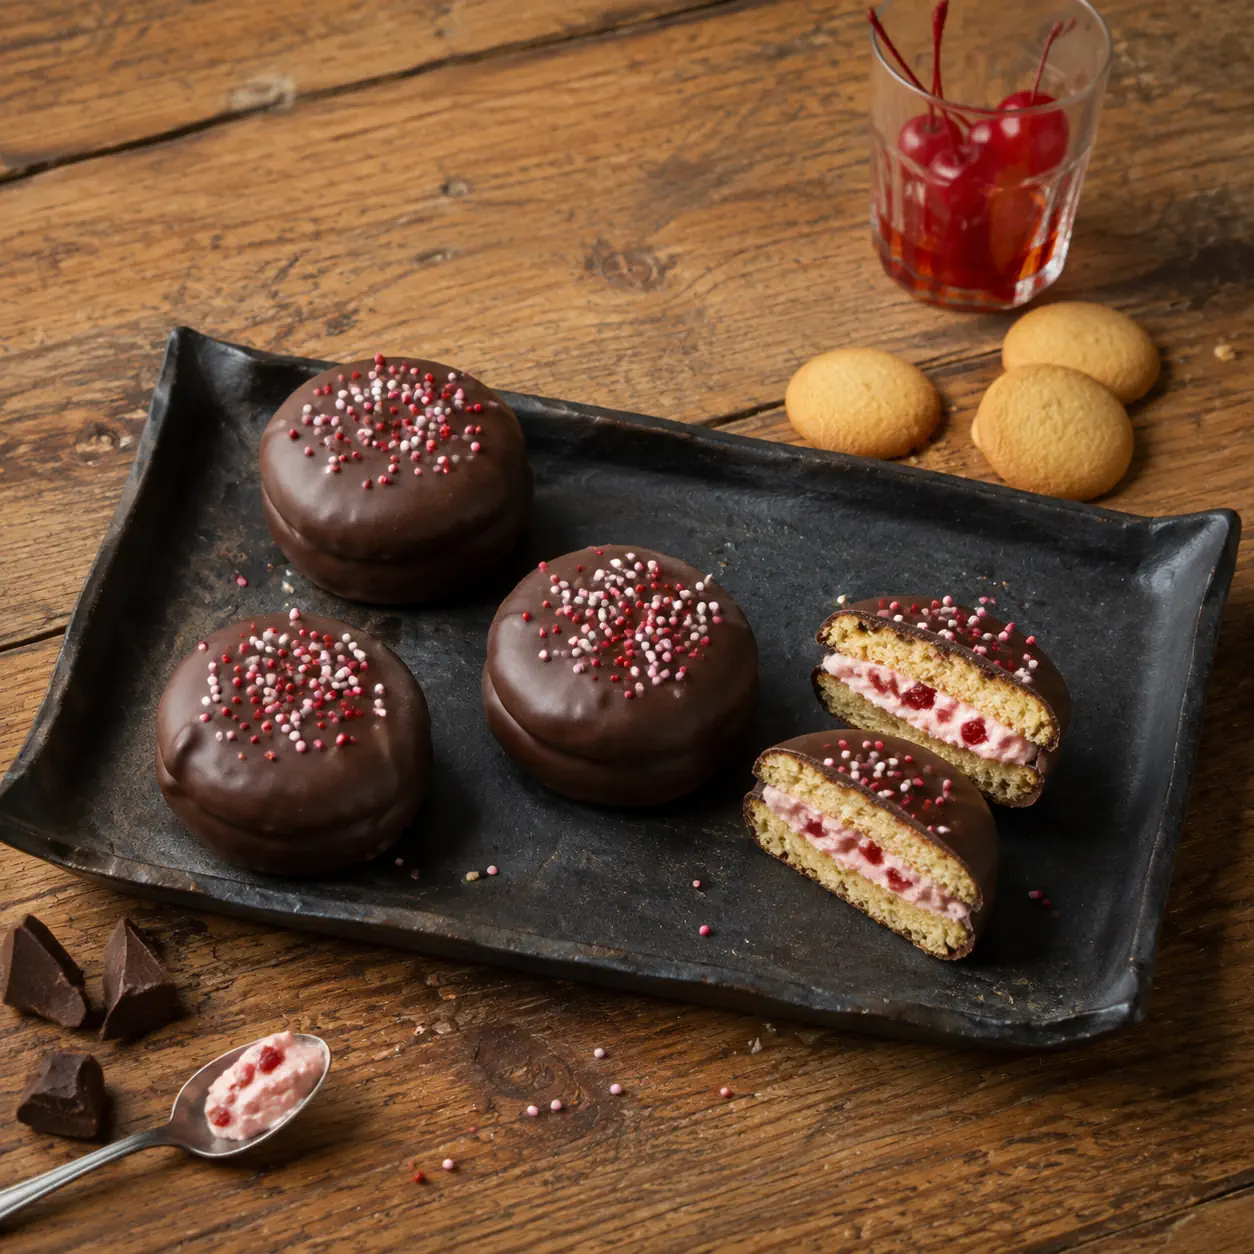
Crisp vanilla wafer sandwiches filled with creamy cherry and almond filling, dipped in smooth chocolate and finished with colourful decorations. This small-batch recipe makes four individual sandwich cookies.
Place the softened cream cheese and powdered sugar in a medium mixing bowl.
Beat with an electric mixer at medium speed until smooth.
Stir in the chopped maraschino cherries and almond extract.
For the Cookie Sandwiches
Spread the cherry filling over the flat sides of 4 vanilla wafers.
Place the remaining wafers on top with their flat sides facing the filling.
Gently press the wafers together to form 4 sandwich cookies.
Refrigerate the assembled cookies for 30 minutes, or until the filling is firm.
For the Chocolate Coating
Place the chocolate coating and shortening in a microwave-safe bowl.
Microwave for 30 seconds.
Stir the mixture thoroughly.
Continue heating in 15-second intervals, stirring after each interval, until melted and smooth.
Dip each chilled sandwich cookie into the melted chocolate using a fork.
Turn the cookie until it is completely coated.
Lift it from the chocolate and allow the excess coating to drip back into the bowl.
Place the coated cookie on baking paper.
Immediately add the sprinkles or edible decorations.
Repeat with the remaining cookies.
Leave the cookies at room temperature until the coating has set.
Refrigerate until ready to serve.
Notes & Wine Advice
Serving Suggestions
Serve the cookies chilled with coffee, tea or hot chocolate. They also work well on a dessert platter or packaged individually as a homemade gift.
Recipe Notes
Drain the maraschino cherries thoroughly and pat them dry before chopping. Excess liquid can make the cream cheese filling too soft. Check the vanilla wafers, candy coating and decorations when preparing the cookies for someone with a food allergy.
Variations
Replace the maraschino cherries with finely chopped dried cherries. Dark, milk or white chocolate coating can be used. Add finely chopped pistachios, coconut or freeze-dried raspberry crumbs instead of sprinkles.
Storage
Layer the cookies between sheets of baking paper in an airtight container. Refrigerate for up to two days. Freezing is not recommended because the filling may separate and the wafers can lose their crisp texture.
Wine Advice
A lightly sparkling Moscato complements the sweet cherry filling and chocolate coating. A ruby port is a richer alternative for serving these cookies as an after-dinner treat.
Chocolate cherry cookie bites combine crisp vanilla wafers with a smooth cream cheese filling flavoured with maraschino cherries and almond extract. Each sandwich is dipped in chocolate and decorated with colourful sprinkles. They require no baking and the small-batch recipe makes four individual treats.
A Simple No-Bake Treat
Vanilla wafers form a convenient cookie base because they are crisp, evenly shaped and ready to use. Their mild flavour allows the cherry filling and chocolate coating to stand out. Using eight wafers creates four sandwiches, making this version useful when you want a small dessert without a large quantity of leftovers.
The cream cheese filling needs only powdered sugar, cherries and a tiny amount of almond extract. Almond enhances the cherry flavour, but it is strong, so just a couple of drops are sufficient for this small batch. Too much extract can quickly overpower the filling.
Preparing the Cherry Filling
Allow the cream cheese to soften before mixing. Cold cream cheese is difficult to beat smoothly and may leave small lumps. Beat it with the powdered sugar first, then fold in the chopped cherries and almond extract.
Drain the maraschino cherries carefully and pat them dry before chopping. Excess syrup can loosen the filling and make the wafer sandwiches slide apart. Chop the cherries finely so their flavour is evenly distributed and the cookies remain easy to assemble.
Making Chocolate Cherry Cookie Bites
Spread the filling over the flat sides of four wafers and top them with the remaining wafers. Press gently because vanilla wafers can crack under too much pressure. Refrigerating the assembled sandwiches for 30 minutes firms the cream cheese and helps prevent the cookies from separating when dipped.
Melt the candy coating with a small amount of vegetable shortening. The shortening makes the chocolate thinner and easier to spread evenly around each cookie. Microwave it in short intervals and stir frequently. Chocolate can retain its shape even after it has melted, so stirring is a better test than appearance alone.
Dipping and Decorating
Lower one sandwich into the melted coating using a fork, turn it carefully and lift it out. Tap the fork gently against the side of the bowl to remove excess chocolate. Place the dipped cookie on baking paper and add decorations immediately, before the coating begins to set.
Sprinkles are the easiest finish, but freeze-dried raspberry crumbs, finely chopped pistachios or desiccated coconut also work well. When serving anyone with a food allergy, check every package carefully. Vanilla wafers, chocolate coating and decorations may contain wheat, milk, egg, nuts or soy. General kitchen guidance is available from the FDA information about safe food handling.
Serving Ideas
Serve one cookie per person with coffee, tea or hot chocolate. They also look attractive on a platter with other choices from the cookie recipes collection. For a larger sweet selection, combine them with recipes from the chocolate collection.
The cookies are suitable for high tea, Christmas, Valentine’s Day and gift-giving. Allow refrigerated cookies to stand at room temperature for about 10 minutes before serving. This softens the filling slightly while keeping the outer chocolate coating firm.
Flavour Variations
Dark chocolate creates a less sweet finish, while white chocolate gives the cookies a softer colour and creamier flavour. Dried cherries can replace maraschino cherries, although they produce a firmer filling. Raspberry, strawberry or orange flavouring can also be used in place of almond extract.
Browse the no-bake recipes for more desserts that do not require an oven. When increasing the quantity, multiply all ingredients evenly and dip the cookies in batches so the chocolate remains fluid.
Storage
Place the finished cookies in a single layer in an airtight container. If they must be stacked, separate the layers with baking paper. Refrigerate for up to two days because the filling contains cream cheese.
Freezing is not recommended. Thawing can cause condensation on the chocolate, while the filling may separate and soften the wafers. These chocolate cherry cookie bites are best prepared the day before serving and enjoyed while their contrasting textures remain fresh.
In a medium heavy saucepan, cook and stir the vanilla caramels and cream over medium-low heat until they are melted and smooth.
Reduce the heat to low.
Coat Pretzels with Caramel:
Spoon the hot caramel mixture over three-fourths of each pretzel rod, turning the pretzel to coat and shaking off excess caramel back into the pan.
Roll the coated portion of the pretzel in the chopped nuts.
Place the coated pretzels on the prepared cookie sheet.
Let them stand for 30 minutes or until the caramel is set.
Prepare the Coating:
Transfer the coated pretzels to waxed paper.
In a small heavy saucepan, cook and stir the vanilla-flavor candy coating and 1/2 teaspoon of the shortening over low heat until they are melted and smooth.
In another small heavy saucepan, cook and stir the chocolate-flavor candy coating and the remaining 1/2 teaspoon of shortening over low heat until they are melted and smooth.
Pipe the Coating:
Spoon the melted vanilla and chocolate coatings into separate heavy resealable plastic bags, then snip a small hole in one corner of each bag.
Decorate the Pretzels:
Pipe the melted vanilla and chocolate coatings over the coated portion of each pretzel.
Return the coated pretzels to the cookie sheet.
Set and Serve:
Let the pretzels stand for 30 minutes or until the coatings are set.
Notes & Wine Advice
Storage:
Layer the coated pretzels between sheets of waxed paper in an airtight container. You can store them at room temperature for up to 3 days or in the refrigerator for up to 1 week.Enjoy these Triple-Treat Pretzel Rods, a delightful combination of sweet caramel, crunchy nuts, and luscious chocolate coatings on a salty pretzel base!
Line a 15×10-inch baking pan with foil, extending the foil over the edges.
In a large saucepan, cook and stir granulated sugar and corn syrup over medium heat until the mixture begins to boil around the edges.
Cook and stir for an additional minute, then remove from heat.
Stir in peanut butter until the mixture is smooth.
Then, add the crisp rice cereal and cornflakes, mixing until they are evenly coated.
Transfer the mixture to the prepared pan and use a piece of waxed paper to press it firmly into the pan.
For the Pudding Layer:
In a medium saucepan, melt 3/4 cup of butter over medium heat.
Stir in the powdered sugar, dry pudding mix, 1/2 cup of the chopped candy, and the milk.
Mix until smooth.
Spread the pudding mixture evenly over the cereal layer.
For the Chocolate Frosting:
In a small saucepan, cook and stir the chocolate chips and 1/2 cup of butter over low heat until the mixture is melted and smooth.
Spread the chocolate frosting evenly over the pudding layer.
Sprinkle the remaining 1/4 cup of chopped candy on top.
Cover and chill for 1 hour or until the bars are set.
Using the foil, lift the uncut bars out of the pan and then cut them into individual bars.
Notes & Wine Advice
Storage:Layer the bars between sheets of waxed paper in an airtight container. Store in the refrigerator for up to 3 days or freeze for up to 3 months. Before serving, let the bars stand at room temperature for 30 minutes.Enjoy these delicious Butterscotch Crunch Bars, a delightful combination of flavors and textures!
2tspcracked pink peppercornsoptional, for a subtle kick
Additional grated white baking chocolate for sprinkling
Instructions
Begin by preparing the dough according to the basic sugar cookie recipe.
For the White Chocolate-Pistachio variation:
Reduce the all-purpose flour to 1 1/3 cups.
Add 1/3 cup finely ground pistachio nuts and 1/4 cup grated white baking chocolate with the flour.
If desired, stir in 2 tsp of cracked pink peppercorns for a subtle, spicy kick.
Continue with the shaping and baking steps as per the basic sugar cookie recipe.
After baking, while the cookies are still warm, sprinkle them with additional grated white baking chocolate for extra sweetness and a visually appealing finish.
Notes & Wine Advice
Enjoy: These White Chocolate-Pistachio Sugar Cookies with a hint of pink peppercorns offer a delightful blend of sweet and nutty flavors with a touch of spice. Savor these unique cookies and share them with your friends and family!Don’t forget to store the cookies between sheets of waxed paper in an airtight container. You can keep them at room temperature for up to 3 days or freeze them for up to 3 months.
Prepare the Butterscotch Sugar Cookies as directed by the basic sugar cookie recipe, but with a few adjustments.
Omit the cream of tartar from the original recipe.
Reduce the granulated sugar to 1 cup and add 1 cup packed brown sugar with the granulated sugar.
Add 1 tsp of pumpkin pie spice or apple pie spice with the flour.
Continue with the shaping and baking instructions for the basic sugar cookie recipe.
Chai-Clementine Sugar Cookies:
Prepare the Chai-Clementine Sugar Cookies as directed by the basic sugar cookie recipe, with a few flavor enhancements.
Add 2 tsp of clementine zest with the sugar.
Add 2 tsp of chai seasoning (to make your own chai seasoning, combine 1 1/2 tsp ground cardamom, 1/4 tsp each of ground ginger and cinnamon, and a dash of ground cloves) with the flour.
Proceed with shaping and baking as per the basic sugar cookie recipe.
Lime-Coconut Sugar Cookies:
Prepare the Lime-Coconut Sugar Cookies following the basic sugar cookie recipe.
However, you’ll make a few adjustments for a tropical twist.
In a food processor, combine the sugar, 1/3 cup toasted coconut, and 2 tsp lime zest.
Cover and pulse just until the coconut is very fine.
Add the sugar mixture with the baking soda to the basic sugar cookie dough and follow the remaining instructions for shaping and baking.
Notes & Wine Advice
Enjoy:
These three unique flavors of sugar cookies offer a delightful variety to suit different preferences. Share and savor these delicious cookies with your loved ones!As always, remember to store the cookies between sheets of waxed paper in an airtight container. Store them at room temperature for up to 3 days or freeze them for up to 3 months
In a small bowl, combine the sugar and 1 Tbsp. lemon zest.
Use your fingertips to rub the lemon zest into the sugar until the sugar becomes very fragrant.
Add the lemon-scented sugar mixture with the baking soda and 2 Tbsp. poppy seeds to the basic sugar cookie dough recipe provided earlier.
Follow the steps for shaping and baking as instructed.
For the Vanilla-Bean Sugar Cookies:
Prepare the basic sugar cookie dough recipe as directed, but substitute 2 tsp of vanilla bean paste for the vanilla extract.
Alternatively, cut a vanilla bean in half lengthwise and scrape out the seeds.
Add the vanilla bean seeds with the egg yolks.
Shape the dough into 1-inch balls, place them 2 inches apart on an ungreased cookie sheet, and follow the baking instructions.
For the Spicy Sugar Cookies:
Prepare the sugar cookie dough as directed through shaping the dough into 1-inch balls.
In a shallow dish, combine 1/4 cup sugar, 1/2 tsp ground cinnamon, and 1/4 tsp cayenne pepper.
Roll the dough balls in the sugar mixture before baking.
Enjoy: These three delightful variations of sugar cookies offer different flavors to suit various tastes.
Have fun baking and savoring these delicious cookies!
Remember to store the cookies between sheets of waxed paper in an airtight container.
Store them at room temperature for up to 3 days or freeze them for up to 3 months
Shape the dough into 1-inch balls.
Place the dough balls 2 inches apart on an ungreased cookie sheet.
Bake:
Bake the cookies for 12 to 14 minutes or until the edges are set but not brown.
Cool and Serve:
Allow the cookies to cool on the cookie sheet for 2 minutes, then transfer them to a wire rack to cool completely.
Enjoy: Your Classic Butter Sugar Cookies are ready to be enjoyed!
This recipe yields approximately 48 servings, with one cookie per serving.
Notes & Wine Advice
Storage:Layer the cookies between sheets of waxed paper in an airtight container. You can store them at room temperature for up to 3 days or freeze them for up to 3 months.These classic butter sugar cookies are perfect for any occasion and can be decorated or enjoyed as-is. Enjoy baking and savoring these delightful treats!
To provide the best experiences, we use technologies like cookies to store and/or access device information. Consenting to these technologies will allow us to process data such as browsing behavior or unique IDs on this site. Not consenting or withdrawing consent, may adversely affect certain features and functions.
Functional
Always active
The technical storage or access is strictly necessary for the legitimate purpose of enabling the use of a specific service explicitly requested by the subscriber or user, or for the sole purpose of carrying out the transmission of a communication over an electronic communications network.
Preferences
The technical storage or access is necessary for the legitimate purpose of storing preferences that are not requested by the subscriber or user.
Statistics
The technical storage or access that is used exclusively for statistical purposes.The technical storage or access that is used exclusively for anonymous statistical purposes. Without a subpoena, voluntary compliance on the part of your Internet Service Provider, or additional records from a third party, information stored or retrieved for this purpose alone cannot usually be used to identify you.
Marketing
The technical storage or access is required to create user profiles to send advertising, or to track the user on a website or across several websites for similar marketing purposes.
To provide the best experiences, we use technologies like cookies to store and/or access device information. Consenting to these technologies will allow us to process data such as browsing behavior or unique IDs on this site. Not consenting or withdrawing consent, may adversely affect certain features and functions.
Functional
Always active
The technical storage or access is strictly necessary for the legitimate purpose of enabling the use of a specific service explicitly requested by the subscriber or user, or for the sole purpose of carrying out the transmission of a communication over an electronic communications network.
Preferences
The technical storage or access is necessary for the legitimate purpose of storing preferences that are not requested by the subscriber or user.
Statistics
The technical storage or access that is used exclusively for statistical purposes.The technical storage or access that is used exclusively for anonymous statistical purposes. Without a subpoena, voluntary compliance on the part of your Internet Service Provider, or additional records from a third party, information stored or retrieved for this purpose alone cannot usually be used to identify you.
Marketing
The technical storage or access is required to create user profiles to send advertising, or to track the user on a website or across several websites for similar marketing purposes.