Hot Three-Cheese Dip

Three-cheese dip garnished with fresh parsley

Hot Three-Cheese Dip

Hot Three-Cheese Dip combines cheddar, mozzarella, cream cheese, and sour cream in a smooth, rich dip that is ready in minutes.
Couverts4 servings
estimated costs pp $1.75
Deel op Facebook Print Recipe

Equipment

Ingredients

Instructions

  • Place the softened cream cheese, sour cream, and garlic powder in a microwave-safe bowl.
  • Microwave on high for 1 minute.
  • Stir until smooth.
  • Add the shredded cheddar and mozzarella.
  • Microwave for another 1 to 2 minutes.
  • Stir thoroughly until the cheeses have melted.
  • Season with black pepper.
  • Microwave for another 30 to 60 seconds if the cheese has not melted completely.
  • Stir until the dip is smooth and creamy.
  • Garnish with chopped parsley.
  • Serve immediately.

Notes & Wine Advice

Serving Suggestions

Serve the dip warm with tortilla chips, crackers, toasted bread, pretzels, or vegetable sticks. Broccoli, celery, bell pepper, and carrots provide a fresh contrast to the rich cheese.

Recipe Notes

Soften the cream cheese before mixing to prevent lumps. Microwave times vary between appliances, so heat the dip in short intervals and stir regularly. Avoid overheating because melted cheese can separate and become oily.

Variations

Add chopped jalapeรฑos, chilli flakes, smoked paprika, spring onions, or crispy bacon. Monterey Jack can replace the mozzarella, while mature cheddar creates a stronger cheese flavour.

Storage

Store leftover dip in an airtight container in the refrigerator for up to three days. Reheat it in the microwave in 30-second intervals, stirring each time. Add a spoonful of milk or sour cream if the reheated dip becomes too thick.

Wine Advice

A crisp Sauvignon Blanc balances the richness of the three cheeses. Chardonnay or a light lager is another suitable choice.

Nutrition values

Serving: 1 serving | Calories: 250 kcal | koolhydraten: 5 g | Eiwitten: 10 g | Vet: 21 g | Verzadigd vet: 13 g | Natrium: 623 mg | Suiker: 2 g
————————————————————————————————–

Three-cheese dip combines cheddar, mozzarella, cream cheese, and sour cream in one warm, smooth appetiser. Cheddar supplies a strong savoury flavour, mozzarella creates a stretchy texture, and cream cheese keeps everything rich and creamy. Prepared in the microwave, the dip is ready quickly and requires only a bowl and spoon.

How the Three Cheeses Work Together

Each cheese has a different purpose. Cheddar contributes most of the flavour and gives the dip its warm golden colour. Mature cheddar produces a sharper result, while mild cheddar is better suited to children or anyone who prefers a gentler taste.

Mozzarella melts smoothly and creates the characteristic cheese pull. It has a mild flavour, so it supports the cheddar rather than competing with it. Cream cheese forms the creamy base and prevents the dip from becoming stringy or difficult to scoop.

Sour cream loosens the mixture and adds a slight tang that balances the rich cheese. Garlic powder and black pepper provide seasoning without introducing pieces that could interrupt the smooth texture.

Find more easy serving ideas among the dip recipes or explore other dishes in the appetiser collection.

Achieving a Smooth Texture

Allow the cream cheese to soften before mixing. Cold cream cheese remains firm and can form small lumps that are difficult to remove. Stir it with the sour cream and garlic powder before adding the grated cheeses.

Use freshly grated cheddar and mozzarella when possible. Packaged shredded cheese often contains anti-caking ingredients that can prevent completely smooth melting. Grating cheese directly from a block generally produces a creamier result.

Heat the mixture in short intervals and stir thoroughly between each one. Microwaves do not always heat food evenly, so the centre and edges of the bowl may reach different temperatures. Regular stirring distributes the heat and helps the cheeses melt together.

Avoiding Oily or Separated Cheese

Excessive heat can cause the fat to separate from the cheese, leaving an oily surface and grainy texture. Stop heating as soon as the cheese has melted. The residual heat in the bowl will continue warming the mixture briefly.

If the dip becomes too thick, stir in a tablespoon of milk or additional sour cream. Add only a small amount at a time because an overly thin dip will not cling properly to chips, bread, or vegetables.

Dairy products should remain refrigerated until needed, and leftover dip should be chilled promptly. More practical information is available in the FDA safe food handling guidance.

Serving the Dip

This hot cheese dip is suitable for game day, movie night, parties, and relaxed weekend gatherings. Serve it with tortilla chips, crackers, pretzels, breadsticks, toasted baguette, or soft bread.

For a fresher option, offer raw broccoli, carrots, celery, cucumber, or bell pepper. Using several different dippers creates an attractive serving board and gives guests both light and indulgent choices.

Keep the dip warm in a small heatproof serving dish. Stir it occasionally because the surface can thicken as it cools. Browse more informal serving ideas in the snack recipes section.

Variations for Extra Flavour

Add chopped jalapeรฑos, chilli flakes, cayenne pepper, or hot sauce for heat. Smoked paprika gives the dip a warmer flavour, while spring onions or chives provide freshness and colour.

Crispy bacon can be stirred through the dip, although it changes the vegetarian classification. Monterey Jack can replace the mozzarella, and blue cheese can replace part of the cheddar for a stronger, more distinctive version.

When preparing the recipe for someone with dietary restrictions, check the labels on every cheese, seasoning, and accompaniment. Crackers, bread, and tortilla chips are not automatically gluten-free even when the dip itself contains no gluten ingredients.

Storage and Reheating

Store leftovers in an airtight container in the refrigerator for up to three days. Reheat the dip in the microwave in 30-second intervals, stirring after each interval. Add a small spoonful of milk or sour cream if it has thickened.

Freezing is not recommended because cream cheese and sour cream can separate after thawing. Prepared fresh and served warm, three-cheese dip provides a simple and satisfying centrepiece for a snack table.

Summer Fruit Cookie Pizza

Fruit cookie pizza with cream cheese and colourful fresh fruit

Summer Fruit Cookie Pizza

Summer Fruit Cookie Pizza features a golden sugar-cookie crust covered with sweetened cream cheese and a colourful mixture of strawberries, blueberries, kiwi, mandarin, and pineapple.
Couverts4 servings
estimated costs pp $2.75
Deel op Facebook Print Recipe

Equipment

  • Baking sheet or pizza stone
  • Bowls, medium
  • Electric mixer or whisk
  • Rolling Pin
  • spatula

Ingredients

For the Cookie Crust

For the Fruit Topping

Instructions

Prepare the Cookie Crust

  • Preheat the oven to 180ยฐC (350ยฐF).
  • Roll the sugar-cookie dough into a large, even circle on a lightly floured surface.
  • Transfer the dough to a baking sheet or pizza stone.
  • Bake for 10 to 12 minutes, or until the edges are golden.
  • Remove the cookie crust from the oven.
  • Allow it to cool completely.
  • Prepare the Cream Cheese Filling
  • Place the softened cream cheese, powdered sugar, and vanilla extract in a medium bowl.
  • Beat with an electric mixer or whisk until smooth and creamy.
  • Refrigerate until the cookie crust has cooled.

Add the Fruit Topping

  • Spread the cream cheese mixture evenly over the cooled cookie crust.
  • Arrange the strawberries, blueberries, kiwi, mandarin segments, and pineapple decoratively over the filling.
  • Drizzle the honey lightly over the fruit.
  • Refrigerate until ready to serve.
  • Cut into four equal portions.
  • Serve chilled.

Notes & Wine Advice

Serving Suggestions

Serve the fruit pizza chilled as a summer dessert or picnic treat. Add a scoop of vanilla ice cream or a spoonful of whipped cream when an extra-rich dessert is preferred.

Recipe Notes

Allow the cookie crust to cool completely before adding the cream cheese filling. A warm crust will soften the filling and may cause it to slide. Pat all washed or canned fruit dry to prevent excess liquid from collecting on the surface.

Variations

Use raspberries, blackberries, grapes, mango, peaches, or banana. Lemon or orange zest can be mixed into the cream cheese filling. Mascarpone may replace part of the cream cheese for a richer variation.

Storage

Store the assembled fruit pizza covered in the refrigerator and consume it within two days. The crust gradually softens after the filling and fruit are added. Freezing the assembled dessert is not recommended.

Wine Advice

A lightly sparkling Moscato complements the sweet fruit and creamy filling. A chilled fruity rosรฉ is another suitable choice.

Nutrition values

Serving: 1 1/4 pizza | Calories: 250 kcal | koolhydraten: 30 g | Eiwitten: 3 g | Vet: 12 g | Verzadigd vet: 12 g | Natrium: 420 mg | Suiker: 18 g
————————————————————————————————–
Course; Dessert / Fruit / Oven / Pizza / Treats
Cuisine; American
Season: Summer
Diets; Vegetarian
Occasions Kids / Party / Picnic / Summerpartys / Weekend

Fruit cookie pizza combines a soft, golden sugar-cookie crust with sweetened cream cheese and a colourful arrangement of fresh fruit. Strawberries, blueberries, kiwi, mandarin, and pineapple provide contrasting colours, flavours, and textures. A light drizzle of honey completes this chilled American dessert, which is especially suitable for summer gatherings and picnics.

A Dessert That Looks Like Pizza

This recipe borrows the round shape and sliced presentation of a pizza but uses completely sweet ingredients. The cookie crust replaces pizza dough, cream cheese takes the place of sauce, and fresh fruit becomes the topping.

The colourful presentation makes it especially appealing for children, parties, and festive tables. Arranging the fruit in circles, sections, or a repeating pattern gives the dessert a polished appearance without requiring complicated decorating skills.

Discover more colourful ideas among the dessert recipes or browse other dishes in the fruit collection.

Preparing the Cookie Crust

Roll the dough to an even thickness so the centre and edges bake at approximately the same speed. An uneven crust may remain soft in the middle while becoming too dark around the outside. Leave some room around the dough because it can spread during baking.

Remove the crust when the edges are lightly golden. It may still feel slightly soft in the centre, but it will become firmer as it cools. Overbaking creates a hard base that can be difficult to slice with a fork.

Cooling is essential. The crust must reach room temperature before the cream cheese layer is added. Warm dough softens the filling and can cause it to melt, separate, or slide away when the dessert is cut.

Making a Smooth Cream Cheese Layer

Use cream cheese softened at room temperature. Cold cream cheese is difficult to mix and may leave lumps in the filling. Beat it thoroughly with the powdered sugar and vanilla until smooth, light, and easily spreadable.

Spread the mixture carefully with a spatula, leaving a small border around the cookie crust. Avoid pressing too firmly because the crust may crack. If the filling becomes very soft, refrigerate it for approximately fifteen minutes before spreading.

Keep cream cheese refrigerated until needed and do not leave the assembled dessert at room temperature for extended periods. More storage and preparation advice is available in the FDA safe food handling guidance.

Choosing and Arranging the Fruit

Use ripe fruit that is still firm enough to hold its shape. Soft or overripe pieces release more juice and can make the cream cheese layer watery. Wash the fruit, dry it thoroughly, and cut it shortly before assembling the dessert.

Drain mandarin segments and pineapple carefully. Pat them dry with kitchen paper before placing them on the filling. Arrange larger pieces first and use blueberries to fill the smaller spaces. Add the honey only as a light drizzle because the cookie base and filling are already sweet.

This summer fruit dessert can be served with vanilla ice cream, whipped cream, or extra berries. Find more playful variations in the pizza recipes section.

Fruit and Flavour Variations

Raspberries, blackberries, seedless grapes, mango, peach, or nectarine can replace any of the suggested fruits. Banana also works, but it should be added shortly before serving because it discolours quickly.

Lemon or orange zest can be mixed into the cream cheese for a fresher citrus flavour. Mascarpone may replace part of the cream cheese for a richer filling. A small amount of melted apricot jam can be brushed over the fruit to create a glossy finish.

Storage and Serving

Refrigerate the assembled dessert until ready to serve. Cut it into portions with a sharp knife, wiping the blade between cuts for a cleaner presentation. During warm weather, return unused portions to the refrigerator as soon as possible.

Store leftovers covered in the refrigerator and consume them within two days. The crust gradually becomes softer as it absorbs moisture from the filling and fruit. Freezing is not recommended because fresh fruit and cream cheese can release water after thawing.

With its colourful topping, creamy filling, and soft cookie base, fruit cookie pizza makes an attractive dessert for parties, picnics, childrenโ€™s meals, and relaxed summer weekends.


Crispy Greens with Spinach Tahini & Prosciutto

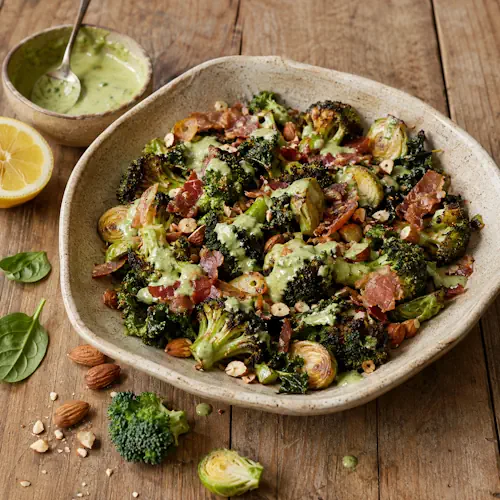
Crispy tahini greens with prosciutto and roasted almonds

Crispy Greens with Spinach Tahini & Prosciutto

Crispy Greens with Spinach Tahini & Prosciutto combines air-fried broccoli, Brussels sprouts, kale, garlic, prosciutto, and almonds with a creamy lemon-spinach tahini sauce.
Couverts4 servings
estimated costs pp $3.50
Deel op Facebook Print Recipe

Equipment

  • Air fryer, 5- or 6-quart
  • Bowl, medium
  • Food processor
  • Knife
  • spatula

Ingredients

For the Roasted Vegetables

For the Spinach Tahini

For the Topping

Instructions

Prepare the Roasted Vegetables

  • Preheat the air fryer to 200ยฐC (400ยฐF) for 3 minutes.
  • Combine the olive oil and honey in a medium bowl.
  • Add the broccoli and Brussels sprouts.
  • Toss until the vegetables are evenly coated.
  • Season with salt and black pepper.
  • Arrange the broccoli and Brussels sprouts in the air-fryer basket.
  • Air-fry at 200ยฐC (400ยฐF) for 8 minutes.
  • Stir the vegetables halfway through cooking.
  • Add the kale to the basket.
  • Coat the kale lightly with cooking spray.
  • Air-fry for another 4 minutes.
  • Add the sliced garlic and prosciutto.
  • Continue air-frying for 5 minutes, or until the vegetables are crisp around the edges and the prosciutto is crunchy.

Prepare the Spinach Tahini

  • Add the tahini, lemon juice, extra-virgin olive oil, and baby spinach to a food processor.
  • Process until smooth.
  • Add water gradually until the sauce reaches a drizzling consistency.
  • Season with salt and black pepper.

Assemble and Serve

  • Transfer the roasted vegetables to a serving dish.
  • Crumble the crispy prosciutto over the vegetables.
  • Drizzle with the spinach tahini.
  • Sprinkle with the chopped roasted almonds.
  • Serve immediately.

Notes & Wine Advice

Serving Suggestions

Serve as a warm side dish with roasted chicken, grilled fish, pork, or a grain such as quinoa. It can also be served as a light lunch with crusty bread.

Recipe Notes

Dry the vegetables thoroughly before air-frying so they become crisp rather than steaming. Add the kale later because its thin leaves cook much faster than the broccoli and Brussels sprouts. The original vegetarian classification was incorrect because this recipe contains prosciutto.

Variations

Replace the prosciutto with crispy chickpeas for a vegetarian version. Sunflower seeds or pumpkin seeds can replace the almonds. Maple syrup may be used instead of honey when a vegan variation is required.

Storage

Store the vegetables and tahini sauce separately in airtight containers in the refrigerator for up to two days. Reheat the vegetables in the air fryer at 180ยฐC (350ยฐF) for 4 to 6 minutes and add the sauce after reheating.

Wine Advice

A crisp Sauvignon Blanc complements the lemon tahini and green vegetables. A dry Pinot Grigio also pairs well with the salty prosciutto.

Nutrition values

Serving: 1 serving | Calories: 330 kcal | koolhydraten: 25 g | Eiwitten: 13 g | Vet: 22 g | Verzadigd vet: 3 g | Natrium: 500 mg | Suiker: 12 g
————————————————————————————————–

Crispy tahini greens combine air-fried broccoli, Brussels sprouts, and kale with crunchy prosciutto, roasted almonds, and a creamy spinach-tahini sauce. Honey helps the vegetables caramelise, while lemon juice keeps the sauce fresh and prevents the finished dish from becoming too rich. The result works as a substantial side dish or a light lunch.

Three Vegetables, Different Cooking Times

Broccoli and Brussels sprouts need more cooking time than kale. They are therefore coated with olive oil and honey before entering the air fryer first. The honey adds mild sweetness and helps the exposed edges brown, while the oil encourages a crisp exterior.

Kale has thin leaves that cook quickly and can burn when added too early. Adding it after the broccoli and Brussels sprouts have started roasting gives each vegetable a better texture. A light coating of cooking spray helps the kale become crisp without turning greasy.

For more ways to prepare fresh produce, explore the vegetable recipes collection or browse other convenient dishes among the air-fryer recipes.

Making a Smooth Tahini Sauce

Tahini is made from ground sesame seeds and has a rich, slightly bitter flavour. Lemon juice adds acidity, while fresh spinach gives the sauce its green colour. Extra-virgin olive oil creates a smoother texture and adds a gentle fruity note.

Tahini can thicken considerably when mixed with lemon juice. Add water gradually while processing until the sauce becomes smooth and easy to drizzle. A small amount is usually enough, so add one tablespoon at a time. Taste before adding salt because the prosciutto already contributes saltiness to the finished dish.

If the sauce still tastes too bitter, add a small drizzle of honey. More lemon juice can be used when a sharper, fresher flavour is preferred. Prepare the sauce shortly before serving to retain the spinachโ€™s bright green colour.

Adding Texture and Savoury Flavour

Prosciutto becomes crisp after a few minutes in the air fryer. Add it near the end of cooking so it does not become excessively dry. The garlic is added at the same stage because thin slices can burn quickly at high temperatures.

Roasted almonds provide additional crunch and a nutty flavour that complements the tahini. Sprinkle them over the dish immediately before serving so they remain crisp. Pumpkin seeds or sunflower seeds are suitable alternatives when almonds are unavailable.

Keep raw and cooked ingredients separate, maintain clean preparation surfaces, and refrigerate leftovers promptly. More information is available in the FDA safe food handling guidance.

Serving the Roasted Green Vegetables

These roasted green vegetables pair well with chicken, pork, grilled fish, or quinoa. They can also be served with crusty bread as a light lunch. The combination of vegetables, sauce, nuts, and prosciutto provides enough contrasting flavour and texture to stand on its own.

Arrange the vegetables on a wide serving dish rather than piling them into a deep bowl. This helps preserve their crisp edges. Drizzle the tahini sauce over the top and serve any remaining sauce separately, allowing everyone to add the amount they prefer.

Vegetarian and Vegan Variations

The recipe is not vegetarian because it contains prosciutto. For a vegetarian version, replace it with crispy chickpeas or additional roasted almonds. Smoked paprika can provide some of the savoury depth normally supplied by the cured meat.

Crispy tahini greens combine air-fried broccoli, Brussels sprouts, and kale with salty prosciutto, roasted almonds, and a creamy spinach-tahini sauce. Honey helps the vegetables caramelise, while lemon juice balances the rich tahini. The result is a colourful vegetable side dish with crisp edges, fresh acidity, and contrasting textures.

Three Green Vegetables Together

Broccoli, Brussels sprouts, and kale each cook at a different speed. The broccoli and Brussels sprouts go into the air fryer first because they need more time to become tender. Kale is added later so its thin leaves become crisp without burning.

Drying the vegetables thoroughly is essential. Moisture creates steam, which prevents browning and can leave the vegetables soft. Cut the broccoli into similarly sized florets and choose small Brussels sprouts whenever possible. Halve larger sprouts so everything cooks evenly.

Explore more ways to prepare seasonal produce in the vegetable recipes collection or find other quick dishes among the air-fryer recipes.

Building Flavour in the Air Fryer

Olive oil helps the vegetables brown, while honey adds a light glaze and balances the natural bitterness of Brussels sprouts and kale. Toss everything thoroughly so the coating is evenly distributed. Too much honey can burn, so stir the vegetables halfway through cooking and check the edges regularly.

Garlic and prosciutto are added near the end. Thin garlic slices can become bitter when exposed to high heat for too long. Prosciutto only needs several minutes to lose moisture and become crisp enough to crumble over the finished dish.

Arrange the vegetables loosely in the basket. When they are packed too tightly, circulating air cannot reach every surface. Cook in two batches if necessary, especially when using a smaller air fryer.

A Creamy Green Tahini Sauce

Tahini gives the sauce a creamy texture without using dairy. Lemon juice provides acidity, while fresh spinach adds colour and a mild earthy flavour. Process everything until smooth, then add water gradually until the sauce can be drizzled easily.

Tahini naturally thickens when mixed with lemon juice. This is normal and does not mean the sauce has failed. Adding one tablespoon of water at a time will loosen it again. Taste before adding salt because the crispy prosciutto already contributes a salty element.

These roasted green vegetables work well with chicken, fish, pork, quinoa, or crusty bread. They can also be served as a warm lunch or a colourful dish on a festive table. Browse more accompaniments in the side-dish collection.

Variations and Dietary Options

For a vegetarian version, replace the prosciutto with crispy chickpeas. A vegan variation can be made by also replacing the honey with maple syrup. Pumpkin or sunflower seeds can replace the almonds, although these substitutions alter the dietary classifications.

Fresh herbs such as parsley, basil, or mint can be blended into the tahini sauce. Add chilli flakes to the vegetables for heat or smoked paprika for a warmer flavour. Cauliflower can replace the broccoli, but it may require a few additional minutes of cooking.

When serving anyone with an allergy or dietary restriction, check the tahini, prosciutto, and other packaged ingredients carefully. Keep preparation equipment clean and refrigerate leftovers promptly. Additional information is available in the FDA safe food handling guidance.

Storage and Reheating

Store the cooked vegetables and tahini sauce separately in airtight containers in the refrigerator for up to two days. Keeping them apart prevents the sauce from softening the crisp vegetables.

Reheat the vegetables in the air fryer at 180ยฐC (350ยฐF) for four to six minutes. Add the cold or room-temperature sauce after reheating, followed by the almonds. The dish is best eaten freshly prepared because kale and prosciutto gradually lose their crisp texture.

With its mixture of caramelised vegetables, creamy lemon sauce, almonds, and savoury prosciutto, crispy tahini greens provide far more flavour and texture than an ordinary vegetable side dish.


Crispy Eggplant Meatball Subs

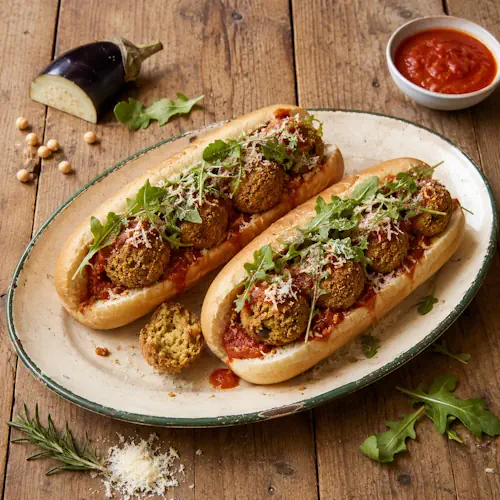
Eggplant meatball subs with tomato sauce and arugula

Crispy Eggplant Meatball Subs

Crispy Eggplant Meatball Subs are filled with air-fried eggplant and chickpea balls, warm tomato sauce, Parmesan, and balsamic-dressed arugula.
Couverts4 servings
estimated costs pp $3.00
Deel op Facebook Print Recipe

Equipment

  • Air fryer, 5- or 6-quart
  • baking tray
  • Bowls, medium and small
  • Food processor
  • Knife
  • Parchment paper

Ingredients

For the Eggplant Meatballs

For the Subs

For the Arugula Topping

Instructions

Prepare the Eggplant Meatballs

  • Preheat the air fryer to 200ยฐC (400ยฐF) for 3 minutes.
  • Line a baking tray with parchment paper.
  • Place the eggplant pieces in the air-fryer basket.
  • Coat the eggplant evenly with olive oil cooking spray.
  • Air-fry for 15 minutes, shaking the basket halfway through, until golden and tender.
  • Transfer the cooked eggplant to a food processor.
  • Add the chickpeas, red onion, garlic, rosemary, and 80 g Parmesan.
  • Process until combined but still slightly textured.
  • Season with salt and black pepper.
  • Add 45 g breadcrumbs and pulse until incorporated.
  • Shape the mixture into 16 equal meatballs.
  • Roll each meatball in the remaining 25 g breadcrumbs.
  • Coat the meatballs generously with olive oil cooking spray.
  • Arrange the meatballs in the air-fryer basket without overcrowding.
  • Air-fry at 200ยฐC (400ยฐF) for 20 minutes, turning halfway through, until golden and firm.

Assemble the Subs

  • Cut each bread roll lengthwise without slicing completely through the bottom.
  • Spread the warmed pasta sauce inside each roll.
  • Place four eggplant meatballs in each roll.
  • Arrange the filled rolls in the air-fryer basket.
  • Air-fry at 200ยฐC (400ยฐF) for 5 minutes, or until the rolls are warm and lightly crisp.

Prepare the Arugula Topping

  • Combine the baby arugula and balsamic vinegar in a small bowl.
  • Top each sub with the dressed arugula.
  • Sprinkle the remaining Parmesan over the subs.
  • Serve immediately.

Notes & Wine Advice

Serving Suggestions

Serve each sub with a green salad, roasted potato wedges, vegetable soup, or extra warmed pasta sauce for dipping. Pickled vegetables provide a sharp contrast to the rich Parmesan topping.

Recipe Notes

Drain the chickpeas thoroughly and allow the cooked eggplant to release excess steam before processing. The mixture should remain slightly textured rather than becoming a smooth purรฉe. If it feels too soft to shape, add a small amount of extra breadcrumbs.

Variations

Replace the rosemary with basil or oregano. Add chilli flakes to the meatball mixture for gentle heat. Mozzarella can be placed inside the rolls before the final air-frying stage for an extra melted cheese layer.

Storage

Store the cooked meatballs separately from the bread, sauce, and arugula in the refrigerator for up to three days. Reheat the meatballs in the air fryer at 180ยฐC (350ยฐF) for 5 to 7 minutes before assembling fresh subs.

Wine Advice

A medium-bodied Chianti complements the tomato sauce, Parmesan, and rosemary. Pinot Grigio is a lighter alternative that works well with the balsamic arugula.

Nutrition values

Serving: 1 sub | Calories: 610 kcal | koolhydraten: 73 g | Eiwitten: 24 g | Vet: 25 g | Verzadigd vet: 10 g | Natrium: 1150 mg | Suiker: 9 g
————————————————————————————————–

Eggplant meatball subs turn roasted eggplant and chickpeas into crisp vegetarian meatballs served with tomato sauce, Parmesan, and balsamic-dressed arugula. The air fryer gives the outside a golden breadcrumb coating while the inside remains soft and savoury. Served in warm bread rolls, they create a satisfying alternative to traditional meatball sandwiches.

A Vegetable-Based Meatball Alternative

Eggplant provides moisture and a rich, almost creamy texture after air-frying. Chickpeas add structure, protein, and a mild nutty flavour. Together they create a mixture that can be shaped without using meat or eggs. Parmesan, rosemary, garlic, and red onion supply the stronger savoury flavours associated with classic Italian-style meatballs.

Unlike many vegetable substitutes, these meatballs are not intended to imitate the exact texture of beef. Their appeal comes from their crisp coating, tender centre, and combination of vegetables, beans, cheese, and herbs. Explore other creative ideas among the vegetable recipes and bean recipes.

Creating the Right Texture

Air-fry the eggplant until tender and golden before processing it with the other ingredients. Proper cooking removes excess moisture and develops a deeper flavour. After cooking, allow the pieces to release steam briefly so the meatball mixture does not become wet or sticky.

Pulse the mixture in the food processor only until everything is combined. Processing it into a completely smooth purรฉe produces meatballs with a dense and pasty texture. Small pieces of chickpea, onion, and eggplant should remain visible.

Breadcrumbs absorb moisture and help the mixture hold its shape. If it still feels too soft, add one tablespoon of breadcrumbs at a time. Allowing the mixture to rest for ten minutes before shaping also gives the crumbs time to absorb moisture.

Shaping and Air-Frying

Divide the mixture into sixteen equal portions so every sub receives four meatballs. Slightly damp hands can prevent sticking while shaping. Roll each portion firmly but avoid compressing it too much, as a tightly packed meatball may become heavy.

Coat the shaped balls with breadcrumbs and apply cooking spray evenly. Arrange them in a single layer with space between them so hot air can circulate. Turn them halfway through cooking to brown the entire surface. If the basket is small, cook them in batches instead of overcrowding it.

Use clean utensils and preparation surfaces, refrigerate perishable ingredients promptly, and store leftovers safely. Additional information is available in the FDA safe food handling guidance.

Building the Perfect Sub

Choose soft bread rolls that are sturdy enough to hold the sauce and meatballs. Cut them lengthwise without slicing completely through the bottom. This creates a pocket that keeps the filling inside while the sandwich is being eaten.

Spread warm pasta sauce inside each roll before adding four meatballs. A final five minutes in the air fryer warms the bread, sets the filling, and lightly crisps the outside. Finish these vegetarian sub sandwiches with Parmesan and arugula dressed in balsamic vinegar. The peppery leaves and sharp vinegar balance the rich cheese and tomato sauce.

Serve the subs with roasted potato wedges, vegetable soup, pickled vegetables, or a simple salad. Find more handheld meal ideas in the sandwich recipes collection.

Variations and Dietary Options

Replace rosemary with basil, parsley, or oregano for a different herbal flavour. Chilli flakes can be added to the meatball mixture or tomato sauce. For an extra layer of melted cheese, place mozzarella inside each roll before the final air-frying stage.

To make the recipe vegan, use dairy-free Parmesan and confirm that the bread rolls and breadcrumbs contain no animal-derived ingredients. Gluten-free rolls and breadcrumbs may be used, but their labels should be checked carefully when preparing the meal for someone with coeliac disease.

Storage and Reheating

Store the cooked meatballs separately from the bread, sauce, and arugula. Refrigerate them in an airtight container for up to three days. Reheat them in the air fryer at 180ยฐC (350ยฐF) for five to seven minutes before assembling fresh sandwiches.

The meatballs can also be frozen after cooking. Freeze them in a single layer before transferring them to a freezer-safe container. With their crisp exterior and tender vegetable centre, eggplant meatball subs offer a hearty vegetarian meal suitable for lunch, dinner, or a relaxed weekend gathering.


Crispy Air-Fryer Vegetable Spring Rolls

Air fryer spring rolls filled with noodles and vegetables

Crispy Air-Fryer Vegetable Spring Rolls

Crispy Air-Fryer Vegetable Spring Rolls are filled with rice noodles, cabbage, carrot, ginger, and Chinese five-spice. They become golden and crunchy with considerably less oil than traditionally fried spring rolls.
Couverts4 servings
Total time 35 minutes
estimated costs pp $1.50
Deel op Facebook Print Recipe

Equipment

  • Air fryer, 5- or 6-quart
  • Bowls, medium and small
  • Kitchen scissors
  • Parchment paper
  • Pastry brush
  • Wire rack

Ingredients

For the Noodles

For the Vegetable Filling

For the Spring Rolls

Instructions

Prepare the Noodles

  • Place the rice vermicelli noodles in a medium bowl.
  • Cover the noodles with boiling water.
  • Leave them to soften for approximately 2 minutes.
  • Drain the noodles thoroughly.
  • Cut the noodles into shorter lengths with kitchen scissors.

Cook the Vegetable Filling

  • Line the air-fryer basket with parchment paper.
  • Add the garlic, ginger, shallot, carrot, Napa cabbage, Chinese five-spice powder, sesame oil, and peanut oil.
  • Toss until evenly combined.
  • Air-fry at 175ยฐC (350ยฐF) for 5 minutes, or until the vegetables have softened.
  • Transfer the cooked vegetables to a medium bowl.
  • Combine the soy sauce and cornstarch in a small bowl.
  • Add the soy sauce mixture and noodles to the vegetables.
  • Toss until thoroughly combined.
  • Allow the filling to cool to room temperature.

Assemble the Spring Rolls

  • Place one spring roll wrapper on a clean work surface.
  • Place approximately 1/4 cup filling in a line one-third of the way up from the bottom edge.
  • Leave a 3/4-inch border on both sides.
  • Fold the bottom of the wrapper over the filling.
  • Fold both sides inward and roll the wrapper up firmly.
  • Brush the final edge with water and press to seal.
  • Repeat with the remaining wrappers and filling.

Air-Fry the Spring Rolls

  • Preheat the air fryer to 175ยฐC (350ยฐF) for 3 minutes.
  • Spray the spring rolls generously with cooking spray.
  • Arrange five spring rolls in the basket without allowing them to overlap.
  • Air-fry for 12 minutes, turning halfway through, until golden and crisp.
  • Transfer the cooked spring rolls to a wire rack.
  • Repeat with the remaining five spring rolls.
  • Serve hot with your preferred dipping sauce.

Notes & Wine Advice

Serving Suggestions

Serve the spring rolls hot with sweet chilli sauce, plum sauce, soy dipping sauce, or a ginger-lime dip. They also work well alongside fried rice, noodles, or a crunchy Asian-style salad.

Recipe Notes

Allow the filling to cool completely before assembling the rolls. Warm filling creates steam and can soften or tear the wrappers. Do not overfill them, and keep unused wrappers covered with a slightly damp kitchen towel to prevent drying.

Variations

Add sliced mushrooms, bean sprouts, spring onions, or finely chopped water chestnuts. Peanut oil can be replaced with vegetable oil. For extra heat, add chilli flakes or finely chopped fresh chilli to the vegetable filling.

Storage

Store cooked spring rolls in an airtight container in the refrigerator for up to two days. Reheat them in the air fryer at 175ยฐC (350ยฐF) for 4 to 6 minutes. Uncooked rolls can be frozen in a single layer and transferred to a freezer container once firm.

Wine Advice

A crisp Riesling balances the savoury filling and complements sweet or spicy dipping sauces. Sauvignon Blanc is another refreshing choice.

Nutrition values

Serving: 1 spring roll | Calories: 105 kcal | koolhydraten: 18 g | Eiwitten: 2.5 g | Vet: 2.5 g | Verzadigd vet: 0.4 g | Natrium: 230 mg | Suiker: 1.5 g
————————————————————————————————–

Air fryer spring rolls deliver a crisp, golden wrapper and a savoury vegetable filling without the large quantity of oil required for deep-frying. Inside each roll is a colourful mixture of rice vermicelli, Napa cabbage, carrot, shallot, garlic, ginger, and Chinese five-spice. Sesame and peanut oils add nutty depth, while soy sauce gives the filling its characteristic savoury flavour.

A Lighter Way to Make Spring Rolls

Traditional spring rolls are commonly submerged in hot oil until crisp. An air fryer uses rapidly circulating hot air instead, allowing the wrappers to become golden with only a coating of cooking spray. The result is lighter and less greasy while still providing the crunch expected from a freshly cooked spring roll.

Cooking the vegetables in the air fryer before assembling the rolls softens them and removes some excess moisture. This step also develops the flavours of the ginger, garlic, shallot, and Chinese five-spice. Explore more convenient recipes in the air-fryer collection.

Preparing a Balanced Filling

Rice vermicelli gives the filling structure without making it heavy. Soak the noodles only until tender, drain them thoroughly, and cut them into shorter lengths. Long strands can make the rolls difficult to fill, roll, and eat.

Napa cabbage has a mild flavour and tender texture that work particularly well in spring rolls. Finely shred it so the filling cooks evenly. The carrot should be cut into thin matchsticks, while the shallot, garlic, and ginger need to be chopped finely enough to spread throughout the mixture.

Cornstarch thickens the soy sauce and helps it cling to the noodles and vegetables. Allow the completed filling to cool to room temperature before placing it on the wrappers. Warm filling produces steam, which can soften the pastry or cause it to tear.

Rolling Them Neatly

Place the filling slightly below the centre of each wrapper, leaving space along the sides. Fold the bottom edge over the filling, bring both sides inward, and continue rolling firmly. Brush the final edge with water and press gently to seal it.

Avoid using too much filling. Overfilled wrappers are harder to close and may burst during cooking. Keep wrappers that are waiting to be filled beneath a slightly damp kitchen towel because exposure to air can make them dry, brittle, and difficult to fold.

Food should be prepared on clean surfaces and leftovers must be refrigerated promptly. Further practical information is available in the FDA safe food handling guidance.

Cooking for Maximum Crispness

Coat the assembled rolls generously but evenly with cooking spray. Arrange them in a single layer with space between each one. Overcrowding restricts the airflow and can leave pale or soft areas on the wrappers.

Turn the rolls halfway through cooking so both sides brown evenly. Cooking them in two batches is preferable to forcing all ten into the basket. Transfer each finished batch to a wire rack rather than a flat plate, as air circulation underneath helps preserve the crisp texture.

These crispy vegetable rolls are suitable as an appetiser, party snack, or part of a larger Asian-inspired meal. Serve them with sweet chilli sauce, plum sauce, or a ginger-lime dip. Find more serving ideas among the appetiser recipes and vegetable dishes.

Variations and Storage

Add mushrooms, bean sprouts, spring onions, or finely chopped water chestnuts for additional texture. Fresh chilli or chilli flakes provide extra heat. Replace the peanut oil with vegetable oil when a milder flavour is preferred, although all ingredient labels should still be checked carefully when cooking for someone with an allergy.

Store cooked rolls in an airtight container in the refrigerator for up to two days. Reheat them in the air fryer at 175ยฐC (350ยฐF) for four to six minutes. Microwaving is not recommended because it makes the wrappers soft.

Uncooked rolls can be frozen in a single layer and transferred to a freezer container once firm. With careful rolling and enough space in the basket, air fryer spring rolls become evenly browned, satisfyingly crisp, and easy to serve.


Classic Margherita Pizza

Classic Margherita pizza with fresh mozzarella and basil

Classic Margherita Pizza

Classic Margherita Pizza features a crisp crust topped with rich tomato sauce, fresh mozzarella, fragrant basil, and extra-virgin olive oil. A simple Italian pizza made with fresh ingredients.
Couverts4 servings
estimated costs pp $2.50
Deel op Facebook Print Recipe

Equipment

  • Baking sheet or pizza stone
  • Knife
  • Rolling Pin

Ingredients

For the Pizza Base

  • 1 gluten-free pizza crust
  • 1 tablespoon extra-virgin olive oil

For the Toppings

  • 150 g tomato sauce
  • 200 g fresh mozzarella cheese sliced
  • 12 fresh basil leaves
  • 1 tablespoon extra-virgin olive oil
  • Salt to taste

Instructions

Prepare the Pizza Base

  • Preheat the oven to 220ยฐC (425ยฐF).
  • Place the pizza crust on a baking sheet or preheated pizza stone.
  • Brush the crust evenly with 1 tablespoon extra-virgin olive oil.

Add the Toppings

  • Spread the tomato sauce in a thin, even layer over the pizza crust.
  • Arrange the fresh mozzarella slices evenly over the tomato sauce.

Bake and Finish

  • Bake for 12 to 15 minutes, or until the crust is golden and the mozzarella has melted.
  • Remove the pizza from the oven.
  • Scatter the fresh basil leaves over the pizza.
  • Drizzle with the remaining tablespoon extra-virgin olive oil.
  • Season lightly with salt.
  • Cut into four equal portions and serve immediately.

Notes & Wine Advice

Serving Suggestions

Serve the pizza with an arugula salad, grilled vegetables, or a simple tomato and cucumber salad. A small bowl of olives makes a suitable Italian-inspired accompaniment.

Recipe Notes

Drain the fresh mozzarella thoroughly and pat it dry before adding it to the pizza. Excess moisture can make the centre of the crust soggy. Add the basil after baking to preserve its fresh flavour, colour, and aroma.

Variations

Add sliced cherry tomatoes, roasted garlic, chilli flakes, or a light drizzle of balsamic glaze. A traditional wheat pizza crust can replace the gluten-free crust when gluten does not need to be avoided.

Storage

Store leftover pizza in an airtight container in the refrigerator for up to two days. Reheat it in a hot oven or dry frying pan until the crust is crisp and the mozzarella is thoroughly heated.

Wine Advice

A crisp Pinot Grigio complements the tomato, mozzarella, and fresh basil. A light Chianti is a suitable red-wine alternative.

Nutrition values

Serving: 1 1/4 pizza | Calories: 300 kcal | koolhydraten: 30 g | Eiwitten: 18 g | Vet: 16 g | Verzadigd vet: 7 g | Natrium: 620 mg | Suiker: 5 g
————————————————————————————————–

Classic Margherita pizza proves that a memorable meal does not require a long list of ingredients. A crisp pizza crust, rich tomato sauce, creamy fresh mozzarella, aromatic basil, and extra-virgin olive oil come together in a balanced Italian favourite. Each ingredient remains clearly recognisable, which makes freshness and careful preparation especially important.

The Story Behind This Italian Favourite

Margherita pizza is closely associated with Naples and is known for its simple red, white, and green topping. Tomato represents the red, mozzarella provides the white, and fresh basil adds the green. These colours are often connected with the Italian flag, although the pizzaโ€™s precise historical origin has been debated.

Whatever its exact history, the recipe has become one of the most recognisable examples of Italian cooking. Its appeal lies in the contrast between tangy tomato, mild cheese, fragrant herbs, and a crisp base. You can find more traditional inspiration among the Italian recipes or explore other combinations in the pizza collection.

Choosing the Best Ingredients

Use a tomato sauce with a smooth consistency and a clean tomato flavour. A heavily seasoned sauce can overpower the mozzarella and basil. If the sauce is watery, allow it to drain or simmer briefly before spreading it over the crust. Only a thin layer is needed to provide flavour without making the base soggy.

Fresh mozzarella contains considerably more moisture than grated pizza cheese. Drain it thoroughly and pat the slices dry with kitchen paper before assembling the pizza. Leaving the sliced mozzarella in a strainer for 15 to 20 minutes can remove additional liquid and improve the final texture.

Fresh basil should be bright green and free from dark or wilted areas. Add it after baking so it retains its colour and aroma. Extra-virgin olive oil provides the finishing touch, so choose one with a flavour you enjoy. Discover more dishes featuring melted and fresh cheeses in the cheese recipes section.

Creating a Crisp Pizza Base

A fully preheated oven is essential. If using a pizza stone, place it in the oven before preheating so that it becomes thoroughly hot. This intense heat starts crisping the bottom of the crust immediately and helps prevent a soft centre.

Spread the tomato sauce thinly, leaving a small border around the edge. Arrange the mozzarella with some space between the slices instead of covering the entire surface. This allows moisture to evaporate during baking and creates attractive areas of tomato between the melted cheese.

Food safety still matters with a simple recipe. Keep chilled mozzarella refrigerated until needed, clean preparation surfaces properly, and refrigerate leftovers promptly. More practical information is available in the FDA safe food handling guidance.

Serving Ideas and Variations

This traditional mozzarella pizza makes a satisfying light dinner or lunch when served with an arugula salad, grilled vegetables, olives, or tomato salad. A crisp Pinot Grigio complements the tomato and basil, while a light Chianti is suitable for anyone who prefers red wine.

For gentle heat, sprinkle chilli flakes over the pizza after baking. Roasted garlic adds depth without changing its basic character too much. Cherry tomatoes, a little Parmesan, or a drizzle of balsamic glaze can also be added, although using too many toppings will move the result away from the simplicity that defines the original.

Storage and Reheating

Store leftover pizza in an airtight container in the refrigerator for up to two days. Reheat it in a hot oven for approximately five minutes or place it in a dry frying pan over medium-low heat. Cover the pan briefly so the mozzarella warms while the base becomes crisp again.

A microwave will heat the pizza quickly but usually produces a softer crust. Add a few fresh basil leaves after reheating to restore its fresh aroma. With careful preparation and good-quality ingredients, Classic Margherita pizza remains one of the simplest and most satisfying ways to enjoy homemade Italian food.


Classic Bread Dressing

Classic bread dressing with a soft centre and crisp golden topping

Classic Bread Dressing

Traditional bread dressing with tender onion, celery, vegetable broth, and nondairy butter. Soft and savoury inside with a crisp golden top, it is ideal for holiday meals.
Couverts4 servings
Total time 1 hour 5 minutes
estimated costs pp $1.25
Deel op Facebook Print Recipe

Equipment

  • Baking Dish, 9-inch square glass
  • Knife
  • Mixing Bowl, Large
  • oven
  • Saucepan, Medium

Ingredients

Instructions

  • Preheat the oven to 350ยฐF (180ยฐC).
  • Lightly grease a 9-inch square glass baking dish.
  • Melt 2 tablespoons of the nondairy butter in a medium saucepan over medium heat.
  • Add the chopped onion and celery.
  • Cook for 5 to 7 minutes, stirring occasionally, until softened, translucent, and fragrant.
  • Melt the remaining 4 tablespoons of nondairy butter.
  • Place the stale bread cubes in a large mixing bowl.
  • Add the sautรฉed onion and celery, melted butter, and vegetable broth.
  • Gently toss until the bread is evenly moistened.
  • Transfer the mixture to the prepared baking dish and spread it into an even layer.
  • Bake uncovered for 40 to 45 minutes, until the centre is hot and the top is crisp and golden brown.
  • Let rest for 5 minutes before serving.

Notes & Wine Advice

Serving Suggestions

Serve the bread dressing with roasted vegetables, mashed potatoes, green beans, vegan gravy, or a festive plant-based roast. It is particularly suited to Christmas and Thanksgiving dinners.

Recipe Notes

Stale bread absorbs the broth without immediately becoming mushy. If the bread is still fresh, cut it into cubes and dry it in a 225ยฐF (110ยฐC) oven for about 1 hour before preparing the dressing. The unbaked mixture can also be used as a stuffing base in another recipe.

Variations

Add fresh sage, thyme, parsley, or rosemary for a more aromatic dressing. Mushrooms, chopped apples, dried cranberries, or vegan sausage can be included for extra flavour and texture.

Storage

Allow leftovers to cool before transferring them to an airtight container. Refrigerate for up to three days. Reheat in a covered baking dish, then uncover during the final few minutes to restore the crisp topping.

Wine Advice

A dry Sauvignon Blanc balances the rich, buttery bread and savoury vegetables. A light Pinot Noir is an excellent red alternative for a holiday dinner.

Nutrition values

Serving: 1 gr | Calories: 230 kcal | koolhydraten: 30 g | Eiwitten: 5 g | Vet: 10 g | Verzadigd vet: 2 g | Natrium: 620 mg | Suiker: 4 g
————————————————————————————————–

Classic bread dressing transforms stale bread, onion, celery, vegetable broth, and nondairy butter into a comforting holiday side dish. The centre remains soft and savoury while the uncovered baking time creates a crisp golden surface. It is simple enough for a family dinner but feels especially appropriate at Christmas or Thanksgiving.

This recipe is also a practical way to use bread that is no longer fresh enough for sandwiches. Slightly dry bread absorbs the vegetable broth and melted butter without immediately falling apart. That produces a cohesive dressing with recognisable pieces of bread instead of a wet or pasty mixture.

Classic Bread Dressing for Holiday Meals

Onion and celery provide the familiar savoury base associated with traditional American stuffing. Cooking them in nondairy butter before combining them with the bread softens their texture and develops their flavour. The vegetables should become translucent and fragrant without browning heavily.

Vegetable broth moistens the bread and distributes the flavours throughout the dish. Add it evenly and toss gently so that some bread cubes do not remain dry while others become saturated. Find more festive accompaniments in the Side Dish recipes collection.

Choosing and Preparing the Bread

A firm white loaf, sourdough, or rustic country bread all work well. Very soft sliced bread can also be used, but it should be thoroughly dried first. Different breads absorb liquid at different rates, so check the consistency before transferring the mixture to the baking dish.

If your bread is fresh, cut it into cubes and dry it in a low oven. The goal is to remove moisture without heavily toasting the cubes. Once dry, allow them to cool before mixing them with the warm vegetables and broth.

For more ways to use loaves, rolls, and homemade dough, browse the Bread recipes on RecipeCollectors.

Creating a Soft Centre and Crisp Top

The dressing should feel moist before baking but should not contain visible pools of broth. An uncovered baking dish allows moisture to escape and encourages the surface to become crisp. Spreading the mixture evenly helps the centre heat through before the top becomes too dark.

Let the dish rest briefly after baking. This gives the absorbed broth time to settle and makes the portions easier to serve. If you prefer an especially crisp topping, return it to the oven uncovered for a few additional minutes.

Variations and Serving Ideas

This homemade bread stuffing provides a useful foundation for other flavours. Sage, thyme, parsley, or rosemary gives it a more aromatic holiday character. Mushrooms add earthy depth, while chopped apple or dried cranberries introduces sweetness. Crumbled vegan sausage can make it richer and more substantial.

Serve it with mashed potatoes, green beans, roasted vegetables, cranberry sauce, or vegan gravy. More comforting dishes for festive menus can be found among the Oven recipes.

The mixture can be assembled in advance, covered, and refrigerated before baking. A chilled dish may require a few additional minutes in the oven. Cool cooked leftovers promptly and refrigerate them in a covered container. Consult the FDA safe food handling guidelines for general storage and reheating advice.

With its short ingredient list, soft interior, and golden crust, classic bread dressing remains a dependable side dish for relaxed family meals and traditional holiday tables.


Italian Cannellini Beans

Italian cannellini beans with roasted red peppers, green olives and tomato sauce

Italian Cannellini Beans

Creamy cannellini beans simmered with roasted red peppers, green olives, tomato, oregano, garlic, and red onion. A hearty Italian one-pot meal packed with Mediterranean flavour.
Couverts4 servings
estimated costs pp $2.25
Deel op Facebook Print Recipe

Equipment

Ingredients

Instructions

  • Heat the olive oil in a medium saucepan over medium heat.
  • Add the chopped red onion and grated garlic.
  • Cook for about 4 minutes, stirring occasionally, until tender and fragrant.
  • Add the cannellini beans, roasted red peppers, green olives, tomato paste, oregano, vegetable broth, salt, and black pepper.
  • Stir until the tomato paste is evenly distributed.
  • Bring the mixture to a gentle boil.
  • Cover the saucepan and reduce the heat to low.
  • Simmer for 30 minutes, stirring occasionally.
  • Remove the lid during the final few minutes if the sauce needs to thicken.
  • Taste and adjust the seasoning if necessary.
  • Serve warm.

Notes & Wine Advice

Serving Suggestions

Serve the cannellini beans with brown rice, crusty bread, creamy polenta, or roasted potatoes. Steamed broccoli, sautรฉed kale, or a fresh green salad completes the meal without making it too heavy.

Recipe Notes

Rinse the canned beans thoroughly to remove excess liquid and sodium. Because the olives, beans, and vegetable broth can already contain salt, taste the finished dish before adding any additional seasoning.

Variations

Add spinach, kale, zucchini, mushrooms, or artichoke hearts for extra vegetables. Chilli flakes provide gentle heat, while fresh basil or parsley adds freshness immediately before serving.

Storage

Allow leftovers to cool before transferring them to an airtight container. Refrigerate for up to four days or freeze for up to two months. Reheat gently in a saucepan, adding a splash of vegetable broth if needed.

Wine Advice

A light Pinot Noir complements the tomato, olives, and creamy beans. A crisp Sauvignon Blanc offers a refreshing contrast to the savoury Mediterranean flavours.

Nutrition values

Serving: 1 serving | Calories: 290 kcal | koolhydraten: 40 g | Eiwitten: 10 g | Vet: 11 g | Verzadigd vet: 2 g | Natrium: 1100 mg | Suiker: 4 g
————————————————————————————————–

Italian cannellini beans are simmered with roasted red peppers, green olives, tomato paste, oregano, garlic, and red onion to create a hearty Mediterranean-style meal. The beans become creamy as they cook, while the peppers contribute sweetness and the olives add a savoury, briny contrast. Everything comes together in one saucepan with very little hands-on work.

Cannellini beans have a mild flavour and soft interior that works particularly well with robust ingredients. They absorb the tomato, garlic, oregano, and vegetable broth while still retaining their shape. This makes the dish substantial enough to serve as a vegan main course but also suitable as a side dish.

Italian Cannellini Beans in One Pan

The recipe begins by gently cooking red onion and garlic in extra-virgin olive oil. This creates an aromatic base before the beans and remaining ingredients are added. Tomato paste provides concentrated flavour and helps form a rich sauce without requiring a long list of ingredients.

Once everything is combined, the covered saucepan holds in moisture and allows the flavours to develop slowly. Stir the mixture occasionally to prevent the beans from catching on the bottom. For more simple meals centred around legumes, explore the Bean recipes collection.

Balancing Peppers, Olives, and Tomato

Roasted red peppers have a naturally sweet flavour that balances the acidity of the tomato paste. Green olives provide saltiness and a firmer texture, preventing the finished dish from tasting flat or overly soft.

Because canned beans, olives, roasted peppers, and vegetable broth may all contain sodium, it is sensible to taste the dish before adding extra salt. Rinsing the cannellini beans thoroughly can remove some of the liquid and salt from the can.

Ways to Serve This Bean Dish

These Mediterranean white beans pair well with ingredients that can absorb their savoury tomato sauce. Serve them over creamy polenta, brown rice, couscous, or mashed potatoes. Crusty bread is a particularly easy choice for a relaxed lunch or family dinner.

For a lighter plate, add steamed broccoli, sautรฉed kale, roasted zucchini, or a simple green salad. More colourful accompaniments can be found among the Vegetable recipes on RecipeCollectors.

The beans can also be served in smaller portions beside grilled vegetables, fish, or another main dish. Their combination of protein, fibre, and vegetables makes them versatile enough for both everyday meals and larger shared menus.

Variations and Make-Ahead Tips

Spinach or kale can be stirred through during the final few minutes of cooking. Mushrooms, artichoke hearts, or chopped zucchini make the dish even more substantial. Chilli flakes add warmth, while fresh basil or parsley gives the finished sauce a brighter flavour.

This is also a useful make-ahead meal because the flavours continue to develop while refrigerated. Prepare it a day in advance and reheat gently in a saucepan, adding a small splash of broth if the sauce has thickened too much. Browse the Main Course recipes for more easy plant-based dinner ideas.

Cool leftovers promptly and store them in a covered container. General information about safe storage and reheating is available in the FDA safe food handling guidelines.

With creamy beans, sweet roasted peppers, savoury olives, and a fragrant tomato sauce, Italian cannellini beans provide a comforting one-pot dinner using practical pantry ingredients.


Tempeh Cannellini Couscous Bake

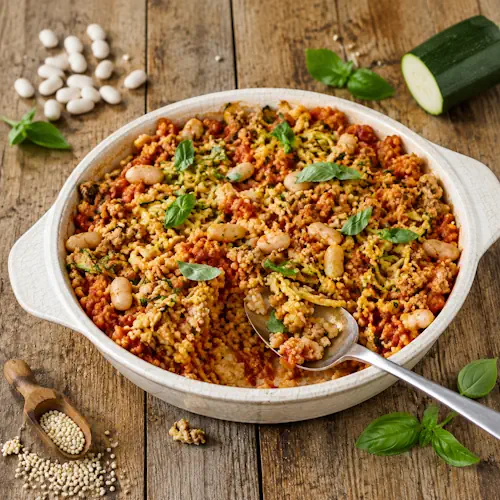
Tempeh couscous bake with cannellini beans, zucchini and tomato

Tempeh Cannellini Couscous Bake

A hearty vegan bake combining creamy cannellini beans, protein-rich tempeh, couscous, zucchini, tomato, garlic, and fresh basil in flavourful foil-baked parcels.
Couverts4 servings
Total time 1 hour 20 minutes
estimated costs pp $2.25
Deel op Facebook Print Recipe

Equipment

  • aluminum foil
  • Baking sheet
  • Food processor
  • oven

Ingredients

Instructions

  • Preheat the oven to 350ยฐF (180ยฐC).
  • Add the tempeh, cannellini beans, tomato sauce, couscous, yellow zucchini, green zucchini, olive oil, basil, garlic, salt, and black pepper to a food processor.
  • Pulse until the ingredients are evenly combined but the mixture remains slightly chunky.
  • Cut two sheets of aluminum foil, each about 12 inches long.
  • Divide the mixture evenly between the two sheets of foil.
  • Place each portion in the centre of the foil and shape it into a compact log.
  • Roll the foil tightly around each portion and twist the ends to seal.
  • Arrange the foil parcels on a baking sheet.
  • Bake for 1 hour.
  • Remove the parcels from the oven and let them rest for 10 minutes.
  • Carefully open the foil, transfer the mixture to a serving bowl, and fluff it with a fork.
  • Serve warm.

Notes & Wine Advice

Serving Suggestions

Serve the bake with steamed greens, roasted vegetables, or a fresh tomato and cucumber salad. It can be enjoyed as a vegan main course or served in smaller portions as a hearty side dish.

Recipe Notes

Pulse the mixture only until evenly combined. Processing it completely smooth will produce a dense texture. Seal the foil parcels tightly so the couscous can absorb the moisture from the tomato sauce and vegetables while baking.

Variations

Add chopped olives, roasted peppers, oregano, or chilli flakes for extra Mediterranean flavour. Chickpeas can replace the cannellini beans, while fresh parsley can be used instead of basil.

Storage

Allow leftovers to cool before storing them in an airtight container in the refrigerator for up to three days. Reheat in the oven or microwave until thoroughly hot, adding a spoonful of vegetable broth if the couscous seems dry.

Wine Advice

A light Chianti complements the tomato, basil, and cannellini beans. A crisp Pinot Grigio is a refreshing white alternative for this vegetable-rich bake.

Nutrition values

Serving: 1 serving | Calories: 220 kcal | koolhydraten: 28 g | Eiwitten: 9 g | Vet: 8 g | Verzadigd vet: 1 g | Natrium: 4603 mg | Suiker: 4 g
————————————————————————————————–

Tempeh couscous bake combines cannellini beans, crumbled tempeh, couscous, zucchini, tomato sauce, garlic, and basil in one hearty plant-based dish. The mixture cooks inside sealed foil parcels, allowing the couscous to absorb moisture and flavour while the beans and tempeh create a satisfying texture. It works as a vegan main course or a substantial side dish.

This unusual preparation method keeps the ingredients moist without requiring the couscous to be cooked separately. Tomato sauce and water released by the zucchini provide liquid, while extra-virgin olive oil adds richness. Fresh basil and garlic give the bake a Mediterranean character that complements the mild beans and nutty tempeh.

Why This Combination Works

Cannellini beans have a creamy texture and delicate flavour, making them a useful partner for firmer, more savoury tempeh. Couscous absorbs the tomato, basil, and garlic flavours while giving the finished dish a light, fluffy base.

Yellow and green zucchini add colour and moisture without dominating the other ingredients. For more dishes featuring legumes as a central ingredient, explore the Bean recipes collection.

Preparing the Tempeh Couscous Bake

Processing the ingredients briefly ensures they are evenly distributed, but the mixture should remain slightly chunky. Blending for too long can turn the beans and tempeh into a paste and produce a heavier finished texture.

Pulse just until no large pieces remain, then divide the mixture evenly between the foil sheets. Shape each portion into a compact log and seal the foil tightly. The enclosed steam helps cook the couscous and prevents the mixture from drying out during its hour in the oven.

Place the parcels on a baking sheet before transferring them to the oven. This provides support and catches any liquid if the foil is accidentally punctured.

Serving It as a Complete Meal

After baking, allow the parcels to rest before opening them. Steam will escape when the foil is unwrapped, so open each parcel carefully and away from your face. Transfer the contents to a bowl and fluff them with a fork to separate the couscous.

Serve this cannellini bean bake with steamed greens, roasted vegetables, or a tomato and cucumber salad. You can find more substantial plant-based ideas among the Main Course recipes.

The dish also works in smaller portions alongside grilled vegetables or a fresh salad. The creamy beans, chewy tempeh, and fluffy couscous provide enough contrasting textures to keep the meal satisfying without needing a heavy sauce.

Simple Variations

Chopped olives, roasted peppers, chilli flakes, oregano, or parsley can all be added for extra Mediterranean flavour. Chickpeas can replace the cannellini beans when you prefer a firmer texture. Finely chopped spinach is another useful addition, although excess moisture should be squeezed out first.

For more inspiration using seasonal produce, browse the Vegetable recipes collection. Leftovers can be added to stuffed peppers, wraps, grain bowls, or salads the following day.

Allow leftovers to cool promptly before transferring them to a covered container. Store them in the refrigerator and reheat until thoroughly hot. General guidance about storing and reheating prepared food is available in the FDA safe food handling guidelines.

With beans, tempeh, vegetables, and couscous together in one parcel, this vegan bake offers a practical way to prepare a filling meal using simple ingredients and minimal washing up.


Spicy Seitan Poppers

Spicy seitan poppers filled with vegan cheese and jalapeรฑos

Spicy Seitan Poppers

Crispy vegan seitan poppers stuffed with creamy vegan cheese and spicy jalapeรฑos, coated in a light beer batter and fried until golden. Perfect for parties and game day.
Couverts4 servings
estimated costs pp $2.50
Deel op Facebook Print Recipe

Equipment

  • cast-iron skillet
  • Measuring cups
  • Mixing Bowl, Large
  • Mixing Bowl, Medium
  • Paper towels
  • Plate

Ingredients

For the Seitan

For the Filling

For the Beer Batter

Instructions

For the Seitan

  • Combine the vital wheat gluten, whole wheat pastry flour, chili powder, paprika, cumin, and black pepper in a large mixing bowl.
  • Add the canola oil, tamari, and water.
  • Mix and knead until a uniform dough forms.
  • Divide the dough into 12 equal pieces.
  • Flatten each piece into a small patty.

For the Filling

  • Place a piece of vegan cheese and 2 jalapeรฑo slices in the centre of each seitan patty.
  • Fold the seitan around the filling and pinch the edges closed.
  • Shape each filled piece into a small log.
  • Repeat until all 12 poppers are filled.

For the Beer Batter

  • Heat about 1/4 inch of canola oil in a cast-iron skillet over medium-high heat.
  • Combine the all-purpose flour, paprika, salt, and black pepper in a medium mixing bowl.
  • Gradually whisk in the beer until a smooth batter forms.
  • Dip each filled seitan popper into the beer batter until completely coated.
  • Carefully place the battered poppers into the hot oil without overcrowding the skillet.
  • Fry for about 3 minutes per side, until crisp and golden brown.
  • Transfer to a paper towel-lined plate to drain.
  • Serve hot.

Notes & Wine Advice

Serving Suggestions

Serve the poppers hot with buffalo sauce, vegan ranch dressing, barbecue sauce, or a spicy mayonnaise for dipping. They are especially suited to game day, parties, movie nights, or a shared snack platter.

Recipe Notes

Seal the seitan firmly around the cheese and jalapeรฑos so the filling stays inside during frying. Fry in small batches to prevent the oil temperature from dropping, which can make the batter absorb too much oil.

Variations

Use a mild vegan cheddar for less heat or add extra jalapeรฑo for a spicier version. Smoked paprika can replace regular paprika for a deeper flavour. A little garlic or onion powder can also be added to the beer batter.

Storage

Store cooled leftovers in an airtight container in the refrigerator for up to three days. Reheat in an oven or air fryer until thoroughly hot and crispy. Avoid reheating in the microwave if you want to preserve the crunchy coating.

Wine Advice

A chilled Riesling works well with the spicy jalapeรฑos because its fresh fruit character balances the heat. A crisp Sauvignon Blanc is another refreshing choice with the rich fried coating.

Nutrition values

Serving: 1 popper | Calories: 210 kcal | koolhydraten: 18 g | Eiwitten: 8 g | Vet: 12 g | Verzadigd vet: 2 g | Natrium: 390 mg | Suiker: 2 g
————————————————————————————————–

Spicy seitan poppers are crispy, golden bites filled with creamy vegan cheese and jalapeรฑos, wrapped in seasoned seitan and finished with a light beer batter. They combine a savoury, chewy centre with a crunchy exterior and enough chilli heat to make them particularly well suited to parties, game days, or a relaxed movie night.

Seitan provides the structure for these poppers. Made primarily from vital wheat gluten, it develops a firm, pleasantly chewy texture when kneaded. Chili powder, paprika, cumin, black pepper, and tamari season the dough from the inside, so the flavour does not depend entirely on the crispy coating.

Building the Filled Seitan Centre

Dividing the dough into equal portions before filling makes the poppers easier to cook evenly. Each piece is flattened before adding vegan cheese and jalapeรฑo slices. The edges are then brought around the filling and firmly sealed.

Take a little extra time when closing them. A good seal helps prevent melted cheese from escaping into the frying oil. If you enjoy plant-based alternatives like this, explore more ideas in the Comfort Food recipes collection.

Why the Beer Batter Gets Crispy

The beer batter creates a different texture from ordinary breading. Flour forms the structure, while beer produces a lighter coating around the seitan. The paprika adds colour and a mild savoury flavour.

Oil temperature matters when frying spicy seitan poppers. If the oil is not hot enough, the coating absorbs excess fat and becomes heavy. Frying in small batches also helps maintain a steady temperature and gives each popper enough room to brown properly.

For more dishes with a crisp golden exterior, browse the Fried Food recipes on RecipeCollectors.

Perfect for Sharing

These vegan jalapeรฑo poppers are made for dipping. Buffalo sauce is a natural choice when you want even more heat, while vegan ranch provides a cool contrast. Barbecue sauce, spicy mayonnaise, or a simple garlic dip also work well.

Serve them as part of a larger snack platter with vegetable sticks, pickles, fries, and other finger foods. More ideas for informal entertaining can be found among the Snack recipes.

Adjusting the Heat and Flavour

The recipe is easy to adapt to different spice preferences. Reduce the amount of jalapeรฑo for a milder popper or add extra slices when you want noticeably more heat. Smoked paprika can replace regular paprika for a deeper character, while garlic or onion powder works well in either the seitan dough or batter.

Different vegan cheeses can also change the result. A cheddar-style variety gives the poppers a familiar sharp flavour, while a milder cheese allows the spices and jalapeรฑos to stand out more clearly.

These poppers are best eaten freshly fried, when the coating is at its crispiest. Refrigerate leftovers promptly and reheat them in an oven or air fryer rather than a microwave. For general information about storing prepared foods safely, follow the FDA safe food handling guidelines.

Crispy outside, chewy inside, and filled with spicy jalapeรฑo and creamy cheese, these plant-based poppers are a satisfying alternative to ordinary party snacks and an easy way to put seitan firmly in the spotlight.