Autumn Quinoa Salad

Autumn Quinoa Salad

This versatile Quinoa Salad is perfect for meal prep and can be customized with a variety of colorful, seasonal ingredients. Quinoa cooked with aromatic spices and broth serves as the base, and then you can mix in your favorite additions. If you don’t have a pressure cooker, you can follow the stovetop instructions on the quinoa package, replacing water with broth infused with the specified spices.
Deel op Facebook Print Recipe

Ingredients

Instructions

  • Use the sauté function of the pressure cooker to heat the oil.
  • Add all the spices and sauté briefly to release their flavors, then turn off the sauté function.
  • Add the quinoa and broth to the spices, and stir well to combine spices, broth, and quinoa.
  • Close and seal the pressure cooker, setting it to high pressure for 1 minute.
  • It will take several minutes to build pressure but will count down once pressurized.
  • Turn off or unplug the pressure cooker once the timer notifies you that the minute is up.
  • Set a timer for 10 minutes to allow the pressure to release naturally.
  • While the quinoa is cooking, blend the vinaigrette ingredients together, or use your preferred store-bought dressing.
  • Quick-release any remaining pressure, then fluff the quinoa with a fork while transferring it to a large baking sheet to cool.
  • Serve the quinoa salad warm or cold with the arugula, dried cherries, and slivered almonds.
  • Toss the salad with the vinaigrette.
  • Enjoy the leftovers throughout the week, customizing your salad with different dried fruits, nuts, seeds, greens, or dressings to find your favorite combinations.

Notes & Wine Advice

Nutrition Analysis:

300 calories
19g fat
0mg cholesterol
220mg sodium
26g carbohydrates
3g dietary fiber
This Autumn Quinoa Salad is a delightful blend of flavors and textures, offering a satisfying and nutritious option for your meal prep routine. Feel free to adapt the ingredients to suit your preferences and embrace the beauty of the season’s produce.
————————————————————————————————–
Course; Salad
Diets; Gluten-Free

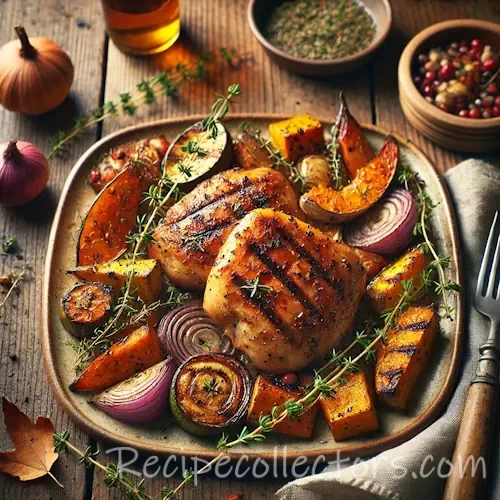
Autumn-Inspired Grilled Chicken

Autumn-Inspired Grilled Chicken on rustic wooden table

Autumn-Inspired Grilled Chicken

This recipe bridges the gap between summer and autumn, infusing the beloved tradition of summer grilling with the warmth and comfort of anti-inflammatory and immune-boosting herbs and spices. Prepare the quick and easy marinade on a leisurely Saturday and savor a stress-free Sunday dinner, with plenty of leftovers for weekday lunches.
Deel op Facebook Print Recipe

Ingredients

Instructions

  • Generously season the raw chicken pieces with kosher salt and pepper on both sides.
  • Prepare the marinade by blending garlic, honey, turmeric, ginger, lemon juice, and olive oil until it forms a smooth mixture.
  • Marinate the chicken for 24 hours or overnight in a large sealed bag or container.
  • Flip it halfway through to ensure an even coating.
  • Remove the marinated chicken from the fridge and allow it to come closer to room temperature.
  • Preheat your grill to low heat.
  • For tender meat and crispy skin, cook the chicken with the skin side up over indirect heat.
  • *
  • Cook the chicken, covered, for 45 minutes to 1 hour, or until the internal temperature reaches about 160 degrees Fahrenheit (it will continue to cook after removal).
  • Let the chicken rest for 10 minutes to ensure it remains juicy.
  • Serve the grilled chicken, garnished with your favorite herbs (chives are pictured).
  • *For gas grills, heat the outside burners on low and cook the chicken in the middle.
  • For charcoal grills, heat the coals on one side only and place the chicken on the other.

Notes & Wine Advice

Nutrition Analysis:

410 calories
31g fat
85mg cholesterol
80mg sodium
11g carbohydrates
This Autumn-Inspired Grilled Chicken beautifully captures the essence of the season. Embrace the flavors and warmth of autumn while enjoying the simple pleasures of grilled chicken. Feel free to customize, substitute, or adjust the recipe according to your preferences and what’s available to you. Enjoy the taste of the season!
————————————————————————————————–
Course; Chicken
Diets; Gluten-Free

Beet and Halloumi Appetizer

Beet and Halloumi Appetizer

This vibrant Beet and Halloumi Appetizer is a delightful combination of flavors and textures. Grilled beets and halloumi cheese come together beautifully, complemented by a simple balsamic reduction and fresh basil for a refreshing start to your meal.
Deel op Facebook Print Recipe

Ingredients

  • 4 medium beets use your preferred color or a combination
  • 2 tablespoons extra-virgin olive oil divided
  • Salt and pepper to taste
  • 12 slices of halloumi cheese approximately ¼-inch thick
  • 1 tablespoon approximately Simple Balsamic Reduction (recipe on page 31)
  • A small handful of basil finely sliced into strips
  • Makes: 6 servings 2 appetizers per person

Instructions

  • Preheat your grill to medium heat.
  • Begin by washing the beets thoroughly.
  • There’s no need to peel them; the peel is easier to remove after they’re cooked.
  • Drizzle each beet with 1 teaspoon of olive oil, then season with a sprinkle of salt and some fresh ground pepper.
  • Individually wrap each beet in foil, ensuring the oil coats the entire surface as you wrap them.
  • Grill the beets for approximately 45 minutes or until they become fork-tender.
  • Once the beets are done grilling, remove them from the grill, and carefully vent the foil to prevent overcooking.
  • The cooked beet skin can be easily slipped off with your hands.
  • Place the halloumi cheese slices directly on the grill and cook for about 2 minutes on each side, turning them when they become golden brown.
  • Remove the halloumi slices from the grill once they are golden on both sides.
  • Assemble the dish by cutting the warm beets into 3-4 even slices.
  • Add a slice of grilled halloumi to each beet slice, sprinkle them with the remaining olive oil, and season with salt to taste.
  • Drizzle the balsamic reduction over the beets and halloumi, and finish by garnishing with the sliced basil.

Notes & Wine Advice

Nutrition Analysis:

360 calories
23g fat
50mg cholesterol
830mg sodium
22g carbohydrates
4g dietary fiber
17g sugar
17g protein
Enjoy this Beet and Halloumi Appetizer as a delightful and colorful addition to your meal. It’s a feast for the eyes and the palate!
————————————————————————————————–
Course; Appetizer
Diets; Gluten-Free

Pumpkin Coffee Cake

Pumpkin Coffee Cake

This Pumpkin Coffee Cake is a delightful treat, perfect for sharing during cozy gatherings or as a comforting dessert. It’s a moist and flavorful cake with a crumbly cinnamon topping that pairs wonderfully with a cup of coffee or tea.
Deel op Facebook Print Recipe

Ingredients

For the Cake:

For the Cinnamon Topping:

Serves: 4-6

Instructions

  • Preheat your oven to 350°F (175°C) and grease a 9×9-inch baking dish.
  • In a medium-sized bowl, whisk together the flour, baking powder, baking soda, ground cinnamon, nutmeg, cloves, and salt.
  • In a separate large mixing bowl, combine the pumpkin puree, granulated sugar, brown sugar, vegetable oil, eggs, and vanilla extract.
  • Mix until well combined.
  • Gradually add the dry ingredients to the wet ingredients, mixing until just combined.
  • Pour the cake batter into the greased baking dish, spreading it out evenly.
  • To make the cinnamon topping, in a small bowl, mix together the granulated sugar, flour, and ground cinnamon.
  • Cut in the cold cubed butter using a pastry cutter or a fork until the mixture resembles coarse crumbs.
  • Sprinkle the cinnamon topping evenly over the cake batter.
  • Bake in the preheated oven for 30-35 minutes, or until a toothpick inserted into the center comes out clean and the cake is golden brown.
  • Allow the coffee cake to cool slightly before serving.
  • It’s delicious when served warm or at room temperature.

Notes & Wine Advice

Enjoy your Pumpkin Coffee Cake as a delightful dessert or sweet snack!
The provided recipe is for a Pumpkin Coffee Cake and does not align with the description of loaded nachos in your initial request. If you have a nacho recipe you’d like me to rewrite, please provide the nacho recipe separately, and I’ll be happy to assist you.)
————————————————————————————————–
Course; Cake
Diets; Gluten-Free

Dutch Baby Pancake

Dutch Baby Pancake

This Dutch Baby Pancake is a culinary spectacle that combines the best of both pancakes and popovers. It’s a delightful oven-baked treat that magically puffs up to impressive heights during the baking process. While we’ve included a sautéed apple topping that adds a burst of flavor, you can also opt for a simple dusting of powdered sugar or a sprinkling of fresh berries to elevate the pancake’s taste.
Deel op Facebook Print Recipe

Ingredients

Pancake:

Serves: 4

Instructions

  • Preheat your oven to 400°F (200°C).
  • Place the butter into an 8-inch cast-iron skillet and put the skillet in the oven to melt the butter.
  • In a medium bowl, whisk together the eggs and milk until you have a smooth mixture.
  • Add the flour and sugar, then whisk until smooth, ensuring there are no lumps (about 1 minute).
  • Remove the skillet from the oven and carefully rotate it to coat the inside with the melted butter.
  • Then, pour the batter into the hot skillet and return it to the oven.
  • Bake the pancake for 20 to 25 minutes, or until it puffs up in the center and turns golden brown along the edges.
  • If you choose to prepare the Apple Topping, do so while the Dutch Baby bakes.
  • Melt the butter in a medium nonstick skillet over medium heat.
  • Add the apple slices, sugar, and cinnamon, stirring to combine.
  • Reduce the heat to low and stir occasionally.
  • Cook until the apples are soft, which should take about 20 minutes.
  • If the apples are ready before the pancake, turn off the heat.
  • Once the pancake is done, remove it from the oven, and top it with the cooked apples if you’ve prepared the topping.
  • Serve the Dutch Baby Pancake immediately.

Notes & Wine Advice

Nutrition Analysis (for the pancake):
280 calories
7g fat
210mg cholesterol
95mg sodium
27g carbohydrates
0g dietary fiber
5g sugar
9g protein
Enjoy your delightful Dutch Baby Pancake with either the apple topping or your choice of sweet accompaniments!
————————————————————————————————–
Cuisine; Dutch / European
Diets; Gluten-Free

Rainbow Quinoa Bowls

Rainbow Quinoa Bowls

These vibrant bowls are bursting with flavor. While there are several steps in making this recipe, they can all be completed in under an hour. You can prepare the quinoa and chickpeas while the vegetables are roasting. To save time, you can also cut the vegetables and mix up the dressing the night before and store them in the refrigerator.
Deel op Facebook Print Recipe

Ingredients

VEGETABLES:

QUINOA:

  • 2 cups gluten-free chicken or vegetable stock
  • 1 cup quinoa rinsed

CHICKPEAS:

  • 1 15- ounce can chickpeas drained, rinsed, and patted dry
  • 2 teaspoons olive oil
  • ½ teaspoon ground chipotle pepper

DRESSING:

SERVES 4

Instructions

  • Preheat the oven to 425°F.
  • Lightly grease a large rimmed baking sheet.
  • In a small bowl, toss grape tomatoes with ½ teaspoon olive oil.
  • Place tomatoes in a row on the baking sheet.
  • Repeat with remaining vegetables, tossing each type with a ½ teaspoon oil and placing in a row on the baking sheet.
  • If the baking sheet seems crowded, divide the vegetables between two rimmed baking sheets.
  • Sprinkle kosher salt and freshly ground black pepper evenly over the vegetables.
  • Roast until the vegetables are tender, about 25 minutes.
  • Combine quinoa and chicken stock in a small saucepan.
  • Bring to a boil, then stir.
  • Cover and reduce heat to low.
  • Simmer until tender, about 20 minutes.
  • Prepare the chickpeas.
  • Heat olive oil in a large nonstick skillet over medium heat until hot.
  • Add chickpeas and cook until light brown, stirring frequently.
  • Turn off the heat and add chipotle powder.
  • Stir to combine.
  • For the sauce, stir together the yogurt, garlic, and lemon juice in a small bowl.
  • Add milk to thin it as needed.
  • Season with salt and pepper to taste.
  • To assemble the bowls, divide the quinoa and vegetables evenly among 4 bowls.
  • Top with chickpeas and sauce.

Notes & Wine Advice

Nutrition Analysis: 310 calories, 9g fat, 5mg cholesterol, 430mg sodium
————————————————————————————————–
Course; Poké bowl
Diets; Gluten-Free

Southwest BBQ Breakfast on the Go

Southwest BBQ Breakfast on the Go

If you’re a fan of breakfast with a little kick, you’ll love this quick and easy vegetarian recipe that’s ready in about 10 minutes. All you need is an egg, 1/4 cup of your preferred salsa, half an avocado, and a flavorful Southwestern BBQ Q Cup™ for a convenient and satisfying breakfast that’s perfect for when you’re on the move
Deel op Facebook Print Recipe

Ingredients

  • 1 Ellyndale® Q Cupâ„¢ Southwestern BBQ
  • 1 egg
  • 1/2 avocado sliced
  • 1/4 cup of your favorite salsa
  • Prep Time: 5 minutes / Cook Time: 5 minutes

Instructions

  • Place 1/4 cup of water into the Q Cupâ„¢ and stir.
  • Crack the egg on top of the open Q Cupâ„¢ and microwave for one minute.
  • Cover and let it sit for five minutes.
  • Add sliced avocado and your favorite salsa.
  • Replace the cover, and you have the perfect portable breakfast!
  • Enjoy!
————————————————————————————————–
Course; Barbecue / Breakfast
Diets; Gluten-Free

Chocolate Banana Loaf

Chocolate Banana Loaf

Deel op Facebook Print Recipe

Ingredients

  • 2 free-range eggs
  • 80 g 2¾oz olive oil (coconut oil can be used instead if desired)
  • 60 ml 2fl oz milk (or water)
  • 1 tsp vanilla paste optional
  • 100 g 3½oz honey
  • 4 ripe bananas peeled, plus extra for decorating
  • 1 tsp bicarbonate of soda
  • 100 g 3½oz chestnut flour
  • 50 g 1¾oz gluten-free plain flour
  • 50 g 1¾oz cacao powder
  • 1 tsp cinnamon
  • Serving Size: 6 / Calories per Serving: 367
  • Preparation Time: 20 minutes / Cooking Time: 1 hour 10 minutes

Instructions

  • Preheat your oven to 160ºC and line a medium loaf tin with baking paper.
  • In a mixing bowl, whisk together the eggs, olive oil (or coconut oil), milk (or water), vanilla paste (if using), and honey.
  • Mash the ripe bananas with a fork and add them to the egg mixture, whisking together until well combined.
  • In another bowl, mix together the bicarbonate of soda, chestnut flour, gluten-free plain flour, cacao powder, and cinnamon.
  • Pour the dry ingredients into the wet mixture and combine with a wooden spoon.
  • Pour the mixture into the prepared baking tin.
  • Slice an extra banana and place the slices on top of the mixture.
  • Put the tin in the oven and bake for about 1 hour and 10 minutes.
  • After an hour of baking, test the loaf by poking a skewer or knife into the middle.
  • If it comes out clean, remove it from the oven.
  • If not, continue baking for another 10 minutes.

Notes & Wine Advice

Allow the banana loaf to cool and store it in an airtight container. It can be kept for up to 5 days.
Enjoy your delicious Chocolate Banana Loaf, a moist and flavorful treat perfect for any time of day!
————————————————————————————————–
Course; Chocolate / Fruit
Diets; Gluten-Free