There’s not much you can do to improve upon a chicken parm sandwich in my opinion. The marriage of a fried chicken cutlet, somehow staying crispy while bathed in warm tomato sauce and blanketed in gooey mozzarella cheese, all stuffed inside a soft sesame-seed roll is heaven. But for this air-fried version, I wanted to infuse a bit of my favorite spice, smoked paprika, into the chicken and up the “smoky” flavor with pleasantly pungent smoked mozzarella. It gives the sandwich a certain “wood-fired” quality that’s a wonderful change of pace, whether at a barbecue in the summer or a cold cabin during the winter, all without having to strike a match.
2store-bought softsesame-seed hamburger or Italian buns, split
Instructions
Season the chicken cutlets all over with salt and pepper.
Set up three shallow bowls: Place the flour in the first bowl, the eggs in the second, and stir together the breadcrumbs and smoked paprika in the third.
Coat the chicken pieces in the flour, then dip fully in the egg.
Dredge in the paprika breadcrumbs, then transfer to a wire rack set over a baking sheet and spray both sides liberally with cooking spray.
Transfer 2 of the chicken cutlets to the air fryer and cook at 350°F until beginning to brown, about 6 minutes.
Spread each cutlet with 2 tablespoons of the marinara sauce and sprinkle with one-quarter of the smoked mozzarella.
Increase the heat to 400°F and cook until the chicken is cooked through and crisp and the cheese is melted and golden brown, about 5 minutes more.
Transfer the cutlets to a plate, stack on top of each other, and place inside a bun.
Repeat with the remaining chicken cutlets, marinara, smoked mozzarella, and bun.
In my opinion, “crispy chickpeas” never lived up to their promise, and were a constant disappointment when I made them whether they were deep-fried or roasted in the oven. They often came out too soggy and chewy, rather than truly crispy. So I set out to see if the air fryer did a better job. And I can confidently say, it does the best job I’ve ever witnessed of making actually crisp chickpeas. The high heat, circulating at a super-fast speed, dries out the chickpeas so they’re almost dehydrated. Be careful, or you’ll start eating these and wake up 5 minutes later to an empty bowl.
In a large bowl, combine all the ingredients except the kosher salt and black pepper and toss until the chickpeas are evenly coated in the herbs and spices.
Scrape the chickpeas and seasonings into the air fryer and cook at 350°F until browned and crisp, 6 to 12 minutes, shaking the basket halfway through.
Transfer the crispy chickpeas to a bowl, sprinkle with kosher salt and black pepper, and serve warm.
Notes & Wine Advice
During testing, I found that different brands of canned chickpeas “fry” up at wildly different rates. Some brands only took 6 minutes to get crisp, while other brands, where the chickpeas were comparatively larger in size and meatier, took almost double that. Hence, the range in cooking time for this recipe. Start out with your favorite go-to brand and cook them for 6 minutes. If they’re not crisp enough after that, continue cooking in 2-minute intervals until they are. Then you’ll know the correct amount of time for that specific brand.
In a large bowl, toss the onion with the olive oil, salt, and sugar.
Transfer to a 7-inch round cake pan insert, metal cake pan, or foil pan, place the pan in the air fryer, and cook at 300°F, stirring every 5 minutes, until browned and crispy and lightly caramelized in parts, 30 to 40 minutes.
Notes & Wine Advice
If you want to have these potato skins even faster, use your microwave! Simply poke the potatoes all over with the tines of a fork, then cook until tender, about 10 minutes on high power. Once cooled slightly, brush the oil on the skin side of the potato shells before filling them and transferring to the air fryer to finish cooking.
If you’ve ever wanted to throw an impromptu cocktail party after work, all you need is this ridiculously simple nut mix on hand that’s ready to serve in less than 10 minutes. The nuts fry up crunchy and hot, the perfect complement to icy-cold cocktails. You can use 2 cups of any kind of nuts, or, for a shortcut, pick up a can of mixed nuts on your way home from work—just use half the amount of salt here since the mixed nuts come salted and check them after cooking for 4 minutes to see if they’re done since the canned nuts also come preroasted.
In a large bowl, combine all the ingredients and toss until the nuts are evenly coated in the herbs, spices, and sugar.
Scrape the nuts and seasonings into the air fryer and cook at 350°F until golden brown and fragrant, about 6 minutes, shaking the basket halfway through.
Transfer the cocktail nuts to a bowl and serve warm.
Spiralize the potato with a spiralizer. If you do not have a spiralizer, cut the potato into thin ⅛-inch-thick matchsticks.
Place the potato in a large colander and rinse under cold running water until the water runs clear.
Spread the potato over a double layer of paper towels and pat completely dry.
Combine the potato, vegetable oil, smoked paprika, and garlic powder in a large mixing bowl. Season with kosher salt and freshly ground black pepper and toss until evenly coated.
Transfer the potato to the air fryer and cook at 400°F (204°C) for 15 minutes, shaking the basket halfway through, until browned and crisp.
Meanwhile, blend the crushed tomatoes, apple cider vinegar, brown sugar, Worcestershire sauce, and hot sauce until smooth.
Transfer the tomato mixture to a small saucepan and simmer over medium heat for 3 to 5 minutes, until reduced by approximately half.
Pour the spicy tomato ketchup into a serving bowl and allow it to cool slightly.
Remove the crispy potato from the air fryer and serve immediately with the spicy tomato ketchup.
Notes & Wine Advice
Serving Suggestions
Serve the potato nests immediately while they are hot and crisp, with the spicy tomato ketchup alongside for dipping. They make an easy Side Dish with burgers or grilled dishes and also work well as a crunchy Snack for sharing. For a larger selection, combine them with recipes from the Dips collection.
Recipe Notes
Rinse the spiralized potato thoroughly to remove excess surface starch and dry it completely before adding the oil and seasonings. Remaining moisture can prevent the potato from becoming crisp. Shake the basket halfway through cooking so the strands brown more evenly. Find more crispy potato dishes in the Potatoes collection.
Variations
If you do not have a spiralizer, cut the potato into thin ⅛-inch matchsticks and follow the same method. Adjust the hot sauce in the ketchup to control the heat. For more dishes with similar flavours, browse the Spain collection or explore other recipes in Airfryer.
Storage and Reheating
Store leftover potatoes and ketchup separately in airtight containers in the refrigerator. Reheat the potatoes briefly in the Airfryer until hot and crisp. The ketchup can be served cold or gently reheated in a saucepan. The potatoes are best served freshly cooked because they gradually lose their crisp texture during storage.
Wine Advice
A fresh, crisp Sauvignon Blanc provides a refreshing contrast to the smoked paprika, spicy ketchup, and crisp potato. Its acidity also works well when these potato nests are served as a savoury Appetizer.
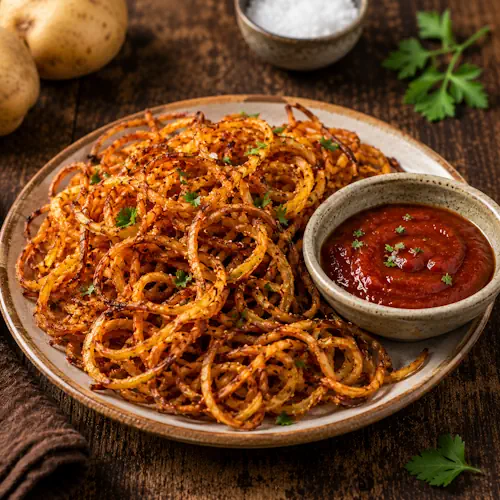
Crispy Potato Nests turn an ordinary russet potato into a crunchy Airfryer dish with plenty of texture. The potato is spiralized into thin strands, seasoned with hot smoked paprika and garlic powder, and cooked until browned and crisp. A homemade spicy tomato ketchup made with crushed tomatoes, apple cider vinegar, brown sugar, Worcestershire sauce, and hot sauce provides a sweet, tangy, and gently spicy accompaniment.
The inspiration is closely related to the crisp potato and paprika flavours associated with Spanish-style potatoes. However, spiralizing the potato creates considerably more exposed surface area. That means more edges can become browned during cooking, giving this recipe a particularly crunchy character. Explore the Spain collection for more dishes with Spanish influences.
Why Spiralizing Makes Potatoes Crisp
A whole potato contains relatively little exposed surface compared with the same potato cut into thin strands. A spiralizer changes that dramatically. The long, narrow pieces expose much more potato directly to the circulating hot air, allowing moisture to escape rapidly while the exterior browns.
Removing surface starch is equally useful. Rinsing the potato under cold running water until the water becomes clear removes loose starch from the cut surfaces. Drying the strands thoroughly afterwards is essential because excess water works against browning. Once dry, the potato can be coated with vegetable oil, smoked paprika, and garlic powder.
Cooking the Potato in the Air Fryer
The Airfryer cooks the thin potato strands at 400°F (204°C). At this relatively high temperature, the exterior browns quickly while the thin pieces cook through. Shaking the basket halfway through redistributes the strands and helps prevent the bottom portion from cooking differently from the pieces exposed directly to the circulating air.
The finished potato should have deeply golden edges and a crisp texture. Because spiralizers produce slightly different thicknesses, the exact cooking time can vary. Check the potatoes near the end of the fifteen-minute cooking period and remove them when they have reached the desired degree of browning.
Making the Spicy Tomato Ketchup
The homemade ketchup gives this Potatoes recipe much of its character. Crushed tomatoes form the base, while apple cider vinegar supplies acidity and dark brown sugar adds sweetness. Worcestershire sauce contributes savoury depth, and mild hot sauce provides gentle heat.
Blending the ingredients creates a smooth mixture before cooking. Simmering it for several minutes then reduces the water content and concentrates the flavours. Reducing the mixture by approximately half produces a thicker consistency that clings more effectively to the crisp potato strands.
Serving Ideas and Variations
Serve the potato nests as a Side Dish, Snack, or part of a Party spread. The spicy tomato ketchup can be placed in a small bowl in the centre so the crisp potato strands can be dipped individually.
A spiralizer is useful but not essential. Cutting the potato into very thin matchsticks produces a similar result, although the finished appearance will be different. You can also adjust the amount of hot sauce in the ketchup according to how spicy you want the finished dish.
Storage and Food Safety
These potatoes are best eaten directly from the air fryer. Refrigeration introduces moisture and softens their crisp exterior. If leftovers remain, store the potatoes separately from the ketchup and reheat them using dry heat in the air fryer rather than a microwave. This gives them the best chance of regaining some crunch.
Keep the homemade ketchup refrigerated when it is not being served and refrigerate leftovers promptly. For current information about safe preparation, storage, and handling of food at home, follow the FDA food safety guidance. Served fresh and hot, these crispy potato nests combine the familiar appeal of fried-style Potatoes with the convenience of air frying and a punchy homemade dipping sauce.
The air fryer was made for fries, so it’s no surprise that it does a great job cooking a potato to crisp perfection. To capitalize on that effect, I made these shoestring fries, which “fry” up super crunchy and golden. Eat them out of hand by the palmful or use them in place of store-bought potato sticks. At your next party, triple this recipe and cook in batches, then pile the fries high on a giant plate and set them out for a crowd-pleasing party snack that is more impressive than a bowl of nuts.
Place the julienned potatoes in a large colander and rinse under cold running water until the water runs clear.
Spread the potatoes out on a double-thick layer of paper towels and pat completely dry.
In a large bowl, combine the potatoes, oil, and rosemary.
Season with kosher salt and pepper and toss to coat evenly.
Place the potatoes in the air fryer and cook at 400°F, shaking the basket every 5 minutes and adding the garlic in the last 5 minutes of cooking, until the fries are golden brown and crisp, about 18 minutes.
Transfer the fries to a plate and sprinkle with flaky sea salt while they’re hot.
Notes & Wine Advice
Classic French FriesMy aim was to develop the most creative potato recipes I could for this book, but I couldn’t leave out your basic, classic french fry, for which the air fryer was originally invented. These fries are markedly better than a regular oven-baked fry, since the convection crisps the outside without drying out the inside. To make them: Cut 1 large russet potato into ½-inch-square sticks. Rinse with water and toss with oil just as instructed in the shoestring fry recipe, then fry at 375°F for 25 minutes, until browned and crispy, shaking the basket every 5 to 7 minutes to make sure they’re browning evenly.
Sweet Potato FriesSweet potato fries(SPF) often get a bad rap because they don’t fry up as crisp as regularpotatoes. But these air fryer SPFs cook up with remarkably crunchy exteriorsand are coated with lots of spices to balance the often too-sweet spud.
In a large bowl, combine the olive oil, paprika, salt, chili powder, cumin, turmeric, mustard powder, and cayenne.
Add the sweet potatoes, season with black pepper, and toss to evenly coat.
Transfer the sweet potatoes to the air fryer (save the bowl with the leftover oil and spices) and cook at 400°F, shaking the basket halfway through, until golden brown and crisp, about 15 minutes.
Return the potato wedges to the reserved bowl and toss again while they are hot out the fryer.
Meanwhile, in a small bowl, stir together the sour cream and garlic.
Season with salt and black pepper and transfer to a serving dish.
Serve the potato wedges hot with the garlic sour cream.
Toss the shishito peppers with the vegetable oil in a mixing bowl until evenly coated. Season with kosher salt and freshly ground black pepper.
Transfer the peppers to the air fryer and cook at 400°F (204°C) for about 6 minutes, shaking the basket halfway through, until blistered and lightly charred.
Meanwhile, whisk the mayonnaise, basil, parsley, tarragon, chives, lemon zest, and lemon juice together in a small bowl until evenly combined.
Pile the hot shishito peppers onto a serving plate and sprinkle with flaky sea salt.
Serve immediately with the Green Goddess dressing alongside for dipping.
Notes & Wine Advice
Serving Suggestions
Serve the blistered shishito peppers immediately while they are still hot, with the cool Green Goddess dressing alongside for dipping. They work particularly well as an Appetizer or Snack and can also accompany dishes from the Barbecue collection.
Variations
For a sharper dressing, add a little extra fresh lemon juice. You can also adjust the proportions of basil, parsley, tarragon, and chives according to the herbs you have available. The same Green Goddess dressing works well with other recipes from the Vegetables collection.
Storage and Reheating
The peppers are best served immediately because their blistered exterior softens during storage. Refrigerate leftovers in a covered container and reheat briefly in the Airfryer. Store the Green Goddess dressing separately in the refrigerator and serve it chilled.
Wine Advice
A fresh Sauvignon Blanc is a good match for the green flavours of the shishito peppers, fresh herbs, and lemon. Its acidity also provides a pleasant contrast to the creamy mayonnaise-based dressing. Explore suitable wines at René’s Wijnbeleving.
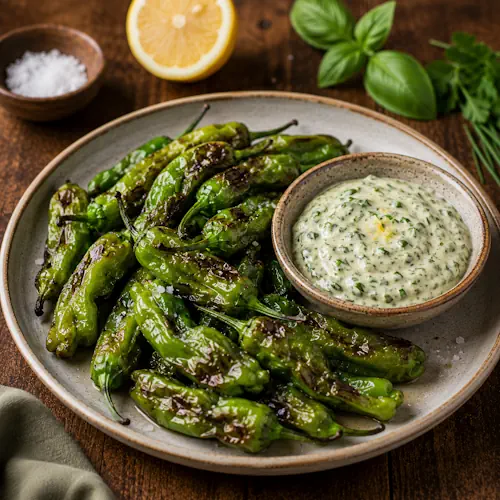
Blistered Shishito Peppers are a quick Airfryer dish built around the contrast between hot, lightly charred peppers and a cool, creamy herb dressing. Shishito peppers have thin skins, making them particularly suitable for high-temperature cooking. In only a few minutes, their surfaces blister and develop dark roasted spots while the peppers themselves become tender. Using an air fryer achieves this effect with just one tablespoon of vegetable oil.
The Green Goddess-style dressing provides the counterpoint. Mayonnaise creates a rich and creamy base, while basil, flat-leaf parsley, tarragon, and chives add several layers of fresh herbal flavour. Lemon zest and fresh lemon juice brighten the dressing and help balance the richness of the mayonnaise. Together, the hot peppers and chilled dressing create a simple dish with considerably more flavour than its short ingredient list might suggest.
Why Shishito Peppers Work in the Air Fryer
Shishito peppers are traditionally well suited to fast cooking at high temperatures. Their thin skins react quickly to heat, blistering before the interior becomes overly soft. The circulating hot air in an Airfryer creates a similar effect without requiring a wok or a large quantity of oil.
Coating the peppers lightly with vegetable oil helps conduct heat across their uneven surfaces. Cooking them at 400°F (204°C) encourages rapid blistering and light charring. Shaking the basket halfway through exposes different sides of the peppers to the strongest airflow and promotes more even cooking.
The Green Goddess Dressing
The dressing transforms these peppers from a simple roasted Vegetables dish into something suitable for sharing as an Appetizer. Green Goddess dressings are characterised by their generous use of fresh green herbs, and this version combines basil, parsley, tarragon, and chives.
The herbs each contribute something different. Basil adds a fresh aromatic quality, parsley keeps the dressing bright, tarragon contributes its distinctive herbal character, and chives add a mild onion note. Lemon zest and juice tie those flavours together while cutting through the richness of the mayonnaise.
Serving the Peppers
The peppers should be served as soon as they leave the air fryer. Sprinkle them with flaky sea salt while they are still hot and place the dressing alongside rather than pouring it over the peppers. Keeping the dressing separate preserves the blistered texture and allows each pepper to be dipped individually.
This makes the recipe especially convenient for a Party, Game Day, or relaxed Weekend meal. It can also be served as a Side Dish alongside grilled foods or as part of a larger selection of vegetable dishes.
Heat and Flavour
One of the distinctive characteristics of shishito peppers is that their heat can vary. Most have a relatively mild flavour, while an occasional pepper can be noticeably hotter. The creamy Green Goddess dressing is particularly useful here because its richness and fresh herbs provide contrast when a hotter pepper appears.
Flaky sea salt added immediately before serving gives the peppers small bursts of salinity without masking their roasted flavour. Because the ingredient list is intentionally simple, the final result depends heavily on cooking the peppers until properly blistered rather than merely warming them.
Storage and Food Safety
For the best texture, prepare only as many peppers as you expect to serve immediately. Leftover peppers can be refrigerated and reheated in the air fryer, although they will not be quite as crisp as freshly cooked peppers. Keep the mayonnaise-based Green Goddess dressing refrigerated separately and do not leave it sitting at room temperature unnecessarily.
For current guidance on storing and handling mayonnaise-based preparations and other perishable foods safely, consult the FDA food safety guidance. With only a few minutes of cooking, these blistered shishito peppers make a quick addition to the Vegetables collection and an easy way to combine charred, fresh, creamy, and occasionally spicy flavours in one dish.
Masala-Spiced Onion Rings With Mint-Mayo Dipping Sauce
Onions pair particularly well with Indian spices, so when I developed these onion rings, I wanted to flavor them with spices used in Indian cuisine to add zest and fun to the typical, rote onion ring. Instead of calling for dozens of different spices, use garam masala and curry powder spice mixes to get the job done, with a little extra paprika and salt for color and flavor.
Trim the ends from the onion and peel away the papery outer skin.
Cut the onion crosswise into ¾- to 1-inch-thick slices, then separate the slices into rings, discarding the feathery skin between the rings.
In a small bowl, whisk together the garam masala, paprika, curry powder, and salt.
Place the flour, eggs, and breadcrumbs in three separate shallow bowls and season each with one-third (2 tablespoons plus 2½ teaspoons) of the spice mixture.
Dip 1 onion ring in the spiced egg, dredge in the flour, then repeat with the egg and flour once more.
Dip the ring back into the egg again, then coat in the spiced breadcrumbs.
Repeat to coat all the onion rings and arrange them on a wire rack set over a baking sheet.
Place the onion rings in the freezer and chill until firm, at least 30 minutes or up to 1 week.
Meanwhile, whisk together the mayonnaise, mint, lemon juice, and scallion in a bowl and season with salt.
Refrigerate to marry the flavors in the sauce while the onion rings freeze.
When ready to fry, spray 5 or 6 of the onion rings liberally with cooking spray and arrange them loosely in the air fryer basket, laying some flat and leaning some against the side of the basket.
Cook at 375°F until the onion rings are tender and the breading is golden brown and crisp, about 10 minutes.
Season with more salt once they come out of the fryer and continue frying as many onion rings as you like.
Serve hot with the mint-mayo sauce and ketchup on the side.
Notes & Wine Advice
To make plain onion rings, simply omit all the spices. Season the flour, egg, and breadcrumbs with salt and freshly ground black pepper. And if you only have large yellow or white onions, you can substitute them just as easily for the red onion.
Growing up near Memphis, I became loyal to their signature “dry” ribs early on in life, preferring them to the “wet,” or sauced, kind found elsewhere. There are many theories about how best to cook ribs (boil first then grill, or barbecue slow and low the whole way?), but in the air fryer, you can have tender, pull-apart ribs in a fraction of the traditional time. The spice rub ensures a crunchy, caramelized exterior “shell” as well, so there’s nothing missing here except the hefty barbecue grill and all the mess that comes along with it.
To provide the best experiences, we use technologies like cookies to store and/or access device information. Consenting to these technologies will allow us to process data such as browsing behavior or unique IDs on this site. Not consenting or withdrawing consent, may adversely affect certain features and functions.
Functional
Always active
The technical storage or access is strictly necessary for the legitimate purpose of enabling the use of a specific service explicitly requested by the subscriber or user, or for the sole purpose of carrying out the transmission of a communication over an electronic communications network.
Preferences
The technical storage or access is necessary for the legitimate purpose of storing preferences that are not requested by the subscriber or user.
Statistics
The technical storage or access that is used exclusively for statistical purposes.The technical storage or access that is used exclusively for anonymous statistical purposes. Without a subpoena, voluntary compliance on the part of your Internet Service Provider, or additional records from a third party, information stored or retrieved for this purpose alone cannot usually be used to identify you.
Marketing
The technical storage or access is required to create user profiles to send advertising, or to track the user on a website or across several websites for similar marketing purposes.
To provide the best experiences, we use technologies like cookies to store and/or access device information. Consenting to these technologies will allow us to process data such as browsing behavior or unique IDs on this site. Not consenting or withdrawing consent, may adversely affect certain features and functions.
Functional
Always active
The technical storage or access is strictly necessary for the legitimate purpose of enabling the use of a specific service explicitly requested by the subscriber or user, or for the sole purpose of carrying out the transmission of a communication over an electronic communications network.
Preferences
The technical storage or access is necessary for the legitimate purpose of storing preferences that are not requested by the subscriber or user.
Statistics
The technical storage or access that is used exclusively for statistical purposes.The technical storage or access that is used exclusively for anonymous statistical purposes. Without a subpoena, voluntary compliance on the part of your Internet Service Provider, or additional records from a third party, information stored or retrieved for this purpose alone cannot usually be used to identify you.
Marketing
The technical storage or access is required to create user profiles to send advertising, or to track the user on a website or across several websites for similar marketing purposes.