
Spiced Spf With Garlic Sour Cream Dip

Spiced Spf With Garlic Sour Cream Dip

This recipe makes spiced sweet potato fries cooked in an air fryer for a crispy texture. It includes a garlic sour cream dip to complement the fries.
Couverts4 servings
Total time 30 minutes
estimated costs pp 2.50
Deel op Facebook Print Recipe

Ingredients

Instructions

  • In a large bowl, combine 4 tablespoons olive oil, 3 teaspoons smoked paprika, 3 teaspoons kosher salt, 2 teaspoons chili powder, 1 teaspoon ground cumin, 1 teaspoon ground turmeric, 1 teaspoon mustard powder, and 1/2 teaspoon cayenne pepper.
  • Add 4 medium sweet potatoes (about 10 ounces each, cut into wedges ยฝ inch thick and 3 inches long), season with freshly ground black pepper, and toss to evenly coat.
  • Transfer the sweet potatoes to the air fryer (save the bowl with the leftover oil and spices) and cook at 400ยฐF, shaking the basket halfway through, until golden brown and crisp, about 15 minutes.
  • Return the potato wedges to the reserved bowl and toss again while they are hot out of the fryer.
  • Meanwhile, in a small bowl, stir together 1 1/3 cups sour cream and 2 grated garlic cloves.
  • Season the garlic sour cream dip with salt and black pepper and transfer to a serving dish.
  • Serve the potato wedges hot with the garlic sour cream dip.

Notes & Wine Advice

Serving Advice

Serve these spiced sweet potato fries hot and crispy straight from the air fryer alongside the cool, creamy garlic sour cream dip. They make a perfect appetizer or side dish for casual meals, game days, or family dinners. Pair with a fresh green salad or grilled meats for a balanced meal. The dip adds a tangy, garlicky contrast that complements the warm spices on the fries beautifully. For extra flavor, sprinkle a little fresh chopped parsley or cilantro over the fries before serving.

Variations

For a different flavor profile, try substituting the smoked paprika with regular paprika or chipotle powder for a smoky heat. You can also add a teaspoon of brown sugar to the spice mix for a touch of sweetness that balances the spices. If you prefer a dairy-free dip, swap the sour cream for a coconut yogurt or cashew cream mixed with garlic and lemon juice. For a milder dip, reduce the amount of garlic or add some chopped fresh herbs like chives or dill. These fries can also be baked in a conventional oven at 425ยฐF for about 25-30 minutes, turning halfway through for even crisping.

Wine Advice

Gewรผrztraminer: Gewรผrztraminer's aromatic and slightly sweet profile complements the warm spices and natural sweetness of the sweet potato fries, while its acidity balances the richness of the garlic sour cream dip.
Pinot Noir: A light-bodied Pinot Noir with bright red fruit flavors and subtle earthiness pairs well with the smoky and spicy notes of the fries without overpowering the dish.
Pair this dish with a sparkling water infused with lemon or a lightly brewed iced green tea to refresh the palate and complement the spices without alcohol.
Estimated ingredient cost: USD 2.50 per serving, excluding optional sides and drinks. Local prices vary.
Missing nutrition values have been estimated per serving; existing values were retained. Assumptions: Nutrition estimates are based on four servings using 4 medium sweet potatoes (about 10 ounces each), 4 tablespoons olive oil, 1 1/3 cups sour cream, and spices as listed. Serving size is one quarter of the prepared recipe. Assumes standard sour cream and olive oil nutritional values. Sodium includes added kosher salt and seasoning. Optional sides and drinks are excluded.

Nutrition values

Calories: 320 kcal | koolhydraten: 45 g | Eiwitten: 4 g | Vet: 12 g | Verzadigd vet: 3 g | Natrium: 900 mg | Suiker: 8 g
————————————————————————————————–

Ingredients and Flavor Profile

This recipe highlights sweet potatoes as the main ingredient, chosen for their natural sweetness and nutritional benefits. Sweet potatoes are rich in beta-carotene, fiber, and vitamins, making them a wholesome alternative to regular potatoes. The spice blend includes smoked paprika, chili powder, cumin, turmeric, mustard powder, and cayenne pepper, which together create a complex, warm, and slightly smoky flavor profile. These spices not only enhance the taste but also add antioxidant properties. Olive oil is used to coat the fries, helping the spices adhere and promoting crispness during air frying. The garlic sour cream dip adds a creamy, tangy contrast with the pungent aroma of fresh garlic, balancing the heat and sweetness of the fries. Freshly ground black pepper and kosher salt season the fries to taste, ensuring a well-rounded flavor. The combination of spices in this recipe is carefully balanced to complement the natural sweetness of the sweet potatoes without overpowering them. Smoked paprika contributes a subtle smokiness and vibrant color, while the turmeric adds earthiness and a golden hue. Mustard powder introduces a mild pungency that enhances the overall depth of flavor. The chili powder and cayenne pepper provide layered heat, which can be adjusted to suit personal preferences. Olive oil not only helps the spices adhere but also promotes caramelization during cooking, resulting in a crispy exterior and tender interior. The garlic in the sour cream dip adds a sharp, aromatic note that contrasts beautifully with the mellow sweetness of the fries, creating a harmonious flavor experience. The texture of the sweet potato wedges is an important aspect of this dish. Cutting them into uniform wedges ensures consistent cooking, allowing the edges to crisp up nicely while the centers remain soft and creamy. The air fryerโ€™s hot circulating air crisps the exterior without drying out the inside, preserving the sweet potatoesโ€™ natural moisture. The sour cream dip adds a cooling, creamy element that balances the spices and provides a luscious mouthfeel. Freshly ground black pepper adds a subtle bite and complexity, rounding out the seasoning profile. Using fresh garlic grated directly into the sour cream intensifies the dipโ€™s flavor and aroma compared to pre-minced or powdered garlic. This freshness is key to cutting through the richness of the sour cream and complementing the spices on the fries. The choice of sour cream as a base provides a tangy, smooth texture that contrasts with the crispy wedges. The kosher salt enhances all the flavors, ensuring the seasoning is well distributed and the natural sweetness of the potatoes is highlighted rather than masked. This thoughtful ingredient interplay makes the dish both flavorful and satisfying.

Practical Preparation and Cooking Tips

Preparing these spiced sweet potato fries involves cutting the sweet potatoes into uniform wedges to ensure even cooking. Tossing them thoroughly in the spice and oil mixture guarantees each piece is well coated, which is essential for flavor and crispiness. Using an air fryer allows the fries to cook quickly at a high temperature of 400ยฐF, producing a crunchy exterior without the need for deep frying in oil, making the dish healthier and less greasy. Shaking the basket halfway through cooking helps the fries cook evenly and prevents sticking. Reserving the bowl with leftover oil and spices to toss the fries again after cooking intensifies the flavor and helps maintain their crisp texture. The garlic sour cream dip is simple to prepare by grating fresh garlic into sour cream and seasoning it, providing a fresh and creamy accompaniment that complements the fries perfectly. When cutting the sweet potatoes, aim for wedges that are about half an inch thick and three inches long to maximize surface area for crisping while maintaining a tender interior. Uniformity in size is crucial to prevent uneven cooking, which can result in some pieces being underdone while others become too dry. Tossing the wedges thoroughly in the spice and oil mixture ensures each piece is evenly coated, which not only enhances flavor but also promotes even browning during air frying. Using a large bowl for tossing helps avoid overcrowding and allows the spices to distribute uniformly. Preheating the air fryer to 400ยฐF before adding the sweet potatoes can improve cooking efficiency and crispness. Shaking the basket halfway through the cooking time is essential to prevent the wedges from sticking together and to promote even exposure to hot air. This step also helps redistribute any spices that may have settled at the bottom of the basket. After cooking, immediately tossing the fries again in the reserved spiced oil mixture while they are still hot helps to re-coat them, intensifying the flavor and maintaining a desirable crisp texture. For the garlic sour cream dip, grating the garlic on a Microplane ensures a fine texture that blends smoothly into the sour cream without large chunks. Stirring the dip well and seasoning it with salt and freshly ground black pepper to taste balances the pungency of the garlic and the richness of the sour cream. Preparing the dip just before serving preserves the fresh garlic aroma and prevents it from becoming too overpowering. This timing also allows the dip to remain cool and refreshing, providing a perfect contrast to the warm, spicy fries.

Serving Suggestions and Variations

These spiced sweet potato fries are versatile and can be served as an appetizer, side dish, or snack. They pair well with a variety of main courses such as grilled chicken, burgers, or fish. For a complete meal, serve alongside a fresh salad or steamed vegetables. The garlic sour cream dip can be customized by adding herbs like chives, dill, or cilantro for added freshness. For those with dietary restrictions, the dip can be made dairy-free using plant-based yogurt or cashew cream. The spice blend can be adjusted to taste, increasing or decreasing the heat level by modifying the cayenne pepper amount. Additionally, the fries can be baked in a conventional oven if an air fryer is unavailable, though cooking times will be longer. These fries are suitable for all seasons and occasions, making them a reliable and flavorful addition to any menu. These spiced sweet potato fries are excellent served immediately while hot and crispy, making them a perfect finger food for casual gatherings or game day snacks. For a more substantial meal, they can be paired with grilled meats or roasted vegetables, adding a flavorful and nutritious side. The garlic sour cream dip can be served in individual ramekins or a communal bowl, encouraging sharing and interaction at the table. Garnishing the dip with a sprinkle of smoked paprika or chopped fresh herbs can add visual appeal and an extra layer of flavor. To customize the dip, consider mixing in finely chopped fresh herbs such as chives, parsley, or cilantro, which add brightness and a fresh herbal note that complements the spices on the fries. For a dairy-free alternative, substitute the sour cream with coconut yogurt or a cashew-based cream, adjusting the seasoning accordingly. The spice blend on the fries can also be varied by adding a pinch of cinnamon or ground coriander for a slightly different aromatic profile, or by omitting the cayenne pepper for a milder version suitable for children or those sensitive to heat. For meal planning, these fries can be prepared in advance by cutting and seasoning the sweet potatoes, then storing them in the refrigerator until ready to cook. The dip can be made a few hours ahead and refrigerated to allow the flavors to meld, but fresh garlic should be added just before serving to maintain its pungency. If an air fryer is unavailable, baking the fries on a parchment-lined sheet at 425ยฐF for 25 to 30 minutes, flipping halfway through, will yield a similar crispy texture. This flexibility makes the recipe adaptable to different kitchen setups and schedules. Browse our airfryer recipes for more ideas. General kitchen guidance is available from the FDA.
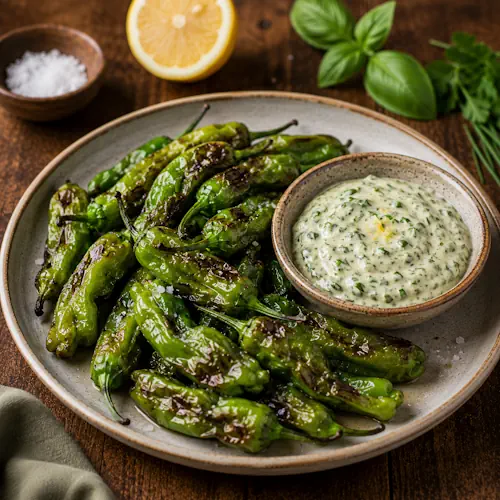
Blistered Shishito Peppers

Blistered air-fried shishito peppers with flaky sea salt and creamy herb Green Goddess dressing on a rustic wooden table.

Blistered Shishito Peppers

Blistered air-fried shishito peppers served hot with a cool, creamy Green Goddess dressing made with fresh herbs and lemon.
Couverts4
estimated costs pp $1.50
Deel op Facebook Print Recipe

Equipment

Ingredients

Instructions

  • Toss the shishito peppers with the vegetable oil in a mixing bowl until evenly coated. Season with kosher salt and freshly ground black pepper.
  • Transfer the peppers to the air fryer and cook at 400ยฐF (204ยฐC) for about 6 minutes, shaking the basket halfway through, until blistered and lightly charred.
  • Meanwhile, whisk the mayonnaise, basil, parsley, tarragon, chives, lemon zest, and lemon juice together in a small bowl until evenly combined.
  • Pile the hot shishito peppers onto a serving plate and sprinkle with flaky sea salt.
  • Serve immediately with the Green Goddess dressing alongside for dipping.

Notes & Wine Advice

Serving Suggestions

Serve the blistered shishito peppers immediately while they are still hot, with the cool Green Goddess dressing alongside for dipping. They work particularly well as an Appetizer or Snack and can also accompany dishes from the Barbecue collection.

Variations

For a sharper dressing, add a little extra fresh lemon juice. You can also adjust the proportions of basil, parsley, tarragon, and chives according to the herbs you have available. The same Green Goddess dressing works well with other recipes from the Vegetables collection.

Storage and Reheating

The peppers are best served immediately because their blistered exterior softens during storage. Refrigerate leftovers in a covered container and reheat briefly in the Airfryer. Store the Green Goddess dressing separately in the refrigerator and serve it chilled.

Wine Advice

A fresh Sauvignon Blanc is a good match for the green flavours of the shishito peppers, fresh herbs, and lemon. Its acidity also provides a pleasant contrast to the creamy mayonnaise-based dressing. Explore suitable wines at Renรฉโ€™s Wijnbeleving.

Nutrition values

Serving: 75 gr | Calories: 205 kcal | koolhydraten: 4 g | Eiwitten: 1 g | Vet: 21 g | Verzadigd vet: 3 g | Natrium: 260 mg | Suiker: 2 g
————————————————————————————————–

About Blistered Shishito Peppers

Blistered Shishito Peppers are a quick Airfryer dish built around the contrast between hot, lightly charred peppers and a cool, creamy herb dressing. Shishito peppers have thin skins, making them particularly suitable for high-temperature cooking. In only a few minutes, their surfaces blister and develop dark roasted spots while the peppers themselves become tender. Using an air fryer achieves this effect with just one tablespoon of vegetable oil.

The Green Goddess-style dressing provides the counterpoint. Mayonnaise creates a rich and creamy base, while basil, flat-leaf parsley, tarragon, and chives add several layers of fresh herbal flavour. Lemon zest and fresh lemon juice brighten the dressing and help balance the richness of the mayonnaise. Together, the hot peppers and chilled dressing create a simple dish with considerably more flavour than its short ingredient list might suggest.

Why Shishito Peppers Work in the Air Fryer

Shishito peppers are traditionally well suited to fast cooking at high temperatures. Their thin skins react quickly to heat, blistering before the interior becomes overly soft. The circulating hot air in an Airfryer creates a similar effect without requiring a wok or a large quantity of oil.

Coating the peppers lightly with vegetable oil helps conduct heat across their uneven surfaces. Cooking them at 400ยฐF (204ยฐC) encourages rapid blistering and light charring. Shaking the basket halfway through exposes different sides of the peppers to the strongest airflow and promotes more even cooking.

The Green Goddess Dressing

The dressing transforms these peppers from a simple roasted Vegetables dish into something suitable for sharing as an Appetizer. Green Goddess dressings are characterised by their generous use of fresh green herbs, and this version combines basil, parsley, tarragon, and chives.

The herbs each contribute something different. Basil adds a fresh aromatic quality, parsley keeps the dressing bright, tarragon contributes its distinctive herbal character, and chives add a mild onion note. Lemon zest and juice tie those flavours together while cutting through the richness of the mayonnaise.

Serving the Peppers

The peppers should be served as soon as they leave the air fryer. Sprinkle them with flaky sea salt while they are still hot and place the dressing alongside rather than pouring it over the peppers. Keeping the dressing separate preserves the blistered texture and allows each pepper to be dipped individually.

This makes the recipe especially convenient for a Party, Game Day, or relaxed Weekend meal. It can also be served as a Side Dish alongside grilled foods or as part of a larger selection of vegetable dishes.

Heat and Flavour

One of the distinctive characteristics of shishito peppers is that their heat can vary. Most have a relatively mild flavour, while an occasional pepper can be noticeably hotter. The creamy Green Goddess dressing is particularly useful here because its richness and fresh herbs provide contrast when a hotter pepper appears.

Flaky sea salt added immediately before serving gives the peppers small bursts of salinity without masking their roasted flavour. Because the ingredient list is intentionally simple, the final result depends heavily on cooking the peppers until properly blistered rather than merely warming them.

Storage and Food Safety

For the best texture, prepare only as many peppers as you expect to serve immediately. Leftover peppers can be refrigerated and reheated in the air fryer, although they will not be quite as crisp as freshly cooked peppers. Keep the mayonnaise-based Green Goddess dressing refrigerated separately and do not leave it sitting at room temperature unnecessarily.

For current guidance on storing and handling mayonnaise-based preparations and other perishable foods safely, consult the FDA food safety guidance. With only a few minutes of cooking, these blistered shishito peppers make a quick addition to the Vegetables collection and an easy way to combine charred, fresh, creamy, and occasionally spicy flavours in one dish.

Masala-Spiced Onion Rings With Mint-Mayo Dipping Sauce

Masala-Spiced Onion Rings With Mint-Mayo Dipping Sauce

This recipe creates flavorful onion rings seasoned with Indian spices like garam masala and curry powder for a zesty twist. They are air-fried to a crisp golden brown and served with a refreshing mint-mayo dipping sauce.
Couverts4 servings
Total time 1 hour
estimated costs pp 2.50
Deel op Facebook Print Recipe

Ingredients

Instructions

  • Trim the ends from the onion and peel away the papery outer skin.
  • Cut the onion crosswise into ยพ- to 1-inch-thick slices, then separate the slices into rings, discarding the feathery skin between the rings.
  • In a small bowl, whisk together the ยผ cup garam masala, 2 tablespoons sweet paprika, 2 tablespoons curry powder, and 2 tablespoons kosher salt.
  • Place the 2 cups all-purpose flour, 6 lightly beaten large eggs, and 2 cups panko breadcrumbs in three separate shallow bowls and season each with one-third (2 tablespoons plus 2ยฝ teaspoons) of the spice mixture.
  • Dip 1 onion ring in the spiced egg, dredge in the flour, then repeat with the egg and flour once more.
  • Dip the ring back into the egg again, then coat in the spiced breadcrumbs.
  • Repeat to coat all the onion rings and arrange them on a wire rack set over a baking sheet.
  • Place the onion rings in the freezer and chill until firm, at least 30 minutes or up to 1 week.
  • Meanwhile, whisk together the ยฝ cup mayonnaise, 2 tablespoons finely chopped fresh mint, 2 teaspoons fresh lemon juice, and 1 finely chopped scallion in a bowl and season with salt.
  • Refrigerate to marry the flavors in the sauce while the onion rings freeze.
  • When ready to fry, spray 5 or 6 of the onion rings liberally with cooking spray and arrange them loosely in the air fryer basket, laying some flat and leaning some against the side of the basket.
  • Cook at 375ยฐF until the onion rings are tender and the breading is golden brown and crisp, about 10 minutes.
  • Season with more salt once they come out of the fryer and continue frying as many onion rings as you like.
  • Serve hot with the mint-mayo sauce and ketchup on the side.

Notes & Wine Advice

Serving Advice

Serve these masala-spiced onion rings hot and crispy straight from the air fryer alongside the cool, creamy mint-mayo dipping sauce and a side of ketchup for variety. They make a perfect appetizer or snack for parties and game days. Pair with a light salad or vegetable sticks for a balanced plate. The refreshing mint in the sauce complements the warm spices beautifully, making each bite flavorful and satisfying.

Variations

To make plain onion rings, simply omit all the spices and season the flour, eggs, and breadcrumbs with salt and freshly ground black pepper. You can substitute large yellow or white onions for the red onion if preferred. For a gluten-free version, use gluten-free flour and breadcrumbs. For a spicier kick, add a pinch of cayenne pepper to the spice mix. Baking the rings instead of air frying is possible but may result in a less crispy texture. Experiment with adding finely chopped cilantro or a dash of garlic powder to the mint-mayo sauce for extra flavor.

Wine Advice

Gewรผrztraminer: Gewรผrztraminer's aromatic and slightly sweet profile complements the warm spices of the masala onion rings and balances the richness of the mint-mayo sauce, enhancing the overall flavor experience.
Sauvignon Blanc: Sauvignon Blanc offers crisp acidity and herbal notes that pair well with the fresh mint in the dipping sauce and cut through the fried onion rings' richness, refreshing the palate.
Try a sparkling water infused with fresh mint and a splash of lemon juice to echo the flavors in the dipping sauce while providing a refreshing, palate-cleansing drink.
Estimated ingredient cost: USD 2.50 per serving, excluding optional sides and drinks. Local prices vary.
Missing nutrition values have been estimated per serving; existing values were retained. Assumptions: Nutrition estimates are based on the edible portions of all ingredients listed for four servings, assuming standard sizes for the red onion and eggs. The calculations include the coating and dipping sauce but exclude optional ketchup. The serving size is one quarter of the total prepared recipe. Optional sides and drinks are excluded.

Nutrition values

Calories: 410 kcal | koolhydraten: 50 g | Eiwitten: 12 g | Vet: 18 g | Verzadigd vet: 3 g | Natrium: 900 mg | Suiker: 6 g
————————————————————————————————–
Course; Air fryer / Appetizer
Cuisine; India
Season: All Seasons
Occasions Game Day / Party / Weekend

Ingredients and Flavor Profile

This recipe highlights the unique pairing of onions with Indian spices to create a flavorful twist on traditional onion rings. The key spices used are garam masala and curry powder, which bring warmth, complexity, and a hint of earthiness to the dish. Sweet paprika adds a subtle smoky sweetness and vibrant color, while kosher salt enhances all the flavors. The use of red onion, known for its mild sweetness and crisp texture, complements the spices perfectly. The coating process involves flour, eggs, and panko breadcrumbs, each seasoned with the spice blend to ensure every bite is flavorful. The mint-mayo dipping sauce adds a refreshing contrast with its cool, creamy texture and bright notes from fresh mint and lemon juice. This combination of spices and fresh herbs creates a balanced and exciting flavor profile that elevates a simple snack into a memorable appetizer. The role of each ingredient in this recipe is crucial to achieving the desired texture and flavor balance. The red onion provides a natural sweetness and a firm bite that contrasts nicely with the crunchy coating. Garam masala and curry powder are complex spice blends that contribute aromatic warmth and subtle heat, while sweet paprika adds a mild smokiness and enhances the visual appeal with its reddish hue. Kosher salt is distributed evenly through the flour, eggs, and breadcrumbs to season every layer, ensuring the flavor penetrates the coating rather than just the surface. Panko breadcrumbs are chosen for their light, airy texture, which creates a crisp crust that resists sogginess during air frying. The triple-dipping technique used in this recipe is designed to build a thick, multi-layered crust that locks in moisture and flavor. By alternating between egg and flour coatings twice before the final breadcrumb layer, the breading adheres better and becomes more substantial. This method also allows the spices mixed into each component to infuse the crust thoroughly. The eggs act as a binding agent, helping the flour and breadcrumbs stick to the onion rings, while the flour provides a dry surface for the egg to cling to. This interplay of ingredients results in a crunchy, flavorful exterior that complements the tender onion inside. The mint-mayo dipping sauce serves as a cooling counterpoint to the warm, spiced onion rings. Mayonnaise provides a creamy base that carries the fresh, bright flavors of finely chopped mint and lemon juice. The scallion adds a mild oniony sharpness that echoes the main ingredient without overpowering it. This sauce not only balances the spices but also adds moisture and richness, making each bite more indulgent. The freshness of the mint and acidity from the lemon juice help cleanse the palate, enhancing the overall eating experience and preventing the dish from feeling too heavy.

Preparation and Cooking Techniques

The preparation of these masala-spiced onion rings involves careful layering of flavors through the spiced flour, egg, and breadcrumb coatings. The onion is sliced into thick rings to maintain structure during cooking. The triple-dipping methodโ€”egg, flour, egg, flour, egg, then breadcrumbsโ€”ensures a thick, crispy crust that holds the spices well. Freezing the coated rings before cooking is an essential step; it helps the breading set firmly, preventing it from falling off during air frying. Cooking in an air fryer at 375ยฐF crisps the rings evenly with less oil than traditional frying, making the dish lighter and less greasy. The mint-mayo sauce is prepared while the rings freeze, allowing the flavors to meld. This methodical approach to preparation and cooking results in onion rings that are crispy on the outside, tender on the inside, and bursting with layered flavors. Slicing the onion into ยพ- to 1-inch-thick rings is a deliberate choice to ensure the rings hold their shape during the multiple coating steps and cooking. Thinner slices might become fragile and break apart, while thicker slices could remain undercooked inside. Separating the rings carefully and discarding the feathery inner skin prevents unwanted texture and ensures even cooking. The use of three separate shallow bowls for flour, eggs, and breadcrumbs allows for an efficient workflow, minimizing cross-contamination and making the dipping process smoother and faster. Freezing the coated onion rings before air frying is a critical step that improves the final texture. Chilling the rings for at least 30 minutes firms up the breading, reducing the risk of it falling off during cooking. This step also helps the layers of coating to set and bind together, resulting in a more cohesive crust. The option to freeze for up to a week adds convenience, allowing for batch preparation and easy access to a ready-to-cook snack. When air frying, arranging the rings loosely and spraying them with cooking spray promotes even browning and crispness by allowing hot air to circulate freely around each piece. The air fryer temperature of 375ยฐF is chosen to balance thorough cooking of the onion with the development of a golden, crispy crust. Cooking for about 10 minutes ensures the onion becomes tender without becoming mushy, while the breading crisps up nicely. Spraying the rings with cooking spray before air frying mimics the effect of oil in traditional frying, enhancing browning and texture without excess fat. Seasoning the rings with additional salt immediately after cooking heightens the flavor and compensates for any salt lost during the cooking process. This technique yields a healthier yet satisfying alternative to deep-fried onion rings.

Serving Suggestions and Variations

These masala-spiced onion rings are best served hot and fresh from the air fryer alongside the mint-mayo dipping sauce and a side of ketchup for those who enjoy a classic condiment. They make an excellent appetizer or party snack, pairing well with light salads or vegetable sticks to balance the richness. For variations, you can omit the spices for plain onion rings or substitute yellow or white onions if red onions are unavailable. Gluten-free alternatives can be used for the flour and breadcrumbs to accommodate dietary needs. Adding cayenne pepper to the spice mix can introduce heat for those who prefer spicier snacks. The mint-mayo sauce can be customized by incorporating garlic powder or cilantro for additional flavor layers. These options allow the recipe to be tailored to different tastes and occasions while maintaining its core appeal. Serving these masala-spiced onion rings immediately after air frying ensures the coating remains crisp and the onion inside is warm and tender. Pairing them with the mint-mayo dipping sauce and ketchup offers a variety of flavor contrasts, from creamy and herbal to sweet and tangy. These onion rings can be a standout appetizer at gatherings or a flavorful side dish alongside grilled meats or vegetarian mains. For a more substantial meal, consider serving them with a fresh green salad or roasted vegetables to add balance and variety to the plate. For those looking to customize the recipe, the spice blend can be adjusted to suit different palates. Reducing the amount of garam masala or curry powder will mellow the flavor, while adding a pinch of cayenne or chili powder can introduce a spicy kick. The mint-mayo sauce can be varied by swapping fresh mint for cilantro or adding a small amount of garlic powder or ground cumin for extra depth. Additionally, swapping mayonnaise for Greek yogurt can lighten the sauce and add a tangy note, making it suitable for those seeking a lower-fat option. In terms of meal planning, these onion rings can be prepared in advance and stored frozen, making them a convenient snack or side dish to cook on demand. They reheat well in the air fryer, retaining their crispness better than in a microwave. For a gluten-free adaptation, substitute the all-purpose flour and panko breadcrumbs with gluten-free alternatives, ensuring the spice mix remains unchanged to preserve the flavor profile. This flexibility makes the recipe accessible to a wider range of dietary preferences without compromising taste or texture. Browse our appetizer recipes for more ideas. General kitchen guidance is available from the FDA.

Memphis-Style Bbq Pork Ribs

Memphis-Style Bbq Pork Ribs

Growing up near Memphis, I became loyal to their signature โ€œdryโ€ ribs early on in life, preferring them to the โ€œwet,โ€ or sauced, kind found elsewhere. There are many theories about how best to cook ribs (boil first then grill, or barbecue slow and low the whole way?), but in the air fryer, you can have tender, pull-apart ribs in a fraction of the traditional time. The spice rub ensures a crunchy, caramelized exterior โ€œshellโ€ as well, so thereโ€™s nothing missing here except the hefty barbecue grill and all the mess that comes along with it.
Couverts2
Deel op Facebook Print Recipe

Ingredients

Instructions

  • In a large bowl, whisk together the salt, brown sugar, paprika, garlic powder, onion powder, poultry seasoning, mustard powder, and pepper.
  • Add the ribs and toss and rub the seasonings into them with your hands until theyโ€™re fully coated.
  • Arrange the ribs in the air fryer basket standing up on their ends and leaned up against the wall of the basket and each other.
  • Cook at 350ยฐF until the ribs are tender inside and golden brown and crisp on the outside, about 35 minutes.
  • Transfer the ribs to plates and serve hot.
————————————————————————————————–
Course; Air fryer / Pork

Chile-Brined Fried Calamari

Chile-Brined Fried Calamari

Fried calamari is my go-to bar snack, but unfortunately, if not executed well, it easily soaks up excess oil and becomes soggy and greasy. In the air fryer, thereโ€™s no worrying about that, so youโ€™re guaranteed crispy, nearly greaseless calamari. I like to โ€œquick brineโ€ the calamari in pickled pepper juice to infuse it with more flavor and โ€œfryโ€ up some peppers alongside it to add interest to the pile of fried squid. A rosemary-infused garlic mayo is the perfect foil for this spicy, crunchy appetizer.
Couverts2
Deel op Facebook Print Recipe

Equipment

  • Small bowl

Ingredients

Instructions

  • Drain the pickled pepper brine into a large bowl and tear the peppers into bite-size strips.
  • Add the pepper strips and calamari to the brine and let stand in the refrigerator for 20 minutes or up to 2 hours.
  • Grate the lemon zest into a large bowl then whisk in the flour and season with salt and pepper.
  • Dip the calamari and pepper strips in the egg, then toss them in the flour mixture until fully coated.
  • Spray the calamari and peppers liberally with cooking spray, then transfer half to the air fryer.
  • Cook at 400ยฐF, shaking the basket halfway into cooking, until the calamari is cooked through and golden brown, about 8 minutes.
  • Transfer to a plate and repeat with the remaining pieces.
  • In a small bowl, whisk together the mayonnaise, rosemary, and garlic.
  • Squeeze half the zested lemon to get 1 tablespoon of juice and stir it into the sauce.
  • Season with salt and pepper.
  • Cut the remaining zested lemon half into 4 small wedges and serve alongside the calamari, peppers, and sauce.
————————————————————————————————–
Course; Air fryer / Fish

Herb And Lemon Breadcrumbโ€“Stuffed Blooming Onion

Herb And Lemon Breadcrumbโ€“Stuffed Blooming Onion

This recipe creates a flavorful hybrid of a stuffed artichoke and a blooming onion using a yellow onion stuffed with a lemon herb breadcrumb mixture. It is cooked in an air fryer for a tender, golden brown result, suitable as a vegetarian main or a side dish.
Couverts4 servings
Total time 30 minutes
estimated costs pp 3.50
Deel op Facebook Print Recipe

Ingredients

Instructions

  • Place the 2 large yellow onions (14 ounces each) on a cutting board and trim the tops off. Peel off the outer skin.
  • Turn each onion upside down and use a paring knife to cut vertical slits halfway through the onion at ยฝ-inch intervals around the onion, keeping the root intact.
  • Turn the onions right side up; they should open up like the petals of a flower.
  • Drizzle the cut sides of the onions with 2 tablespoons olive oil and season with Kosher salt and freshly ground black pepper to taste.
  • Place the onions petal-side up in the air fryer and cook at 350ยฐF for 10 minutes.
  • Meanwhile, in a bowl, stir together ยฝ cup plus 2 tablespoons panko breadcrumbs, ยฝ cup grated parmesan cheese, 6 tablespoons mayonnaise, 2 tablespoons fresh lemon juice, 2 tablespoons chopped fresh flat-leaf parsley, 4 teaspoons whole-grain Dijon mustard, and 2 minced garlic cloves until incorporated into a smooth paste.
  • Remove the onions from the air fryer and stuff the paste all over and in between the onion petals.
  • Return the onions to the air fryer and cook at 375ยฐF until the onions are tender in the center and the breadcrumb mixture is golden brown, about 5 minutes.
  • Remove the onions from the air fryer, transfer to plates, and serve hot.

Notes & Wine Advice

Serving Advice

Serve the Herb and Lemon Breadcrumbโ€“Stuffed Blooming Onion hot as a delightful appetizer or a side dish. It pairs wonderfully with grilled meats like a Chile-Rubbed Rib Eye or can stand alone as a vegetarian main course. Garnish with extra fresh parsley or a lemon wedge for added brightness. A crisp green salad or steamed vegetables complement the rich, tangy flavors and crunchy texture of the stuffed onion.

Variations

For a different flavor profile, try substituting the parmesan cheese with a sharp cheddar or a tangy pecorino. You can add finely chopped herbs such as thyme or rosemary to the breadcrumb mixture for an earthier taste. For a vegan version, replace mayonnaise with a plant-based alternative and use nutritional yeast instead of cheese. To add a spicy kick, mix in a pinch of cayenne pepper or smoked paprika. This recipe also works well with other large onions or shallots, adjusting cooking times accordingly.

Wine Advice

Chardonnay: A lightly oaked Chardonnay complements the creamy mayonnaise and parmesan in the breadcrumb stuffing, while its citrus notes enhance the fresh lemon juice and parsley flavors.
Sauvignon Blanc: Sauvignon Blancโ€™s crisp acidity and herbaceous character pair well with the fresh herbs and lemon in the dish, balancing the richness of the mayonnaise and cheese.
Pair this dish with a sparkling water infused with lemon and fresh herbs or a chilled herbal iced tea to complement the lemon and herb flavors without alcohol.
Estimated ingredient cost: USD 3.50 per serving, excluding optional sides and drinks. Local prices vary.
Missing nutrition values have been estimated per serving; existing values were retained. Assumptions: Nutrition estimates are based on the edible portions of 2 large yellow onions (14 ounces each), panko breadcrumbs, parmesan cheese, mayonnaise, lemon juice, parsley, Dijon mustard, garlic, and olive oil. Serving size is one of four servings. Sodium includes salt added to taste. Values are approximate and may vary with ingredient brands and preparation. Optional sides and drinks are excluded.

Nutrition values

Calories: 320 kcal | koolhydraten: 30 g | Eiwitten: 9 g | Vet: 18 g | Verzadigd vet: 4 g | Natrium: 450 mg | Suiker: 8 g
————————————————————————————————–

Ingredients and Flavor Profile

This recipe centers around a large yellow onion, which is carefully cut to bloom open like a flower, creating a visually striking presentation. The stuffing combines panko breadcrumbs and grated parmesan cheese, which provide a crunchy texture and savory depth. Mayonnaise adds creaminess and helps bind the mixture, while fresh lemon juice and chopped flat-leaf parsley contribute brightness and herbaceous notes. Whole-grain Dijon mustard and minced garlic add subtle pungency and complexity. The combination of these ingredients results in a harmonious balance of creamy, tangy, and savory flavors with a satisfying crunch. The use of fresh herbs and lemon juice keeps the dish light and refreshing, making it suitable as a vegetarian main or a side dish. The choice of yellow onion is important for its size and mild sweetness, which softens during cooking and complements the stuffing perfectly. The panko breadcrumbs in this recipe are essential for creating a light, crispy texture that contrasts beautifully with the tender onion petals. Their coarse structure allows them to brown evenly and hold the stuffing together without becoming soggy. Parmesan cheese not only adds a salty, umami-rich depth but also helps bind the mixture when combined with mayonnaise. The mayonnaise contributes moisture and richness, ensuring the stuffing remains creamy and cohesive during cooking. Fresh lemon juice brightens the overall flavor, cutting through the richness and adding a subtle acidity that balances the savory elements. Flat-leaf parsley introduces a fresh, slightly peppery note that complements the garlic and mustard. Whole-grain Dijon mustard plays a dual role by adding a mild heat and a tangy complexity that elevates the stuffingโ€™s flavor profile. The minced garlic infuses the mixture with aromatic pungency, enhancing the savory character without overpowering the other ingredients. Olive oil, used to drizzle the onion petals before air frying, promotes even browning and adds a subtle fruity richness. Kosher salt and freshly ground black pepper season the onion and stuffing, enhancing natural flavors and ensuring each bite is well-balanced. The careful combination of these ingredients results in a multi-dimensional taste experience that is both comforting and vibrant. Texture is a key consideration in this recipe. The onion petals soften during the initial air frying, becoming tender yet still holding their shape to support the stuffing. The breadcrumb mixture crisps up on the surface, providing a satisfying crunch that contrasts with the creamy interior. This interplay of textures makes the dish engaging to eat and visually appealing. The mild sweetness of the yellow onion mellows with cooking, harmonizing with the savory, tangy, and herbaceous notes of the stuffing. Together, these elements create a cohesive dish that delights both the palate and the eye.

Practical Preparation and Cooking Method

Preparing the blooming onion involves trimming and peeling the onion, then making precise vertical cuts halfway through the onion at half-inch intervals while keeping the root intact. This technique allows the onion to open up like petals when turned right side up, creating a flower-like shape that is both attractive and functional for stuffing. Drizzling olive oil and seasoning with salt and pepper before the initial air frying helps to soften the onion and develop flavor. The air fryer is an excellent tool for this recipe, as it cooks the onion evenly and crisps the breadcrumb topping without the need for deep frying, reducing oil usage and cleanup. The initial 10-minute cook at 350ยฐF softens the onion, and after stuffing, a final 5-minute cook at 375ยฐF crisps the breadcrumb mixture to a golden brown. This method ensures the onion is tender in the center and the topping is perfectly crisp. The recipe is straightforward and requires minimal hands-on time, making it accessible for cooks of all skill levels. When cutting the onion, itโ€™s important to use a sharp paring knife and steady hands to make even vertical slits without cutting through the root. This root acts as a hinge, allowing the onion to bloom open like a flower and hold the stuffing securely. Cutting at half-inch intervals ensures the petals are wide enough to fill with the breadcrumb mixture while maintaining structural integrity during cooking. Peeling the outer skin completely is necessary to avoid bitterness and to allow the oil and seasoning to penetrate the onion petals effectively. Drizzling olive oil over the cut onion petals before the first air frying step helps to promote caramelization and prevents the onion from drying out. Seasoning with kosher salt and freshly ground black pepper at this stage enhances the natural sweetness of the onion as it softens. The initial 10-minute cook at 350ยฐF is crucial for tenderizing the onionโ€™s core, making it easier to stuff without breaking the petals. After stuffing, increasing the temperature to 375ยฐF crisps the breadcrumb topping quickly, ensuring it turns golden brown without overcooking the onion. Using an air fryer streamlines the cooking process by circulating hot air evenly around the onion, which crisps the breadcrumb mixture while gently cooking the onion petals. This method reduces the need for excess oil compared to traditional deep frying, making the dish lighter and less greasy. The recipeโ€™s timing is designed to balance tenderness and crispness, with minimal hands-on time between steps. This workflow allows cooks to prepare the stuffing while the onion softens, making the process efficient and manageable even for those new to air frying or stuffed vegetable dishes.

Serving Suggestions and Variations

This stuffed blooming onion is versatile and can be served as an impressive appetizer or a satisfying vegetarian main course. It pairs well with grilled or roasted meats, such as a Chile-Rubbed Rib Eye, adding a fresh and crunchy contrast to rich dishes. For a complete meal, serve alongside a crisp green salad or steamed seasonal vegetables. Garnishing with extra fresh parsley or a lemon wedge enhances the presentation and flavor. Variations include swapping parmesan for other cheeses like cheddar or pecorino, adding herbs such as thyme or rosemary for different flavor profiles, or incorporating spices like cayenne for heat. For vegan adaptations, mayonnaise can be replaced with plant-based alternatives and cheese with nutritional yeast. The recipe also adapts well to other large onions or shallots, though cooking times may need adjustment. These options allow customization to dietary preferences and seasonal ingredient availability, making the dish suitable year-round. Serving the stuffed blooming onion hot ensures the breadcrumb topping remains crisp and the onion petals are tender and flavorful. It can be presented as a centerpiece appetizer for gatherings, where guests can pull apart the petals to enjoy the flavorful stuffing. Pairing it with a simple dipping sauce, such as a lemon aioli or a light herb yogurt dip, can add an extra layer of flavor and moisture. For a more substantial meal, accompany the dish with roasted potatoes or a grain salad to complement the textures and flavors. To customize the dish, consider experimenting with different herbs and cheeses. Fresh thyme or rosemary can be added to the stuffing for a woodsy aroma, while swapping parmesan for sharp cheddar or pecorino Romano introduces new savory notes. For those who enjoy a bit of heat, a pinch of cayenne or smoked paprika can be mixed into the breadcrumb paste. These variations allow the dish to be tailored to personal taste preferences or seasonal ingredient availability without altering the fundamental cooking technique. Meal planning with this recipe is convenient as the blooming onion can be prepared ahead of time up to the initial air frying step. The breadcrumb stuffing can be mixed and refrigerated separately, then combined and cooked just before serving to maintain optimal texture. Leftovers can be reheated gently in the air fryer or oven to preserve crispness. The recipeโ€™s flexibility also makes it suitable for vegetarian menus or as a side dish alongside grilled meats or seafood, providing a fresh, flavorful contrast that enhances the overall dining experience. Browse our appetizer recipes for more ideas. General kitchen guidance is available from the FDA.

Triple-Coconut Shrimp

Triple-Coconut Shrimp

Thereโ€™s no denying the appeal of coconut shrimpโ€”crunchy, sweet, and easy to eat, like a meaty popcorn kernel. But they can be a mess to fry up, which makes them a perfect candidate for the air fryer. These shrimp are marinated in coconut milk, then coated in breadcrumbs and more coconut before getting cooked up to crispy perfection and served with a cooling-yet-spicy coconut yogurt. Thatโ€™s three hits of coconut and none of the excess grease; I canโ€™t think of a better sales pitch than that.
Couverts2
Deel op Facebook Print Recipe

Ingredients

Instructions

  • In a bowl, combine the shrimp, coconut milk, lime zest, and ยฝ teaspoon kosher salt.
  • Let the shrimp stand for 10 minutes.
  • Meanwhile, in a separate bowl, stir together the breadcrumbs and shredded coconut and season with salt and pepper.
  • A few at a time, add the shrimp to the breadcrumb mixture and toss to coat completely.
  • Transfer the shrimp to a wire rack set over a baking sheet.
  • Spray the shrimp all over with cooking spray.
  • Transfer the shrimp to the air fryer and cook at 400ยฐF until golden brown and cooked through, about 4 minutes.
  • Move the shrimp to a serving platter and season with more salt.
  • Grate the cucumber into a small bowl.
  • Stir in the coconut yogurt and chile and season with salt and pepper.
  • Serve alongside the shrimp while theyโ€™re warm.

Notes & Wine Advice

Go Basic:
To make plain fried shrimp, omit the coconut milk, lime zest, and shredded coconut. Set up a breading station with 1 cup all-purpose flour, 4 large eggs, lightly beaten, and 1 cup panko breadcrumbs in separate shallow bowls, and season each with salt and pepper. Working one at a time, coat each shrimp in the flour, dip in the egg, and dredge in the breadcrumbs. Transfer the shrimp to a wire rack set over a baking sheet and continue with the recipe.
————————————————————————————————–
Course; Air fryer / Fish

Chile-Rubbed Rib Eye

Chile-Rubbed Rib Eye

There are a couple of essential rules to making a great steak in the air fryer. First, make sure the steak is fully at room temperature before you cook it so that the temperature shock from the air fryer doesnโ€™t cause the meat to seize up and tighten more than it naturally does. And second, rub the steak with a flavorful dry rub to give the outside color and flavor. Feel free to try out other spice mixes or rubs that you like, and if you want to keep it simple, go with lots of salt and coarsely ground black pepper and the steak will still come out perfect, no extra pans or grill required.
Couverts2
Deel op Facebook Print Recipe

Equipment

  • Small bowl

Ingredients

Instructions

  • In a small bowl, combine the chili powder, ground espresso, brown sugar, paprika, salt, and pepper.
  • Sprinkle it evenly over the steak, rubbing it into both sides.
  • Let the steak stand for at least 10 minutes, if you have the time.
  • Transfer it to the air fryer and cook at 400ยฐF until browned on the outside and cooked to medium-rare, 10 to 12 minutes.
  • To make sure your steak is cooked to your desired doneness, insert an instant-read thermometer lengthwise through the steak and continue cooking until your desired temperature is reached; 135ยฐF is perfect for medium-rare.
  • Transfer the steak to a cutting board and let rest for at least 10 minutes.
  • Slice the steak across the grain and serve warm.
————————————————————————————————–
Course; Air fryer / Beef

Zesty Pepper Chicken Legs

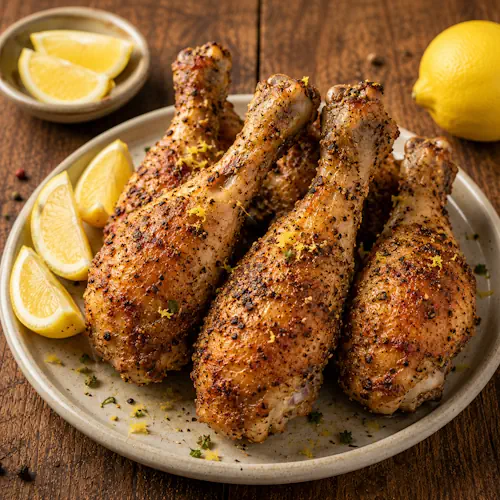
Crispy air fryer chicken drumsticks seasoned with coarse black pepper, garlic and fresh lemon zest, served with lemon wedges on a warm rustic brown wooden table.

Zesty Pepper Chicken Legs

Zesty Pepper Chicken Legs are juicy air fryer drumsticks seasoned with coarse black pepper, garlic, and fresh lemon zest. Baking powder helps create crisp golden skin while the dark chicken meat stays tender and flavorful.
Deel op Facebook Print Recipe

Equipment

  • Fine grater
  • Plate
  • Small bowl
  • Serving platter

Ingredients

Instructions

  • Combine the black pepper, baking powder, and garlic powder in a small bowl.
  • Place the chicken drumsticks on a plate and coat them evenly with the seasoning mixture.
  • Refrigerate the seasoned drumsticks for at least 1 hour or up to overnight.
  • Season the drumsticks with kosher salt before cooking.
  • Arrange the drumsticks in the air fryer basket with the bone ends pointing upward.
  • Air fry at 190ยฐC for about 30 minutes, until the skin is crisp and the chicken is completely cooked through.
  • Transfer the drumsticks to a serving platter.
  • Finely grate the lemon zest over the hot chicken.
  • Cut the lemon into wedges.
  • Serve the drumsticks warm with the lemon wedges.

Notes & Wine Advice

Recipe Notes

Refrigerating the seasoned drumsticks for at least 1 hour helps dry the surface of the chicken. Together with the baking powder, this helps the skin become crisp during air frying.
For even better results, season the drumsticks the evening before cooking and refrigerate them overnight.
Check the thickest part of each drumstick before serving. The internal temperature should reach at least 74ยฐC.
Add the fresh lemon zest immediately after cooking. The heat releases the aromatic oils from the zest and gives the chicken a fresh citrus finish.

Storage Advice

Store leftover chicken drumsticks in an airtight container in the refrigerator for up to 3 days. Reheat them in the air fryer at 180ยฐC for 5 to 7 minutes until thoroughly hot and crisp. Cooked drumsticks can also be frozen for up to 2 months.

Wine Advice

A fresh Sauvignon Blanc pairs nicely with the lemon, garlic, and coarse black pepper. Its lively acidity balances the richness of the dark chicken meat and complements the fresh citrus flavor.

Nutrition values

Serving: 115 gr | Calories: 175 kcal | koolhydraten: 2 g | Eiwitten: 22 g | Vet: 9 g | Verzadigd vet: 2.5 g | Natrium: 330 mg | Suiker: 0 g
————————————————————————————————–

About This Recipe

Zesty Pepper Chicken Legs combine juicy dark chicken meat with crisp skin, coarse black pepper, garlic, and fresh lemon. The simple seasoning keeps the chicken itself at the centre of the recipe, while freshly grated lemon zest adds brightness after air frying.

The Secret to Crispy Chicken Skin

A small amount of baking powder helps create the crisp exterior. The seasoned Chicken rests in the refrigerator before cooking, which helps dry the surface. Removing some surface moisture allows the skin to brown and crisp more effectively.

Black Pepper, Garlic and Lemon

Coarsely ground black pepper provides plenty of savory warmth without overpowering the chicken. Garlic powder adds another layer of flavor. Once the drumsticks are cooked, fresh lemon zest is grated directly over the hot skin. The warmth releases the fragrant citrus oils and gives the rich meat a fresher finish.

Easy Air Fryer Chicken Legs

Cooking the drumsticks in the Air fryer allows hot air to circulate around the chicken. This produces a crisp exterior without deep frying. Dark chicken meat also stays naturally moist and tender during the relatively long cooking time.

Perfect for Dinner or Sharing

These chicken legs make an easy family meal, but their handheld size also makes them useful as Fingerfood. Serve them for a barbecue, Game Day, picnic, or relaxed weekend dinner. Fries, roasted potatoes, grilled vegetables, or a fresh salad all work well alongside them.

Serve Zesty Pepper Chicken Legs straight from the air fryer with fresh lemon wedges. A squeeze of lemon just before eating brings together the peppery seasoning, crisp skin, garlic, and juicy chicken.


Spicy Dry-Rubbed Chicken Wings

Spicy Dry-Rubbed Chicken Wings

In the absence of oil to crisp up the chicken wingsโ€™ skins, which is the best part of eating them, a new technique was devised by J. Kenji Lรณpez-Alt, the author of The Food Lab and a wizard in food science, to get crispy chicken wings in the oven. He proposed rubbing baking powder onto raw chicken wings. Once soaked into the skins and heated in the oven, the powder expands and bursts the chicken skin cells, making the wings super crispy. Donโ€™t worry about all the science of how it works, thoughโ€”just know it does work. And the result is even better in the fryer, thanks to the force of the air, which expands the fat in the chicken skins even more, making these wings virtually indistinguishable from the deep-fried versionsโ€ฆexcept for the lack of super-greasy fingers after eating them. These โ€œdry-styleโ€ air-fried wings are also relatively healthier, swapping out the traditional Buffalo-style bath of butter and hot sauce for the slow-burn of cayenne coating and a simple brushing of melted butter at the end. If youโ€™re a classic-Buffalo fiend, Iโ€™ve got you covered with a variation, too.
Deel op Facebook Print Recipe

Ingredients

Instructions

  • Place the chicken wings on a large plate, then sprinkle evenly with the baking powder, cayenne, and garlic powder.
  • Toss the wings with your hands, making sure the baking powder and seasonings fully coat them, until evenly incorporated.
  • Let the wings stand in the refrigerator for 1 hour or up to overnight.
  • Season the wings with salt and black pepper, then transfer to the air fryer, standing them up on end against the air fryer basket wall and each other.
  • Cook at 400ยฐF until the wings are cooked through and crisp and golden brown, about 20 minutes.
  • Transfer the wings to a bowl and toss with the butter while theyโ€™re hot.
  • Arrange the wings on a platter and serve warm with blue cheese dressing and celery and carrot sticks.

Notes & Wine Advice

Classic Buffalo Wings:

If you prefer saucy traditional Buffalo chicken wings, simply omit the cayenne from the recipe, and when the wings are cooked, toss in a bowl with ยฝ cup mild hot sauce, such as Frankโ€™s, and 4 tablespoons melted unsalted butter until well coated. Serve hot.

Go Basic:

Wanna make some plain wings to have as is or with your own favorite sauce? Simply omit the cayenne, garlic powder, and butter, and cook as directed, still using the baking powder method so that the chicken wings get super crispy.
————————————————————————————————–