Rosemary Tenderloin with Wine Gravy

Rosemary beef tenderloin sliced and served with red wine gravy, roasted potatoes, and green vegetables

Rosemary Tenderloin with Wine Gravy

Tender beef tenderloin seared until deeply browned, roasted with garlic and fresh herbs, and served with a rich red wine gravy. An elegant centerpiece for four people.
Couverts4 servings
estimated costs pp $11.75
Deel op Facebook Print Recipe

Equipment

  • Large oven-safe skillet
  • Measuring cups
  • Measuring spoons
  • Meat thermometer
  • Sharp carving knife
  • Small bowl
  • Tongs
  • Whisk

Ingredients

Instructions

For the Beef Tenderloin

  • Remove the beef tenderloin from the refrigerator 30 minutes before cooking.
  • Preheat the oven to 400ยฐF (200ยฐC).
  • Pat the beef completely dry with paper towels.
  • Season it evenly with salt and black pepper.
  • Heat the olive oil in a large oven-safe skillet over medium-high heat.
  • Add the beef tenderloin.
  • Sear for approximately 2 minutes on each side.
  • Turn the beef with tongs until every surface looks browned.
  • Add the garlic, rosemary, and thyme to the skillet.
  • Transfer the skillet to the oven.
  • Roast for 20 to 25 minutes for medium-rare.
  • Check that the center reaches 125โ€“130ยฐF (52โ€“54ยฐC).
  • Transfer the beef to a cutting board.
  • Cover it loosely with foil.
  • Allow it to rest for 10 minutes.

For the Red Wine Gravy

  • Remove the herb sprigs from the skillet.
  • Carefully pour away excess fat while retaining the browned cooking residue.
  • Place the skillet over medium heat.
  • Pour in the red wine.
  • Scrape the browned residue from the bottom with a wooden spoon.
  • Simmer for 4 to 5 minutes or until the wine reduces by approximately half.
  • Add the beef stock.
  • Bring the mixture to a gentle simmer.
  • Combine the softened butter and flour in a small bowl to make a smooth paste.
  • Whisk small portions of the paste into the simmering liquid.
  • Cook for 5 to 7 minutes while whisking regularly.
  • Remove the gravy from the heat when it coats the back of a spoon.
  • Taste and adjust the seasoning.

To Serve

  • Slice the rested beef across the grain.
  • Divide it among four plates.
  • Spoon the red wine gravy over or alongside the beef.
  • Serve immediately.

Notes & Wine Advice

Serving Suggestions

Serve the sliced tenderloin with roasted potatoes, mashed potatoes, green beans, glazed carrots, or roasted root vegetables. Offer the gravy separately so everyone can add the amount they prefer.

Recipe Notes

A center-cut tenderloin of even thickness cooks more consistently than an irregularly shaped piece. Use a meat thermometer rather than relying only on cooking time. The temperature will rise slightly while the beef rests.

Dietary Information

The original dairy-free, lactose-free, and gluten-free claims were incorrect because the gravy contains butter and wheat flour. For a gluten-free version, replace the flour with a cornstarch slurry. For a dairy-free version, replace the butter with a suitable dairy-free alternative.

Nutrition Information

The values apply to one-quarter of the adjusted recipe, including gravy. The original 1.5 kg tenderloin would provide oversized portions for four people, so the beef has been reduced to 900 g. The amount of gravy consumed and the fat trimmed from the beef can affect the final values.

Variations

Add sliced mushrooms or finely chopped shallots to the gravy. Replace part of the beef stock with mushroom stock for a deeper flavor. For medium beef, roast until the center reaches 135โ€“140ยฐF (57โ€“60ยฐC) before resting.

Storage

Refrigerate the beef and gravy separately within two hours and use them within three days. Reheat the gravy in a saucepan. Warm sliced beef gently in a covered dish with a little gravy to reduce moisture loss.

Wine Advice

Pair the tenderloin with a full-bodied Cabernet Sauvignon. Its structure complements the beef and rich gravy. A rounded Merlot provides a softer alternative with ripe fruit flavors that match the red wine sauce.

Nutrition values

Serving: 1 g cooked beef with red wine gravy | Calories: 610 kcal | koolhydraten: 7 g | Eiwitten: 48 g | Vet: 40 g | Verzadigd vet: 15 g | Natrium: 650 mg | Suiker: 1 g
————————————————————————————————–

Rosemary beef tenderloin makes an elegant centerpiece without requiring complicated preparation. The beef develops a deeply browned exterior in a hot skillet before roasting with garlic, rosemary, and thyme. A rich gravy made from red wine, beef stock, butter, and the browned cooking residue completes the dish.

Why Beef Tenderloin Suits Special Dinners

Beef tenderloin has a naturally tender texture because the muscle receives relatively little exercise. It contains less connective tissue than many other roasting cuts, so it cooks quickly and does not require prolonged braising. This makes it useful for a formal Dinner or celebratory Main Course.

A 900 g center-cut tenderloin provides four generous portions after trimming and cooking. The original 1.5 kg quantity would create oversized portions for four diners. Choose a piece with an even thickness so the center cooks consistently from one end to the other.

Rosemary Beef Tenderloin with Even Doneness

Remove the beef from the refrigerator about 30 minutes before cooking. This reduces the temperature difference between the surface and center. Pat it thoroughly dry because moisture prevents the skillet from creating a properly browned crust.

Use a hot oven-safe skillet and turn the tenderloin with tongs until every surface develops color. Avoid piercing it with a fork because punctures allow juices to escape. Add the garlic and herb sprigs only after searing so they release their flavor without burning during the initial high-heat stage.

A thermometer gives a more dependable result than time alone. For medium-rare beef, remove the tenderloin when its center reaches 125โ€“130ยฐF (52โ€“54ยฐC). Rest it loosely covered for 10 minutes. Residual heat continues cooking the center, while resting allows the juices to redistribute before slicing.

The FDA publishes minimum-temperature and storage information in its safe food-handling guidance. Diners who are pregnant, older, immunocompromised, or otherwise vulnerable may prefer beef cooked to a higher internal temperature.

Making a Smooth Red Wine Gravy

After removing the beef, retain the browned residue in the skillet. These caramelized pieces add concentrated savory flavor. Pour away excessive fat, add the wine, and scrape the bottom while the liquid simmers.

Reduce the wine by approximately half before adding the stock. Reduction concentrates its flavor and removes some alcohol, although ordinary cooking does not guarantee complete alcohol removal. Anyone avoiding alcohol should replace the wine with additional beef stock and a teaspoon of balsamic vinegar.

Mix softened butter and flour into a smooth paste before whisking small portions into the simmering liquid. Adding it gradually prevents lumps and gives you control over the thickness. Continue cooking for several minutes to remove the raw flour taste.

Side Dishes and Related Recipes

Serve this roast tenderloin with gravy with mashed potatoes, roast potatoes, glazed carrots, green beans, or seasonal root vegetables. A crisp salad can balance the richness of the beef and sauce.

For other beef-centered meals, try Citrus Steak Domani Marinade, Crispy Steak Fingers with Tangy Lime Sauce, or Philly Cheesesteak Pizza. Each recipe uses beef differently, from marinating and air-frying to oven baking.

Dietary Information and Variations

The base recipe suits Egg-Free, High-Protein, Low Carb, and Nut Free

For gluten-free gravy, replace the flour paste with a cornstarch slurry. For dairy-free gravy, use a suitable dairy-free butter alternative. Check the beef stock carefully because some products contain gluten, milk, soy, or high levels of sodium.

Storage and Reheating

Refrigerate the beef and gravy separately within two hours and use them within three days. Reheat the gravy in a saucepan. Warm the sliced beef gently with a spoonful of gravy, since strong heat can overcook it and reduce its tenderness.

Wine Pairing

A structured Cabernet Sauvignon complements the beef and concentrated gravy. A rounded Merlot offers a softer pairing with ripe fruit flavors that match the wine sauce.

With its tender center, aromatic herbs, and rich homemade gravy, rosemary beef tenderloin creates a memorable centerpiece for holidays and dinner parties.


Roasted Vegetable Turkish Bread Salad

Turkish Bread Salad with Roasted Vegetables

Hearty Turkish bread salad with roasted vegetables, a vibrant and flavorful summer dish.
Couverts4
Deel op Facebook Print Recipe

Equipment

  • Baking sheet, Large bowl, Measuring cups, Measuring spoons, Whisk

Ingredients

Instructions

  • Preheat oven to 200ยฐC (400ยฐF).
  • In a bowl, toss bell peppers, zucchini, red onion, and cherry tomatoes with 2 tbsp olive oil, oregano, salt, and pepper.
  • Spread vegetables on a baking sheet and roast for 25-30 minutes, or until tender and slightly caramelized.
  • While vegetables roast, tear the Turkish bread into chunks and place in a large bowl.
  • Add the roasted vegetables to the bowl with the bread.
  • Add diced cucumbers and crumbled feta.
  • In a small bowl, whisk together remaining olive oil and lemon juice.
  • Pour dressing over the salad and toss gently to combine.
  • Garnish with fresh parsley.
  • Serve immediately.

Notes & Wine Advice

Serving Tip:

Serve as a light lunch or a side dish at a summer barbecue.

Wine Advice:

A crisp Sauvignon Blanc or a light rosรฉ.

Nutrition values

Calories: 420 kcal | koolhydraten: 50 g | Eiwitten: 12 g | Vet: 20 g | Suiker: 10 g
————————————————————————————————–

Moroccan Honey-Date Roasted Carrots

Honey-Roasted Carrots with Dates and Moroccan Dressing

Sweet and savory roasted carrots with dates and a fragrant Moroccan dressing. A vibrant side dish.
Couverts4
Deel op Facebook Print Recipe

Equipment

  • Baking sheet, Mixing bowl, Whisk, Measuring cups, Measuring spoons

Ingredients

Instructions

  • Preheat oven to 200ยฐC (400ยฐF).
  • In a mixing bowl, combine olive oil, honey, lemon juice, cinnamon, coriander, ras el hanout, salt, and pepper.
  • Add the carrots and toss to coat evenly.
  • Spread the carrots in a single layer on a baking sheet.
  • Roast for 25-30 minutes, or until tender and slightly caramelized.
  • In the last 5 minutes of roasting, add the chopped dates to the baking sheet.
  • Toss to combine.
  • Transfer the roasted carrots and dates to a serving dish.
  • Garnish with fresh cilantro or parsley.
  • Serve warm.

Notes & Wine Advice

Serving Tip:

Serve as a side dish with roasted meats or couscous.

Wine Advice:

A dry rosรฉ or a light-bodied white wine like Viognier.

Nutrition values

Calories: 250 kcal | koolhydraten: 40 g | Eiwitten: 3 g | Vet: 10 g | Suiker: 25 g
————————————————————————————————–

Harissa Honey Tomato Bean Soup

Tomato and Bean Soup with Harissa and Honey

Spicy and sweet tomato bean soup with harissa and honey. A warm and flavorful comfort meal.
Couverts6
Deel op Facebook Print Recipe

Equipment

  • Large pot, Measuring cups, Measuring spoons, Blender or immersion blender (optional)

Instructions

  • Heat olive oil in a large pot over medium heat.
  • Add onion, carrot, and celery, and cook until softened, about 5 minutes.
  • Add garlic and cook for 1 minute more.
  • Stir in harissa paste and red pepper flakes (if using), and cook for 1 minute.
  • Add canned tomatoes, cannellini beans, and vegetable or chicken stock.
  • Bring to a boil, then reduce heat and simmer for 20 minutes.
  • Stir in honey and season with salt and pepper to taste.
  • If desired, use an immersion blender or transfer to a blender to partially blend the soup for a smoother texture.
  • Simmer for another 10 minutes.
  • Garnish with fresh cilantro or parsley before serving.

Notes & Wine Advice

Serving Tip:

Serve with crusty bread or couscous for a complete meal.

Wine Advice:

A dry rosรฉ or a light-bodied red wine like Pinot Noir.

Nutrition values

Calories: 280 kcal | koolhydraten: 40 g | Eiwitten: 12 g | Vet: 8 g | Suiker: 10 g
————————————————————————————————–

Fluffy Raspberry Dream Soufflรฉ

Fluffy Raspberry Soufflรฉ

Light and airy raspberry soufflรฉ with a delicate sweetness. A perfect romantic dessert.
Couverts4
Deel op Facebook Print Recipe

Equipment

  • Egg whites 6 large
  • Granulated sugar 100g
  • Lemon juice 1 tsp
  • Raspberry puree 200g (fresh or frozen raspberries, blended and strained)
  • Cream of tartar 1/4 tsp
  • Powdered sugar for dusting

Ingredients

Instructions

  • Preheat oven to 190ยฐC (375ยฐF).
  • Butter and sugar 4 ramekins.
  • In a bowl, beat egg whites with cream of tartar and lemon juice until soft peaks form.
  • Gradually add granulated sugar, beating until stiff and glossy peaks form.
  • In another bowl, gently fold raspberry puree into the egg white mixture.
  • Divide the mixture evenly among the prepared ramekins.
  • Bake for 20-25 minutes, or until puffed and golden.
  • Dust with powdered sugar and serve immediately.

Notes & Wine Advice

Serving Tip:

Serve immediately while still warm and fluffy, perhaps with a dollop of whipped cream or fresh raspberries.

Wine Advice:

A sweet sparkling rosรฉ or a light dessert wine like Moscato d’Asti.

Nutrition values

Calories: 180 kcal | koolhydraten: 30 g | Eiwitten: 5 g | Vet: 2 g | Suiker: 25 g
————————————————————————————————–
Cuisine; French

Cheesy Two-Bean Nachos

Cheesy two-bean nachos topped with black beans, pinto beans, avocado, salsa, peppers, and melted cheese

Cheesy Two-Bean Nachos

Crispy tortilla chips layered with black beans, pinto beans, colorful peppers, melted cheese, salsa, avocado, and fresh cilantro. A generous sharing dish for parties or relaxed dinners.
Couverts4 servings
estimated costs pp $3.00
Deel op Facebook Print Recipe

Equipment

  • Baking sheet
  • Large skillet
  • Mixing bowl
  • Sharp knife
  • Wooden spoon

Ingredients

Instructions

  • Preheat the oven to 350ยฐF (175ยฐC).
  • Spread the tortilla chips evenly over a large baking sheet.
  • Heat a large skillet over medium heat.
  • Add the black beans, pinto beans, red bell pepper, green bell pepper, red onion, and jalapeรฑo.
  • Cook for approximately 5 minutes.
  • Stir occasionally until the vegetables begin to soften.
  • Spoon the warm bean mixture evenly over the tortilla chips.
  • Sprinkle the cheddar and Monterey Jack cheese over the beans.
  • Bake for 10 to 15 minutes.
  • Remove the nachos when the cheese has melted and the edges of the chips look lightly toasted.
  • Top with salsa, cilantro, and diced avocado.
  • Drizzle the avocado with lime juice if desired.
  • Serve immediately with sour cream.

Notes & Wine Advice

Serving Suggestions

Serve the nachos immediately with sour cream, extra salsa, guacamole, or lime wedges. Place additional toppings in separate bowls so everyone can customize their portion.

Recipe Notes

Spread the tortilla chips in a wide, relatively even layer so every chip receives some beans and cheese. Drain and rinse the beans thoroughly to prevent excess liquid from softening the chips. Add salsa and avocado only after baking.

Dietary Information

This recipe contains dairy. Use certified gluten-free tortilla chips, beans, salsa, spices, and dairy products when preparing it as gluten-free. Check the cheese for animal-derived rennet when serving strict vegetarians. The recipe contains no eggs or nuts when prepared with uncontaminated products.

Nutrition Information

The nutrition estimate includes one-quarter of the complete recipe and approximately one tablespoon of sour cream. The original estimate did not match the quantity of chips, beans, and cheese. Sodium varies considerably between tortilla-chip, canned-bean, salsa, and cheese brands.

Variations

Add corn, sliced olives, pickled jalapeรฑos, or chopped tomatoes after baking. Replace one type of bean with seasoned lentils for a different texture. Pepper Jack can replace Monterey Jack when you want additional heat.

Storage

Loaded nachos taste best immediately because the chips soften during storage. Refrigerate leftovers within two hours and use them within two days. Reheat them in the oven or air fryer, but add fresh avocado and sour cream only after reheating.

Wine Advice

Pair these rich, spicy nachos with a chilled Sauvignon Blanc. Its crisp acidity and fresh citrus character balance the melted cheese, creamy avocado, and spicy jalapeรฑo.

Nutrition values

Calories: 690 kcal | koolhydraten: 76 g | Eiwitten: 22 g | Vet: 30 g | Verzadigd vet: 10 g | Natrium: 850 mg | Suiker: 8 g
————————————————————————————————–

Cheesy two-bean nachos combine crisp tortilla chips with black beans, pinto beans, colorful peppers, melted cheese, fresh salsa, avocado, and cilantro. Every serving offers contrasting textures, from crunchy chips and tender beans to creamy avocado and bubbling cheese. They work equally well as a substantial snack or a relaxed sharing meal.

Why Two Types of Beans Work So Well

Black beans have a firm texture and an earthy flavor, while pinto beans become softer and creamier when heated. Using both varieties gives the topping more structure than a single-bean mixture. Beans also add protein and fiber, making these nachos more satisfying than versions made with cheese alone.

Rinse and drain the canned beans thoroughly before cooking them. This removes excess canning liquid and some sodium while preventing the tortilla chips from becoming soggy. Warming the beans with the peppers and onion also removes additional moisture and blends their flavors.

Cheesy Two-Bean Nachos with Crisp Layers

Arrange the tortilla chips in a wide, fairly even layer instead of creating a tall pile. A single layer with slight overlapping allows more chips to receive beans and cheese. It also helps the oven toast their exposed edges.

Spread the bean mixture across the complete tray, then distribute the cheddar and Monterey Jack evenly. Cheddar adds a sharper flavor, while Monterey Jack melts smoothly and connects the toppings to the chips. Bake the tray only until the cheese melts and bubbles. Leaving it in the oven too long can dry the beans and scorch the chips.

Add salsa, avocado, cilantro, and sour cream after baking. These cool toppings provide freshness and contrast but contain enough moisture to soften the chips if added too early. A squeeze of lime juice brightens the flavors and slows the browning of the avocado.

A Flexible Sharing Dish

Serve these loaded vegetarian nachos as an appetizer, snack, or casual Comfort Food meal. They make a practical choice for Game Day, a family movie night, or an informal party.

For a larger sharing table, serve them with Tortilla Chips with Special Guacamole, Layered Pinto Bean Dip Olรฉ, or Spicy Vegetarian Empanadas. Place salsa, sour cream, jalapeรฑos, and lime wedges in separate bowls so guests can adjust the toppings themselves.

Dietary Information and Easy Variations

The recipe suits a Vegetarian diet when the cheese uses microbial or vegetarian rennet. It can also fit an Egg-Free, Nut Free, or Gluten-Free

Some tortilla chips share production lines with wheat products, while prepared salsa and seasoning blends can contain unexpected additives. Read every label when cooking for someone with an allergy or medical dietary restriction.

For a dairy-free variation, replace the cheese and sour cream with suitable plant-based alternatives. Add roasted corn, sliced olives, fresh tomato, or pickled jalapeรฑos for extra color and flavor. Pepper Jack increases the heat, while mild mozzarella creates a gentler version for children.

The nutrition estimate assumes four generous portions and includes sour cream. Smaller appetizer portions will naturally contain fewer calories. Sodium varies substantially according to the brands of chips, beans, salsa, and cheese. Choosing low-sodium beans and rinsing them well can reduce the final amount.

Storage and Food Safety

Nachos taste best directly from the oven. The chips absorb moisture from the beans and toppings during storage, so they gradually lose their crunch. If you expect leftovers, bake only the amount you plan to eat and refrigerate the remaining bean mixture separately.

Refrigerate leftovers within two hours and consume them within two days. Reheat the chips and bean topping in the oven or air fryer, then add fresh avocado, salsa, and sour cream. Consult the FDAโ€™s safe food-handling guidance for more information about storing and reheating prepared foods.

Wine Pairing

A chilled Sauvignon Blanc provides crisp acidity that cuts through the melted cheese and creamy avocado. Its citrus and herbal character also complements fresh cilantro, lime, peppers, and salsa.

Colorful, filling, and easy to customize, cheesy two-bean nachos offer a dependable centerpiece for relaxed meals and sharing occasions.


Creamy Reuben Party Dip

Creamy Reuben party dip served warm with toasted rye bread cubes and fresh vegetable sticks

Creamy Reuben Party Dip

A warm slow-cooker dip filled with corned beef, sauerkraut, Swiss cheese, and creamy dressing. It delivers the familiar flavors of a Reuben sandwich in a rich party dip.
Couverts4 servings
estimated costs pp $3.25
Deel op Facebook Print Recipe

Equipment

Ingredients

Instructions

  • Squeeze as much moisture as possible from the drained sauerkraut.
  • Place the corned beef, sauerkraut, Swiss cheese, Thousand Island dressing, cream cheese, green onions, Dijon mustard, and caraway seeds in a mixing bowl.
  • Stir until evenly combined.
  • Transfer the mixture to the slow cooker.
  • Spread it into an even layer.
  • Cover and cook on low for 3 to 4 hours.
  • Stir the dip once every hour.
  • Check that the cheese has melted and the dip is hot throughout.
  • Season with black pepper.
  • Taste before adding salt because the corned beef, cheese, sauerkraut, and dressing already contain sodium.
  • Keep the dip warm in the slow cooker during serving.
  • Serve with rye bread cubes, crackers, toasted baguette, or fresh vegetable sticks.

Notes & Wine Advice

Serving Suggestions

Keep the dip warm in the slow cooker and serve it with rye bread cubes, toasted baguette, crackers, pretzel bites, or firm vegetable sticks. Rye bread provides the most traditional Reuben-style combination.

Recipe Notes

Drain, rinse, and firmly squeeze the sauerkraut before adding it. Excess moisture can make the dip watery. Stir the mixture occasionally so the cheese melts evenly around the edges and through the center.

Dietary Information

This recipe contains milk and usually contains egg because Thousand Island dressing commonly includes mayonnaise. Use certified gluten-free corned beef, dressing, Dijon mustard, seasonings, and serving accompaniments when preparing the recipe as gluten-free. The dip contains no nuts when all packaged products come from nut-safe facilities.

Nutrition Information

The nutrition estimate applies to one-quarter of the adjusted recipe, or approximately ยพ cup. Corned beef, sauerkraut, Swiss cheese, dressing, and mustard can all contain considerable sodium. Rinsing the sauerkraut and avoiding extra salt help reduce the final amount, but this remains a high-sodium dish.

Variations

Replace the Thousand Island dressing with Russian dressing for a sharper flavor. Add extra sauerkraut for more acidity or increase the Swiss cheese for a richer texture. A small amount of prepared horseradish adds extra bite.

Storage

Refrigerate leftovers in a covered container within two hours and use them within three days. Reheat the dip slowly until it reaches 165ยฐF (74ยฐC), stirring several times to restore its creamy consistency.

Wine Advice

Pair this rich dip with a dry Riesling. Its bright acidity balances the fatty corned beef and melted cheese, while its fresh fruit character complements the tangy sauerkraut and dressing.

Nutrition values

Calories: 428 kcal | koolhydraten: 9 g | Eiwitten: 19 g | Vet: 34 g | Verzadigd vet: 12 g | Natrium: 1250 mg | Suiker: 5 g
————————————————————————————————–

Creamy Reuben party dip transforms the familiar flavors of a Reuben sandwich into a warm, scoopable slow-cooker appetizer. Corned beef provides a rich and savory base, while sauerkraut adds acidity and a pleasant fermented flavor. Swiss cheese, cream cheese, and Thousand Island dressing bring everything together in a smooth, satisfying dip.

Classic Reuben Flavors in a Warm Dip

A traditional Reuben sandwich combines corned beef, sauerkraut, Swiss cheese, dressing, and rye bread. This recipe keeps those recognizable ingredients but changes the presentation. Instead of building sandwiches, you mix the filling and warm it gently until the cheese melts.

The result works particularly well as an appetizer or dip for a party. Guests can help themselves directly from the slow cooker, which keeps the mixture warm without requiring repeated trips to the kitchen.

Creamy Reuben Party Dip in the Slow Cooker

The slow cooker uses gentle heat to melt the cheeses without scorching them. It also gives the corned beef, dressing, mustard, and caraway time to season the complete mixture. Stirring once every hour helps the ingredients heat evenly, especially around the edges of the cooker.

Sauerkraut contains plenty of liquid, so drain, rinse, and squeeze it thoroughly before mixing the dip. Removing that moisture protects the creamy texture and also reduces some of the sauerkrautโ€™s saltiness. A clean kitchen towel or several sheets of paper towel make this job easier.

Do not automatically add extra salt. Corned beef, Swiss cheese, sauerkraut, dressing, and mustard already contain sodium. Taste the finished dip first, then add only a small amount if the flavor genuinely needs it. Freshly ground black pepper usually provides enough extra seasoning.

Serving Ideas for Parties and Weekends

Serve this warm corned beef cheese dip with rye bread cubes for the closest connection to a classic Reuben. Toasted baguette, crackers, pretzel bites, and sturdy vegetable sticks also work well. Avoid very thin chips because the thick dip can easily break them.

For a larger sharing table, combine it with Creamy Slow-Cooked Refried Bean Dip, Slow-Cooker Buffalo Wings, or Layered Pinto Bean Dip Olรฉ. These dishes create a varied selection for Game Day or a relaxed weekend gathering.

You can prepare the ingredients several hours in advance. Combine everything in the removable slow-cooker insert, cover it, and refrigerate it. Allow the insert to lose its refrigerator chill before placing it in the cooker, unless the manufacturer confirms that a cold insert can safely receive heat.

Dietary Information and Variations

This dip contains dairy from Swiss cheese and cream cheese. Thousand Island dressing usually contains egg because manufacturers often make it with mayonnaise. The corned beef also means the recipe does not qualify as vegetarian, pescatarian, halal, or kosher.

The recipe can suit a Gluten-Free diet when you select certified gluten-free corned beef, dressing, mustard, seasonings, and serving accompaniments. Rye bread contains gluten, so serve gluten-free crackers or vegetables instead. Always check every packaged ingredient because recipes and manufacturing methods can change.

With approximately 9 grams of carbohydrates and 19 grams of protein per serving, the dip fits the Low Carb and High-Protein categories. However, it contains substantial sodium and saturated fat, so the recipe works best as an occasional sharing dish rather than an everyday meal.

Russian dressing can replace Thousand Island dressing for a sharper flavor. Add prepared horseradish for extra bite, or increase the sauerkraut for a more pronounced tang. Chopped pickles bring additional acidity and a little crunch.

Safe Storage and Reheating

Keep the dip warm during serving, but do not leave it sitting at an unsafe temperature for extended periods. Refrigerate leftovers within two hours and use them within three days. Reheat the dip slowly to 165ยฐF (74ยฐC), stirring regularly so the cheese remains smooth. The FDA provides additional safe food-handling guidance for prepared meat and dairy dishes.

Wine Pairing

A dry Riesling offers enough acidity to balance the rich meat and melted cheese. Its fresh fruit character also softens the salty flavor of the corned beef and complements the acidity of the sauerkraut.

Rich, tangy, and easy to keep warm for guests, creamy Reuben party dip brings classic sandwich flavors to a practical sharing dish.


Smoky Walnut Eggplant Dip

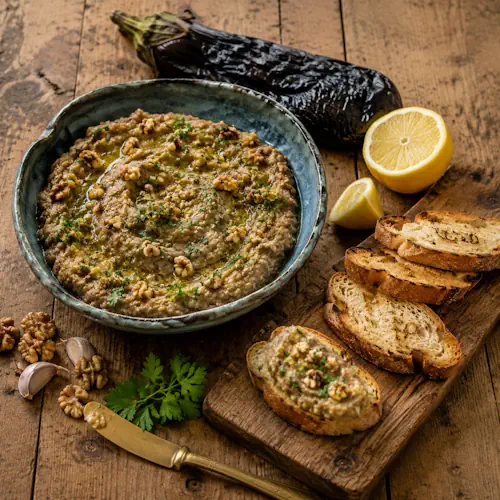
Smoky walnut eggplant dip served with toasted pita, walnuts, parsley, and fresh vegetables

Smoky Walnut Eggplant Dip

A creamy roasted eggplant dip with toasted walnuts, garlic, lemon, and parsley. Its smoky flavor and subtle crunch make it ideal for dipping, spreading, or serving as an appetizer.
Couverts4 servings
estimated costs pp $1.65
Deel op Facebook Print Recipe

Equipment

  • Baking sheet
  • Food processor
  • Fork
  • Mixing bowl

Instructions

  • Preheat oven to 400ยฐF (200ยฐC).
  • Pierce eggplants with a fork and place on a baking sheet.
  • Bake for 35-40 minutes, or until soft and collapsed.
  • Let cool, then peel and scoop out the flesh.
  • Place eggplant flesh, walnuts, garlic, lemon juice, and olive oil in a food processor.
  • Pulse until smooth but still slightly chunky.
  • Transfer to a mixing bowl.
  • Stir in parsley, salt, and pepper.
  • Chill for at least 30 minutes before serving.

Notes & Wine Advice

Serving Suggestions

Serve the dip chilled or at room temperature with toasted pita, crostini, crackers, or fresh vegetable sticks. It also works well as a sandwich spread or alongside grilled vegetables.

Recipe Notes

Draining the roasted eggplant prevents a watery dip. Pulse the ingredients briefly if you prefer a chunkier texture. Toasting the walnuts in a dry skillet for 3 to 4 minutes creates a deeper, nuttier flavor.

Dietary Information

The dip contains walnuts and is therefore unsuitable for anyone with a tree-nut allergy. The recipe contains no dairy, eggs, gluten, soy, or wheat. Check packaged accompaniments separately before serving.

Nutrition Information

The nutrition estimate applies to one-quarter of the complete recipe. The precise values can vary according to the size of the eggplants and the amount of salt retained in each serving.

Variations

Add ยฝ teaspoon smoked paprika for a stronger smoky taste. Fresh cilantro can replace the parsley, while a pinch of cayenne adds heat. For a smoother dip, process the mixture for an additional 20 to 30 seconds.

Storage

Store the dip in a covered container in the refrigerator for up to four days. Stir it before serving. Freezing is not recommended because thawed eggplant can release excess moisture.

Wine Advice

A dry Rosรฉ balances the smoky eggplant and earthy walnuts. A crisp Pinot Grigio provides a lighter pairing that complements the lemon and fresh parsley.

Nutrition values

Calories: 215 kcal | koolhydraten: 15 g | Eiwitten: 5 g | Vet: 17 g | Verzadigd vet: 2 g | Natrium: 300 mg | Suiker: 6 g
————————————————————————————————–

Smoky walnut eggplant dip combines tender roasted eggplant, crunchy walnuts, fresh garlic, lemon juice, parsley, and olive oil. Roasting concentrates the eggplantโ€™s earthy flavor and creates a soft texture that blends easily into a creamy spread. Walnuts add richness and a gentle bite, while lemon keeps the finished dip fresh and balanced.

A Versatile Roasted Vegetable Dip

This recipe works as an appetizer, savory dip, sandwich spread, or addition to a sharing platter. Serve it with warm pita bread, toasted baguette, crackers, cucumber slices, or sweet pepper strips. You can also spoon it onto roasted potatoes or serve it alongside grilled vegetables.

The dip fits naturally into a Mediterranean-inspired meal, although its simple ingredients make it suitable for many different menus. Add Zesty Lemon Hummus, olives, fresh vegetables, and flatbread to create an easy mezze-style platter. The contrasting colors and textures make the platter attractive without requiring complicated preparation.

Smoky Walnut Eggplant Dip with Better Texture

Roast the eggplants until their skins wrinkle and the flesh feels completely tender. Firm or undercooked eggplant can give the dip a spongy texture and slightly bitter flavor. Piercing the skins before roasting allows steam to escape safely.

After cooling the eggplants, remove the skins and drain the flesh briefly in a colander. Eggplants contain plenty of moisture, and removing some of it prevents a thin or watery result. Do not squeeze the flesh because that can remove too much of its flavor and creamy texture.

Pulse the ingredients instead of continuously blending them. Short pulses retain small pieces of walnut and create a more interesting consistency. Process the mixture longer if you prefer a completely smooth spread. Toasting the walnuts in a dry skillet for 3 to 4 minutes adds extra depth, but allow them to cool before adding them to the food processor.

Serving Ideas and Flavor Variations

For a stronger smoky character, add smoked paprika or char the eggplants carefully over a gas flame before finishing them in the oven. A pinch of cayenne provides heat, while ground cumin gives the dip a warmer flavor. Fresh cilantro can replace parsley for a brighter variation.

Serve the roasted aubergine walnut spread with homemade tortilla chips for a less traditional Fusion combination. You can also spread it on toasted bread topped with tomato, parsley, or a small drizzle of olive oil. For another rich vegetable dish, pair it with Slow-Cooked Roasted Garlic.

This recipe suits a Vegan, Vegetarian, Gluten-Free, Dairy-Free, and Egg-Free

Storage and Food Safety

Keep the dip in a clean, airtight container in the refrigerator and use it within four days. Stir it before serving because a little moisture or oil may collect on the surface. Avoid leaving the dip at room temperature for more than two hours, especially during warm weather or outdoor gatherings.

The texture changes after freezing because eggplant releases water as it thaws. Refrigerated storage therefore gives the best result. Always use clean utensils when serving and follow the FDAโ€™s safe food-handling guidance for cooling, storing, and serving prepared foods.

Wine Pairing

A dry Rosรฉ provides fresh acidity and subtle fruit that balance the earthy walnuts and roasted eggplant. A crisp Pinot Grigio complements the lemon and parsley while keeping the pairing light. Serve either wine slightly chilled.

Easy preparation, flexible serving options, and a satisfying combination of creamy and crunchy textures make smoky walnut eggplant dip a useful recipe for parties, picnics, and relaxed weekend meals.


Sweet-Spiced Onion Chutney

Sweet-spiced onion chutney in a glass jar with sliced onions, thyme and toasted bread

Sweet-Spiced Onion Chutney

A rich onion chutney with balsamic vinegar, brown sugar, thyme and warming spices. Serve it with cheese, burgers, sandwiches or grilled meats.
Couverts4 servings
estimated costs pp $0.80
Deel op Facebook Print Recipe

Equipment

Instructions

  • Heat the olive oil in a large saucepan over medium-low heat.
  • Add the sliced onions.
  • Cook for 15 to 20 minutes.
  • Stir regularly until the onions become soft and lightly golden.
  • Add the brown sugar and balsamic vinegar.
  • Stir until the sugar dissolves.
  • Add the apple cider vinegar, water, thyme, ginger, cinnamon and cloves.
  • Season with the salt and black pepper.
  • Bring the mixture to a gentle simmer.
  • Reduce the heat to low.
  • Cook uncovered for 35 to 40 minutes.
  • Stir more frequently as the liquid reduces.
  • Remove the saucepan from the heat when the onions are deeply softened and the mixture resembles jam.
  • Allow the chutney to cool for 30 minutes.
  • Transfer it to a clean covered container.
  • Refrigerate until needed.

Notes & Wine Advice

Serving Suggestions

Serve this chutney with mature cheese, grilled meat, burgers, sandwiches, pรขtรฉ or roasted vegetables. It also works well as a savory topping for crackers and toasted baguette.

Recipe Notes

The original 30-minute cooking time was too short for four large onions and ยฝ cup water. Cooking the onions gently for approximately 1 hour develops a deeper flavor and allows the liquid to reduce to a jam-like consistency. Stir frequently during the final 15 minutes to prevent the sugar from catching.

Dietary Information

This recipe contains no animal products, dairy, eggs, wheat, gluten, soy or nuts. It is suitable for Vegan, Vegetarian and Gluten-Free diets when prepared with uncontaminated ingredients and equipment.

Nutrition Information

The nutritional values are estimates for one-quarter of the complete recipe. Most of the carbohydrates and natural sugars come from the onions. Brown sugar adds approximately 3 g additional sugar per serving. The chutney is low in fat but has not been classified as low-sugar.

Variations

Add chili flakes for heat or replace the thyme with rosemary. Raisins can provide additional sweetness and texture. For a sharper chutney, add another tablespoon of apple cider vinegar during the final 10 minutes.

Storage

Transfer the cooled chutney to a clean covered container and refrigerate it within 2 hours. Use it within 2 weeks and always remove it with a clean spoon. This is a refrigerated chutney, not a tested shelf-stable preserve. Do not store it in the pantry or use an untested canning method.

Wine Advice

A medium-bodied Merlot complements the caramelized onions, warming spices and grilled-meat pairings. A fruity Riesling provides enough acidity to balance the sweetness and works particularly well when serving the chutney with cheese. Serve Merlot at 16โ€“18ยฐC or Riesling at 8โ€“10ยฐC.

Nutrition values

Calories: 105 kcal | koolhydraten: 19 g | Eiwitten: 2 g | Vet: 4 g | Verzadigd vet: 0.5 g | Natrium: 155 mg | Suiker: 10 g
————————————————————————————————–

Sweet-spiced onion chutney combines slowly softened onions with brown sugar, two vinegars, thyme and warming spices. Gentle cooking develops the onionsโ€™ natural sweetness, while balsamic and apple cider vinegar provide enough acidity to keep the finished chutney balanced.

This recipe makes four generous servings and works as a condiment, savory sauce or accompaniment. Serve it with burgers, grilled meat, mature cheese, sandwiches or roasted vegetables. Its concentrated flavor means that a small spoonful can transform a simple dish.

Why Slow Cooking Matters

Four large onions need more than 30 minutes to soften, caramelize and reduce with ยฝ cup water. Cooking them for approximately one hour creates a deeper color and richer flavor. Higher heat may work faster, but it also increases the chance that the sugar will burn before the onions become tender.

Brown sugar supports caramelization without making the chutney excessively sweet. Balsamic vinegar contributes dark fruit notes, while apple cider vinegar adds a cleaner acidity. Together, they create a balsamic onion preserve that remains savory enough for meat and cheese.

How to Make Sweet-Spiced Onion Chutney

Slice the onions evenly so they cook at approximately the same rate. Heat the olive oil over medium-low heat and cook the onions for 15 to 20 minutes. Stir them regularly until they soften and develop a pale golden color.

Add the brown sugar and balsamic vinegar, then stir until the sugar dissolves. Pour in the apple cider vinegar and water before adding thyme, ginger, cinnamon and cloves. Keep the heat low and allow the liquid to reduce gradually.

Stir more frequently during the final 15 minutes. The chutney is ready when the onions look glossy and the remaining liquid coats them like a thick syrup. Remember that it will thicken further while cooling.

Its Culinary Background

Chutney has strong roots in Indian cuisine, where many versions combine fruit, vegetables, spices, sweetness and acidity. British cooks adapted these preserves over time, often creating thicker chutneys designed for cheese, cold meats and sandwiches.

This onion version brings those traditions together, making it suitable for the Fusion classification. Its ingredients and uses also make it appropriate within International cuisine.

Serving Ideas for Everyday Meals

Spoon the chutney over burgers, sausages or grilled steak. It also works well with roast chicken, pork, lamb and plant-based burgers. Add it near the end of cooking rather than directly over high heat because its sugar can burn.

For a cheese board, serve it beside mature Cheddar, Brie, goat cheese or blue cheese. Add crackers, toasted bread and fresh fruit to provide contrasting textures. A small amount can also enrich gravy or a sandwich spread.

Use it as a side dish for a barbecue or weekend meal. For another homemade option, offer Spiced Apple Raisin Chutney alongside it. The apple version tastes fruitier, while the onion chutney offers a more savory result.

Variations and Flavor Adjustments

Add chili flakes or cayenne for a spicy finish. Fresh rosemary can replace thyme, although its stronger flavor requires a smaller quantity. Raisins add texture and sweetness, while diced apple produces a softer, fruitier variation.

Reduce the brown sugar when the onions already taste especially sweet. For extra acidity, stir another tablespoon of apple cider vinegar through the chutney during the final ten minutes. Taste carefully after cooling because hot chutney often seems less sweet than cold chutney.

Dietary Information

The ingredients contain no animal products, making the recipe suitable for Vegan and Vegetarian diets. It also contains no dairy, eggs, soy, wheat or nuts.

The recipe suits a Gluten-Free diet when you use uncontaminated spices and vinegars. People with severe allergies should still check every package label. The chutney does not qualify as low-sugar because onions and brown sugar both contribute sugars.

Safe Refrigerated Storage

Transfer the cooled chutney to a clean container and refrigerate it within two hours. Use it within two weeks and always remove portions with a clean spoon. Discard it if you notice mold, unusual fermentation, a strange odor or a swollen lid.

This recipe has not undergone testing as a shelf-stable canning formula. Do not store it in a pantry or process it using an improvised preserving method. Consult the FDAโ€™s safe food-handling guidance for general information about cooling and refrigerating prepared foods.

Red and White Wine Options

A medium-bodied Merlot complements caramelized onions, warming spices and grilled meats. Serve it at approximately 16โ€“18ยฐC. A fruity Riesling offers a fresher option for cheese boards and balances the chutneyโ€™s sweetness with lively acidity. Serve Riesling chilled at approximately 8โ€“10ยฐC.

Keep a container of sweet-spiced onion chutney refrigerated for adding quick depth to everyday meals. Its combination of sweetness, acidity and spice works across sandwiches, cheese boards, roasted dishes and outdoor meals.


Mellow Crockpot Garlic Spread

Mellow crockpot garlic spread in a small bowl with toasted bread and whole garlic heads

Mellow Crockpot Garlic Spread

Soft, mellow garlic slowly cooked with olive oil, salt and pepper. Spread the creamy cloves over bread or use them to enrich sauces, soups, vegetables and mashed potatoes.
Couverts4 servings
estimated costs pp $0.75
Deel op Facebook Print Recipe

Equipment

  • Aluminum Foil, Heavy-Duty
  • Crockpot, 1-quart
  • Knife
  • Small bowl

Instructions

  • Cut approximately ยผ inch from the top of each garlic head.
  • Expose the tops of the individual cloves without separating them.
  • Remove only the loose outer papery skins.
  • Line a 1-quart crockpot with heavy-duty aluminum foil.
  • Arrange the garlic heads cut side up in the crockpot.
  • Drizzle the olive oil evenly over the exposed cloves.
  • Sprinkle with the salt and black pepper.
  • Cover and cook on low for 4 to 5 hours.
  • Check the garlic after 4 hours.
  • Continue cooking until the cloves feel completely soft when pierced with a knife.
  • Carefully remove the garlic heads from the crockpot.
  • Allow them to cool for 10 minutes.
  • Squeeze the softened cloves from their skins into a small bowl.
  • Mash with a fork to create a smooth spread.
  • Serve immediately or refrigerate promptly.

Notes & Wine Advice

Serving Suggestions

Spread the softened garlic over warm baguette slices, crackers or toast. Stir it into mashed potatoes, pasta sauce, soup, hummus, salad dressing or roasted vegetables.

Recipe Notes

The original three-hour cooking time was too short compared with the stated method. Most slow cookers need 4 to 5 hours on low. Check the garlic after 4 hours and continue until every clove feels completely soft. Slow cookers vary in temperature, so use tenderness rather than time alone.

Dietary Information

The recipe contains no dairy, eggs, gluten, wheat, soy or nuts. It suits vegan, vegetarian, pescatarian, halal and kosher diets when prepared with uncontaminated ingredients and equipment. Although garlic is often used in keto cooking, one full serving here contains approximately 10 g carbohydrate. For that reason, the recipe has not been classified as keto or low-carb.

Nutrition Information

The nutritional values are estimates for one-quarter of the complete recipe, including all the olive oil. The original estimate of 80 calories was slightly too low for three complete garlic heads and two tablespoons of oil. Sodium can be reduced by using ยผ teaspoon salt instead of ยฝ teaspoon.

Variations

Add fresh thyme, rosemary or smoked paprika before cooking. For a sweeter flavor, omit the black pepper. Blend the finished cloves with a little of the cooking oil for an even smoother consistency.

Storage

Garlic stored in oil can support the growth of harmful bacteria when kept incorrectly. Do not leave the cooked garlic at room temperature. Refrigerate it in a covered container within 2 hours and use it within 3 days. Freeze individual portions for longer storage. Never store homemade garlic in oil in the pantry.

Wine Advice

A crisp Sauvignon Blanc provides enough acidity to balance the olive oil and complements the garlicโ€™s mellow sweetness. A lightly styled Chardonnay offers a rounder alternative when serving the garlic with bread, pasta or creamy vegetable dishes. Serve either wine chilled at approximately 8โ€“10ยฐC.

Nutrition values

Calories: 105 kcal | koolhydraten: 10 g | Eiwitten: 2 g | Vet: 7 g | Verzadigd vet: 1 g | Natrium: 295 mg | Suiker: 0.3 g
————————————————————————————————–

Mellow crockpot garlic spread transforms whole garlic heads into soft, creamy cloves with a gently sweet and nutty flavor. Slow cooking removes most of raw garlicโ€™s sharp bite, while olive oil, salt and pepper provide a simple savory finish.

This recipe makes four servings and requires only ten minutes of preparation. The crockpot handles the remaining work, making the recipe useful when your oven is occupied. Spread the finished garlic over bread or use it as a flavorful addition to numerous savory recipes.

Why Slow Cooking Garlic Works

Garlic changes considerably when exposed to gentle heat for several hours. Its firm cloves soften, its sharp sulfur compounds become less dominant and its natural sweetness becomes more noticeable. The result tastes rounder and milder than raw or quickly sautรฉed garlic.

The foil keeps the garlic heads together and makes cleanup easier. Olive oil carries flavor across the exposed cloves and helps prevent their tops from drying out. This produces a slow-cooked garlic paste that you can squeeze directly from the skins.

How to Make Mellow Crockpot Garlic Spread

Cut approximately ยผ inch from the top of each garlic head. You should expose the individual cloves while leaving the root end intact. Remove loose outer skins, but retain enough papery skin to hold each bulb together.

Line a 1-quart crockpot with heavy-duty foil and arrange the garlic cut side up. Drizzle the oil over the exposed cloves, then add salt and pepper. Cover and cook on low for four to five hours.

Slow cookers vary in temperature, so start checking after four hours. The garlic is ready when a knife slides into the center cloves without resistance. Let the heads cool briefly before squeezing them because the cloves and trapped oil can remain extremely hot.

Ways to Use the Finished Garlic

Mash the cloves and spread them over toasted baguette, crackers, flatbread or sandwiches. Stir a spoonful into mashed potatoes, pasta sauce, soup, gravy or hummus. The mild flavor also works well in salad dressing and marinades.

Add it to the vegetables in Balsamic Roasted Asparagus and Pearl Onions or mix it through Roasted Autumn Harvest Vegetables. Its savory sweetness can also provide an interesting contrast alongside Spiced Apple Raisin Chutney on a cheese or appetizer board.

Herbs and Other Variations

Add rosemary, thyme, sage or smoked paprika before cooking. Fresh woody herbs tolerate the long cooking time better than delicate herbs such as basil or parsley. You can add those softer herbs after mashing the cloves.

For a smoother spread, blend the garlic with a small amount of its cooking oil. Do not add large quantities of oil unless you plan to use the mixture immediately or freeze it in small portions.

Reduce the salt to ยผ teaspoon when you plan to stir the garlic into other seasoned foods. Leaving out the salt completely creates a flexible basic ingredient, although the finished flavor will taste less rounded when served on bread.

Nutrition and Dietary Information

The recipe contains no animal products, gluten, wheat, soy, dairy, eggs or nuts. It therefore suits many common dietary requirements. Always use clean equipment and uncontaminated ingredients when preparing it for someone with a serious allergy.

Garlic supplies most of the carbohydrates, while olive oil contributes nearly all the fat and calories. One serving equals approximately three-quarters of a garlic head. That amount contains more carbohydrates than the small quantities of garlic commonly used in keto recipes, so this recipe does not carry a keto or low-carb classification.

Important Storage Advice

Garlic combined with oil requires careful handling because unsafe storage can allow harmful bacteria to grow without creating an obvious smell or visible warning. Never store this homemade preparation at room temperature or in a pantry.

Refrigerate the cooked garlic in a covered container within two hours and use it within three days. Freeze smaller portions when you need longer storage. Consult the FDAโ€™s safe food-handling guidance for general information about cooling and refrigerating prepared foods.

White Wines to Serve Alongside

A crisp Sauvignon Blanc balances the olive oil and complements the garlicโ€™s mellow sweetness. A lightly styled Chardonnay offers a rounder pairing when serving the spread with bread, pasta or creamy vegetables. Serve either variety chilled at approximately 8โ€“10ยฐC.

Prepare mellow crockpot garlic spread whenever you want a versatile garlic ingredient without the harshness of raw cloves. A small spoonful can add considerable depth to everyday vegetables, sauces and appetizers.