
Spiced Apple Raisin Chutney

Spiced apple chutney with raisins and warming spices served in a small glass jar

Spiced Apple Raisin Chutney

A sweet, tangy and gently spiced apple chutney with raisins, onion, ginger and warm baking spices. Serve it with curries, roasted meats, sandwiches or a cheese platter.
Couverts8 servings
estimated costs pp $0.55
Deel op Facebook Print Recipe

Equipment

Instructions

  • Heat the olive oil in a saucepan over medium heat.
  • Add the chopped onion.
  • Cook for 5 minutes until softened but not browned.
  • Add the diced apples and raisins.
  • Add the ginger, cinnamon, cloves, nutmeg and salt.
  • Stir until evenly combined.
  • Add the brown sugar, vinegar and water.
  • Stir until the sugar begins to dissolve.
  • Bring the mixture to a gentle simmer.
  • Reduce the heat to low.
  • Cook uncovered for 40 minutes.
  • Stir every 5 to 10 minutes.
  • Cook until the apples are soft and the liquid has reduced to a thick chutney.
  • Add a small splash of water if the mixture begins sticking before the apples soften.
  • Remove the saucepan from the heat.
  • Allow the chutney to cool for 30 minutes.
  • Transfer it to clean airtight glass jars.
  • Refrigerate until needed.

Notes & Wine Advice

Serving Suggestions

Serve the chutney with curries, grilled or roasted meat, mature cheese, sandwiches or savoury pastries. Start with 1 or 2 tablespoons because the chutney has a concentrated sweet-and-sour flavor.

Recipe Notes

Tart apples such as Granny Smith or Braeburn balance the brown sugar. Dice the apples evenly so they soften at the same rate. The chutney is ready when it looks thick and a spoon drawn across the bottom briefly leaves a visible trail.

Dietary Information

The basic ingredients contain no dairy, eggs, gluten, wheat, soy or nuts. Check the vinegar, spices and raisins for allergen warnings when preparing the chutney for a restricted diet. Halal and kosher classifications depend on the certification of the vinegar and other packaged ingredients.

Nutrition Information

The original estimate of 75 calories appears too low for the stated ingredients unless the recipe makes considerably more than 8 servings. The revised estimate is approximately 125 calories per ยผ-cup serving. Brown sugar, apples and raisins make this chutney high in sugar, so it does not qualify as low-sugar or diabetic-friendly.

Variations

Add ยผ teaspoon chilli flakes for more heat or replace half the raisins with dried cranberries. A teaspoon of mustard seeds adds a sharper Indian-inspired flavor. Reduce the cloves to ยผ teaspoon when you prefer a milder spice profile.

Storage

This is a refrigerated chutney and not a shelf-stable preserve. Store it in clean airtight jars in the refrigerator and use it within 2 weeks. Do not keep it at room temperature or use pantry-canning methods unless you follow a professionally tested preserving recipe.

Wine Advice

The Bรผrgerspital Riesling VDP Gutswein, made from Riesling grapes, has fresh apple, peach, apricot and citrus notes. Its dry style and gentle acidity complement the chutney particularly well when it is served with cheese, pork or poultry. Serve the wine at 8โ€“10ยฐC.

Nutrition values

Serving: 60 gr | Calories: 125 kcal | koolhydraten: 29 g | Eiwitten: 1 g | Vet: 2 g | Verzadigd vet: 0.3 g | Natrium: 75 mg | Suiker: 24 g
————————————————————————————————–

Spiced apple chutney combines tender apples, sweet raisins, tangy vinegar and warming spices in one versatile homemade condiment. The apples soften during cooking while retaining enough texture to give each spoonful character. Brown sugar rounds out the acidity, and ginger, cinnamon, cloves and nutmeg create a fragrant finish.

This recipe produces four generous servings and works particularly well when you want something more exciting than an everyday sauce. Serve it with roasted meat, curries, sandwiches or a carefully arranged cheese board. You can also spoon a little chutney alongside savory pastries or use it to brighten leftover roasted vegetables.

Why This Homemade Chutney Works

The recipe builds flavor in stages. Gently cooking the onion in olive oil first removes its raw sharpness and develops a savory foundation. Apples and raisins then contribute natural sweetness, while vinegar supplies the acidity needed to keep the finished condiment lively rather than sugary.

Warm spices give this apple raisin chutney its distinctive aroma. Ginger adds gentle heat, cinnamon provides sweetness, and small quantities of cloves and nutmeg create depth. Because these spices have strong flavors, the measured amounts keep them from overpowering the apples.

How to Make Spiced Apple Chutney

Cut the apples into evenly sized pieces so they soften at approximately the same rate. After sautรฉing the onion, add the fruit and spices before stirring in the sugar, vinegar and water. Maintain a gentle simmer and stir the mixture regularly, especially toward the end of cooking. The chutney is ready when the liquid has reduced and the apples feel tender but have not completely disappeared.

The chutney will continue to thicken as it cools. If it becomes too thick in the saucepan, stir in a small splash of water. If it still appears watery after 45 minutes, simmer it uncovered for a few additional minutes. Keep the heat low to prevent the sugar from catching on the bottom.

Serving Ideas and Recipe Pairings

Serve the chutney with Roast Lamb Rack with Lemon for a sweet and tangy contrast to the seasoned meat. It also complements the earthy vegetables in Curried Apple Sprouts. For a festive meal, offer it alongside Classic Homestyle Bread Dressing.

For a cheese board, pair it with mature Cheddar, Brie, goat cheese or a nutty aged cheese. Add crackers, toasted bread and fresh apple slices to create contrasting textures. On sandwiches, a thin layer works especially well with cheese, roast chicken or grilled vegetables.

Storage and Food Safety

Transfer the cooled chutney to clean, sterilized jars and refrigerate it promptly. This is a refrigerator chutney rather than a tested shelf-stable preserve. Keep it chilled and use it within two weeks. Always use a clean spoon, and discard the chutney if you notice mold, fermentation, an unusual odor or a bulging lid.

Do not store these jars at room temperature or process them for pantry storage unless you follow a properly tested canning formula. Consult the FDAโ€™s safe food-handling guidance for general advice about preparation, refrigeration and preventing contamination.

Wine Pairing

A dry Riesling offers enough acidity and fruit to complement the apples, vinegar and aromatic spices. The Bรผrgerspital Riesling VDP Gutswein, made from Riesling grapes, brings notes of apple, peach, apricot and citrus. Serve it chilled at approximately 8โ€“10ยฐC. Its freshness balances the chutneyโ€™s sweetness without competing with the cloves and ginger.

Variations and Final Tips

For more heat, add a small pinch of chili flakes. Replace part of the raisins with chopped dried apricots for a fruitier variation, or add mustard seeds for a sharper Indian-inspired character. Choose tart, firm apples if you prefer distinct pieces or softer apples for a smoother consistency.

Allow the finished spiced apple chutney to rest in the refrigerator for several hours before serving. This short resting period gives the vinegar, fruit and spices time to blend, producing a rounder and more balanced flavor.


Zesty Lemon Hummus

Bright Lemon Hummus

Smooth homemade hummus with chickpeas, tahini, garlic, cumin and a generous splash of fresh lemon juice. Serve this creamy Mediterranean dip with vegetables, pita bread or sandwiches.
Couverts4
estimated costs pp $0.95
Deel op Facebook Print Recipe

Equipment

  • Food processor
  • Measuring cups
  • Measuring spoons
  • Rubber spatula
  • serving bowl

Ingredients

Instructions

  • Place the drained chickpeas in a food processor.
  • Add the tahini, lemon juice, garlic, cumin and salt.
  • Process for 1 minute.
  • Stop the food processor.
  • Scrape down the sides with a rubber spatula.
  • Start processing again.
  • Gradually pour in the cold water.
  • Slowly add the olive oil.
  • Continue processing for 2 to 3 minutes until smooth and creamy.
  • Add another tablespoon of water if the hummus is too thick.
  • Taste and adjust the lemon juice, cumin or salt if necessary.
  • Transfer the hummus to a serving bowl.
  • Drizzle with a little extra olive oil if desired.
  • Serve immediately or refrigerate until needed.

Notes & Wine Advice

Serving Suggestions

Serve the hummus with warm pita bread, crackers, cucumber, carrots, celery or sweet pepper strips. It also works as a sandwich spread or as the creamy base of a grain bowl.

Recipe Notes

Processing the hummus for several minutes produces a smoother texture. Cold water helps loosen the tahini and chickpeas without adding more oil. For an exceptionally smooth result, remove the loose skins from the chickpeas before blending.

Dietary Information

The ingredients are naturally free from dairy, eggs, lactose, meat, wheat and tree nuts. Tahini contains sesame, which is a separate major allergen and should never be treated as allergy-free. Check the chickpeas, tahini, spices and other packaged products for gluten, soy, nut traces and certification requirements. Halal and kosher classifications only apply when the chosen products and preparation meet those standards.

Nutrition Information

The original estimate of 210 calories appears low when the recipe contains ยผ cup of olive oil and 3 tablespoons of tahini. The revised estimate is approximately 290 calories per 125 g serving. The calculation includes all the olive oil but excludes optional garnishes and foods served alongside the hummus.

Variations

Add roasted red pepper, smoked paprika or fresh parsley for a different flavor. Reduce the olive oil to 2 tablespoons and add more cold water for a lighter version. Extra lemon zest creates a stronger citrus aroma without adding more acidity.

Storage

Store the hummus in an airtight container in the refrigerator for up to 4 days. Stir before serving and add a small splash of water if it becomes too thick. Do not leave it at room temperature for longer than 2 hours.

Wine Advice

The citrus, green herbs and fresh acidity of the Bodegas Carrau Sauvignon Blanc, made entirely from Sauvignon Blanc, complement the lemon and garlic. Serve it at 8โ€“10ยฐC.
For a rosรฉ pairing, choose the dry Gรฉrard Bertrand Gris Blanc Rosรฉ. Its Grenache Gris grapes produce citrus, red-fruit and mineral notes that work well with hummus and Mediterranean appetizers.

Nutrition values

Serving: 125 gr | Calories: 290 kcal | koolhydraten: 20 g | Eiwitten: 8 g | Vet: 21 g | Verzadigd vet: 3 g | Natrium: 360 mg | Suiker: 3 g
————————————————————————————————–

Bright lemon hummus combines chickpeas, tahini, garlic and cumin with a generous splash of fresh lemon juice. Extra-virgin olive oil creates richness, while cold water loosens the mixture without making it greasy. The result is a creamy homemade dip that works with vegetables, pita bread, crackers, sandwiches and grain bowls.

This recipe requires no cooking and takes approximately 15 minutes. One batch produces four generous servings of about 125 grams each. You can divide it into smaller portions when serving the hummus as part of a larger appetizer platter.

Choosing and Preparing Chickpeas

Canned chickpeas make the recipe quick and convenient. Drain and rinse them thoroughly to remove the canning liquid and some of its sodium. Let excess water drain away before placing the chickpeas in the food processor.

Removing the loose skins creates an exceptionally smooth result, but this step remains optional. Processing the chickpeas for several minutes also improves the texture. Stop once or twice to scrape down the sides so no coarse pieces remain.

For another chickpea-based appetizer, serve the hummus alongside Green Falafel with Tahini Sauce. The combination provides contrasting textures while using several complementary Middle Eastern flavors.

Bright Lemon Hummus

Fresh lemon juice provides acidity and prevents the tahini and olive oil from making the dip taste heavy. Bottled lemon juice can taste sharper or slightly bitter, so freshly squeezed juice gives the best result.

Tahini supplies the distinctive sesame flavor that separates hummus from an ordinary mashed chickpea dip. Stir the tahini before measuring because its natural oils may separate during storage. Choose a smooth, pourable product without a strongly bitter aftertaste.

Add the cold water gradually while the food processor runs. The mixture may initially look thick, but continued processing helps the tahini become lighter and creamier. Add extra water one tablespoon at a time until the hummus reaches your preferred consistency.

Balancing Garlic and Seasoning

Two garlic cloves create a noticeable savory flavor. Use one clove for a milder dip or briefly soak the chopped garlic in lemon juice to soften its sharpness. Ground cumin adds warmth without turning the hummus into a heavily spiced spread.

Taste before adding more salt. Canned chickpeas and tahini may already contribute sodium. Extra lemon juice can sometimes brighten a flat-tasting batch more effectively than additional salt.

This creamy citrus hummus works well as part of a snack platter with Tortilla Chips and Guacamole or Vegetable Spring Rolls. Fresh cucumber, carrots and sweet peppers provide lighter dipping options.

Dietary and Allergen Information

The basic ingredients contain no dairy, eggs, meat or wheat. However, packaged chickpeas, tahini and spices can carry cross-contamination warnings. Check every product when preparing food for someone with coeliac disease or a severe allergy.

Tahini contains sesame. Sesame is not a tree nut, but it is a major allergen in its own right. A nut-free classification does not mean that the hummus suits someone with a sesame allergy.

Halal and kosher classifications depend on ingredient certification and preparation standards. Gluten-free, soy-free and nut-free classifications also require suitable product labels rather than assumptions based only on the basic recipe.

Nutrition and Portion Size

One serving contains approximately 290 calories. Olive oil and tahini provide most of the fat and calories, while chickpeas supply carbohydrates, fibre and protein. The original estimate of 210 calories appears too low when all ยผ cup of olive oil is included.

The calculation does not include pita bread, crackers, vegetables or additional olive oil used for garnish. Reducing the oil to two tablespoons and adding extra water lowers the calorie content while preserving a creamy consistency.

Storage and Safe Serving

Transfer the hummus to an airtight container and refrigerate it for up to four days. Stir before serving and add a teaspoon of water if it thickens. Do not leave it at room temperature for more than two hours.

Use clean utensils and avoid dipping food directly into the storage container. The FDA provides additional information in its safe food-handling guidance.

Wine Pairing

The Bodegas Carrau Sauvignon Blanc offers citrus, passion fruit and green herbal notes that complement the lemon, garlic and cumin. Its Sauvignon Blanc grapes produce a fresh style that balances the richness of tahini and olive oil.

With its smooth texture, lively acidity and flexible serving options, bright lemon hummus makes a practical appetizer, snack or sandwich spread. Fresh lemon, properly mixed tahini and sufficient processing create the best balance between creaminess, savory depth and citrus freshness.


Slow Cooker Caponata

Slow cooker caponata with eggplant, olives and fresh basil

Slow Cooker Caponata

Slow Cooker Caponata is a rich Sicilian vegetable dish made with tender eggplant, tomatoes, olives, capers, basil, and a balanced sweet-and-sour sauce.
Couverts4 servings
estimated costs pp $2.00
Deel op Facebook Print Recipe

Equipment

Ingredients

Instructions

  • Heat the extra-virgin olive oil in a frying pan over medium heat.
  • Add the chopped onion and minced garlic.
  • Sautรฉ for 3 to 4 minutes, or until softened.
  • Add the diced eggplant.
  • Cook for 5 minutes, stirring regularly, until lightly browned.
  • Transfer the eggplant mixture to the slow cooker.
  • Add the diced tomatoes, green olives, capers, red wine vinegar, tomato paste, sugar, salt, black pepper, and red pepper flakes.
  • Stir until evenly combined.
  • Cover and cook on low for 4 hours, stirring once or twice if possible.
  • Stir in the chopped basil immediately before serving.
  • Serve warm or at room temperature.

Notes & Wine Advice

Serving Suggestions

Serve the caponata with crusty bread, grilled polenta, pasta, or toasted crostini. It also works well as a topping for grilled meat, fish, baked potatoes, or sandwiches.

Recipe Notes

Cut the eggplant into evenly sized pieces so it cooks consistently. Browning the eggplant before transferring it to the slow cooker develops more flavour and prevents the finished dish from tasting watery. Capers and olives are naturally salty, so taste before adding extra salt.

Variations

Add diced celery, bell pepper, raisins, or toasted pine nuts for extra texture. Replace the granulated sugar with maple syrup or another suitable sweetener. Increase the red pepper flakes when a spicier caponata is preferred.

Storage

Store the cooled caponata in an airtight container in the refrigerator for up to four days. Its flavour often improves overnight. Serve it cold, at room temperature, or gently reheated. It can also be frozen for up to two months.

Wine Advice

A medium-bodied Chianti complements the tomato, eggplant, and olives. A dry Pinot Grigio is a lighter alternative that works well when the caponata is served as an appetiser.

Nutrition values

Serving: 1 serving | Calories: 120 kcal | koolhydraten: 14 g | Eiwitten: 2 g | Vet: 7 g | Verzadigd vet: 1 g | Natrium: 382 mg | Suiker: 7 g
————————————————————————————————–

Slow cooker caponata transforms eggplant, tomatoes, olives, capers, onion, garlic, and basil into a rich Sicilian vegetable dish. Red wine vinegar and sugar create the characteristic sweet-and-sour flavour, while several hours of gentle cooking allow the vegetables and seasonings to blend. Serve it warm, chilled, or at room temperature as an appetiser, spread, or side dish.

A Traditional Sicilian Combination

Caponata comes from Sicily and is usually built around eggplant cooked with tomatoes, celery, olives, capers, vinegar, and a little sweetness. Recipes differ between regions and families, with some versions containing raisins, pine nuts, peppers, or additional vegetables.

This version uses a slow cooker to create tender vegetables with minimal attention. Browning the eggplant, onion, and garlic first adds extra depth and prevents the finished dish from tasting flat or watery.

Discover more regional dishes among the Italian recipes or explore other convenient meals in the Crockpot collection.

Preparing the Eggplant

Cut the eggplant into evenly sized pieces so they become tender at approximately the same time. Small cubes break down more during slow cooking, while larger pieces retain a chunkier texture. Pieces of about one inch create a good balance.

Cooking the eggplant briefly in a frying pan encourages browning and removes some surface moisture. Do not crowd the pan too tightly. If necessary, brown it in two batches so the pieces sautรฉ rather than steam.

Modern eggplants generally do not require salting before cooking. However, if the eggplant is unusually large, mature, or bitter, sprinkle the diced pieces with salt and leave them for twenty minutes. Rinse and dry them thoroughly before browning.

Balancing Sweet, Sour and Salty

Red wine vinegar gives caponata its bright acidity, while sugar softens the sharper edges of the tomatoes, olives, and capers. Neither element should dominate. Taste the finished dish after cooking and adjust it with a small amount of vinegar or sugar if necessary.

Green olives and capers provide plenty of salt. Drain them well and avoid adding extra salt until all ingredients have cooked together. Their intensity becomes more noticeable as the liquid reduces.

Red pepper flakes add gentle heat but should remain in the background. Fresh basil is stirred in shortly before serving so its colour and fragrance are preserved.

Serving This Versatile Dish

This Sicilian eggplant dish can be spooned onto toasted crostini, spread inside sandwiches, or served alongside grilled fish, chicken, or meat. It also works with pasta, grilled polenta, rice, baked potatoes, or a simple green salad.

Caponata tastes good immediately, but its flavour often improves after resting overnight. Serving it at room temperature allows the sweet, sour, and savoury elements to become more noticeable than when it is very hot.

Find more plant-based serving ideas among the vegetable recipes.

Variations and Dietary Notes

Add diced celery or bell pepper with the onion for extra texture. Raisins increase the sweetness, while toasted pine nuts provide crunch. Both should be stirred in near the end so they retain their character.

The recipe is naturally free from dairy, eggs, gluten, and animal products. Check packaged tomato paste, olives, capers, and other ingredients when cooking for someone with an allergy or coeliac disease.

Keep preparation surfaces clean, refrigerate cooked vegetables promptly, and avoid leaving the dish at room temperature for extended periods. Further information is available in the FDA safe food handling guidance.

Storage and Freezing

Allow the caponata to cool before transferring it to an airtight container. Refrigerate it for up to four days. Stir before serving because some oil and liquid may separate during storage.

Freeze individual portions for up to two months. Thaw them overnight in the refrigerator and reheat gently in a saucepan or microwave. The eggplant may become slightly softer after freezing, but the flavour remains good.

With its tender vegetables and balanced Mediterranean flavours, slow cooker caponata is a practical recipe to prepare ahead for lunches, appetisers, family meals, or weekend gatherings.


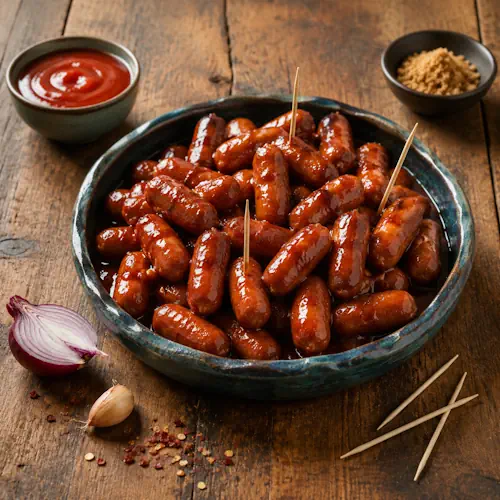
Sweet-and-Sour Cocktail Sausages

Sweet-and-sour cocktail sausages coated in a glossy sticky sauce

Sticky Sweet-and-Sour Sausages

Juicy cocktail sausages coated in a glossy sweet-and-sour sauce made with ketchup, brown sugar, apple cider vinegar and savory seasonings. Serve them warm with cocktail picks as an easy party snack.
Couverts4 servings
estimated costs pp $2.25
Deel op Facebook Print Recipe

Equipment

  • Measuring cups
  • Measuring spoons
  • Saucepan
  • Serving dish
  • Wooden spoon

Instructions

  • Place the ketchup, brown sugar and apple cider vinegar in a saucepan.
  • Add the soy sauce, Worcestershire sauce, garlic powder and onion powder.
  • Add the chilli flakes if desired.
  • Stir until evenly combined.
  • Place the saucepan over medium heat.
  • Bring the sauce to a gentle simmer.
  • Cook for 5 minutes.
  • Stir regularly until the sugar has dissolved and the sauce begins to thicken.
  • Add the fully cooked cocktail sausages.
  • Stir until every sausage is coated.
  • Reduce the heat to medium-low.
  • Simmer for 10 minutes.
  • Stir occasionally until the sausages are piping hot and the sauce is thick and glossy.
  • Check that the sausages reach an internal temperature of at least 74ยฐC.
  • Transfer the sausages and sauce to a warm serving dish.
  • Serve immediately with cocktail picks.

Notes & Wine Advice

Serving Suggestions

Serve the sausages warm with cocktail picks. Mustard, sliced pickles or fresh vegetable sticks provide a sharp contrast to the sweet glaze. Keep a small spoon beside the dish for adding extra sauce.

Recipe Notes

Use fully cooked cocktail sausages because the 10-minute heating time may not cook raw sausages safely. Keep the sauce at a gentle simmer. High heat can burn the sugar before the sausages become hot.

Dietary Information

No allergy-related diet classifications can be guaranteed without checking the products. Cocktail sausages may contain milk, egg, gluten, wheat or soy. Standard soy sauce usually contains wheat, while Worcestershire sauce often contains anchovies. Check every label before adapting the recipe for a specific diet.

Nutrition Information

The original estimate of 220 calories per serving appears too low when 500 g of cocktail sausages and the complete sauce are divided into four portions. A more realistic estimate is approximately 465 calories per serving. The exact values vary significantly by sausage brand. Sodium and saturated fat can be particularly high.

Variations

Replace the chilli flakes with smoked paprika for a milder smoky flavor. Add one tablespoon of Dijon mustard for extra sharpness. Turkey or chicken cocktail sausages may reduce the fat content, depending on the brand.

Storage

Refrigerate leftovers within 2 hours and store them in an airtight container for up to 3 days. Reheat the sausages and sauce until piping hot. Do not leave the serving dish at room temperature throughout a long party.

Wine Advice

A fruity Pinot Noir complements the sausages without making the sweet sauce feel heavier. A dry rosรฉ or sparkling wine can also balance the vinegar and brown sugar. Explore suitable wines at Renรฉโ€™s Wijnbeleving.

Nutrition values

Serving: 125 g sausages with approximately ยผ sauce | Calories: 465 kcal | koolhydraten: 28 g | Eiwitten: 15 g | Vet: 32 g | Verzadigd vet: 11 g | Natrium: 1550 mg | Suiker: 24 g
————————————————————————————————–

Sweet-and-sour cocktail sausages combine juicy miniature sausages with a glossy sauce made from ketchup, brown sugar, apple cider vinegar and savory seasonings. The recipe needs only a saucepan and takes approximately 20 minutes from start to finish. Serve the sausages warm with cocktail picks for an easy party snack that guests can enjoy without plates or cutlery.

The sauce brings several contrasting flavors together. Brown sugar and ketchup provide sweetness, apple cider vinegar adds acidity, and soy sauce contributes salt and umami. Worcestershire sauce supplies extra savory depth, while garlic and onion powder round out the glaze. Optional chilli flakes add warmth without overpowering the sausages.

Choosing the Right Sausages

Use fully cooked cocktail sausages for this recipe. The short simmering time reheats them but may not cook raw sausages safely. Mini smoked sausages, small frankfurters or fully cooked pork cocktail sausages all work well.

Check the packaging before cooking because sausage ingredients differ considerably. Some products contain milk, egg, wheat, gluten or soy. Others contain high levels of sodium and saturated fat. A leaner chicken or turkey variety may reduce the fat content, but the nutritional values depend on the brand.

Sweet-and-Sour Cocktail Sausages

Combine the sauce ingredients before adding the sausages. Five minutes of gentle simmering dissolves the brown sugar and begins concentrating the glaze. Stir frequently so the sugar does not settle and burn on the bottom of the saucepan.

Add the sausages only after the sauce has started thickening. Simmer them over medium-low heat until piping hot. The sauce should cling to their surfaces rather than run off immediately. If it becomes too thick, add one or two tablespoons of water. If it remains thin, remove the sausages temporarily and simmer the sauce for another few minutes.

Use a food thermometer to confirm that the centers reach at least 74ยฐC. This check matters when reheating previously cooked meat, particularly when you plan to keep it warm on a party table.

Building a Complete Party Platter

Arrange the sausages in a warm serving dish with cocktail picks nearby. Place a small bowl of mustard or sliced pickles beside them to provide a sharp contrast to the sticky glaze.

For a larger spread, serve them with Layered Pinto Bean Dip and Tortilla Chips with Guacamole. Guests who prefer a meat-free spicy snack may enjoy the Spicy Seitan Poppers.

This sticky party sausage appetizer also suits game days, movie nights, New Yearโ€™s Eve celebrations and relaxed weekend gatherings. Double the ingredients for a larger group, but use a wide saucepan so the sauce reduces evenly.

Nutrition and Dietary Details

The original estimate of 220 calories per serving appears too low when 500 grams of cocktail sausages and the full quantity of sauce make four portions. A more realistic estimate is approximately 465 calories per serving. Each portion includes about 125 grams of sausage and one-quarter of the sauce.

Sodium may exceed 1,500 milligrams per serving because sausages, ketchup, soy sauce and Worcestershire sauce all contain salt. Reduced-sodium soy sauce and lower-salt sausages can reduce this amount. The recipe also contains a substantial quantity of added sugar, so it does not qualify as low-sugar or diabetic-friendly.

Standard soy sauce normally contains wheat, and Worcestershire sauce commonly contains anchovies. The dish cannot reliably receive gluten-free, wheat-free, soy-free or pescatarian classifications without carefully selected substitutes. Always check every label instead of assuming that all cocktail sausages use the same ingredients.

Serving Safely at Parties

Keep the sausages hot during serving. A small slow cooker set to warm can help, but the sauce may continue thickening. Stir occasionally and add a splash of water when necessary. Do not leave cooked meat sitting at room temperature for longer than two hours.

Provide clean cocktail picks and a separate container for used ones. Refrigerate leftovers promptly in a shallow airtight container. The FDA provides more information in its safe food-handling guidance.

Wine Pairing

A light, fruity Pinot Noir balances the sweet glaze and complements the sausages without adding heavy tannins. The Purcari Pinot Noir 1827 offers red fruit, freshness and gentle spice that suit pork-based cocktail sausages. Serve it slightly cool at approximately 14ยฐC.

With their quick preparation, glossy coating and familiar sweet-savory flavor, sweet-and-sour cocktail sausages make a practical warm snack for almost any informal gathering. Careful simmering keeps the sauce smooth, while proper temperature control keeps every serving safe and enjoyable.


Warm Layered Pinto Bean Dip

Layered pinto bean dip with guacamole, sour cream, salsa, cheese and fresh toppings

Warm Layered Pinto Bean Dip

A colorful Tex-Mex dip with seasoned pinto beans, melted cheddar, guacamole, sour cream, salsa and fresh toppings. Serve it with tortilla chips or vegetable sticks at parties, game nights or family gatherings.
Couverts4 servings
estimated costs pp $1.75
Deel op Facebook Print Recipe

Equipment

  • Baking dish (8-inch),
  • Knife
  • Mixing bowl
  • Potato masher
  • spoon

Ingredients

Instructions

  • Preheat the oven to 180ยฐC.
  • Place the drained pinto beans in a mixing bowl.
  • Mash the beans until mostly smooth.
  • Add the cumin, garlic powder, half of the chilli powder, salt and black pepper.
  • Mix until evenly combined.
  • Spread the seasoned beans in an 8-inch baking dish.
  • Sprinkle the shredded cheddar evenly over the beans.
  • Bake for 8 to 10 minutes until the beans are hot and the cheese has melted.
  • Remove the dish from the oven.
  • Allow it to cool for 5 minutes.
  • Spread the sour cream over the warm cheese.
  • Add the guacamole in an even layer.
  • Spoon the salsa over the guacamole.
  • Top with the black olives, spring onions and diced tomato.
  • Sprinkle with the remaining chilli powder.
  • Serve immediately with tortilla chips or fresh vegetable sticks.

Notes & Wine Advice

Serving Suggestions

Serve the dip with tortilla chips, cucumber slices, celery sticks, mini peppers or carrot sticks. Tortilla chips are not included in the nutritional calculation.

Recipe Notes

Only bake the bean and cheese layers. Adding the sour cream and guacamole after baking preserves their fresh flavor, color and creamy texture. Draining and rinsing the beans also prevents the base from becoming watery.

Dietary Information

Use cheddar made with microbial or vegetarian rennet to keep the dip vegetarian. The recipe can suit egg-free, gluten-free, nut-free and soy-free diets, but only when the salsa, guacamole, sour cream, cheese and seasonings carry suitable allergen information. Check every packaged product for ingredients and cross-contamination warnings.

Nutrition Information

The revised estimate is approximately 275 calories per serving before adding tortilla chips. The original estimate of 210 calories may assume smaller servings or reduced quantities of cheese, sour cream and guacamole. Sodium varies considerably according to the beans, salsa, olives and cheese used.

Variations

Add pickled jalapeรฑos for more heat or replace the pinto beans with black beans. Use Greek yogurt instead of sour cream for a slightly lighter topping. Fresh coriander can be added immediately before serving.

Storage

Refrigerate leftovers within 2 hours and use them within 2 days. Cover the dish tightly. The guacamole may darken and the fresh toppings may release moisture, so the dip tastes best on the day it is prepared. Freezing is not recommended.

Wine Advice

A chilled Sauvignon Blanc complements the salsa and fresh toppings while cutting through the creamy layers. A dry Riesling also works well when jalapeรฑos are added. Explore suitable wines at Renรฉโ€™s Wijnbeleving.

Nutrition values

Serving: 230 g | Calories: 275 kcal | koolhydraten: 29 g | Eiwitten: 11 g | Vet: 14 g | Verzadigd vet: 6 g | Natrium: 690 mg | Suiker: 4 g
————————————————————————————————–

Layered pinto bean dip combines warm seasoned beans and melted cheddar with cool sour cream, guacamole, salsa and crisp fresh toppings. Every layer contributes something different, from the creamy bean base and rich cheese to juicy tomato, salty olives and fresh spring onions. The result makes an inviting appetizer for parties, game days and informal family gatherings.

This recipe produces four generous servings. You can double the ingredients and use a larger baking dish when preparing food for a crowd. Serve it with tortilla chips for a classic combination or add fresh vegetable sticks for a lighter dipping option.

Preparing the Pinto Bean Base

Drain and rinse the canned pinto beans before mashing them. Rinsing removes some of the salty canning liquid and prevents the base from becoming watery. Mash the beans until mostly smooth, leaving a few small pieces for texture.

Cumin, garlic powder and chilli powder give the beans a warm Tex-Mex character. Taste the mixture before adding extra salt because canned beans and cheese can already contain substantial sodium. Spread the mixture evenly so every serving includes the same amount.

If you prefer to prepare the beans from scratch, the Authentic Mexican Refried Beans make a flavorful alternative to the simple mashed base.

Layered Pinto Bean Dip

Bake only the bean base and cheddar. This approach warms the beans and melts the cheese without exposing the sour cream and guacamole to unnecessary heat. Baked guacamole can lose its fresh color, while sour cream may separate when it becomes too hot.

Let the hot layers cool for approximately five minutes before adding the remaining ingredients. The dip should remain warm, but it should not feel hot enough to melt the sour cream. Use the back of a spoon or a small spatula to spread each creamy layer carefully.

Add the salsa after the guacamole. Choose a thick salsa and drain excess liquid if necessary. A thin, watery product can run through the layers and make the dip difficult to scoop.

Fresh Toppings and Texture

Black olives provide a salty contrast, while spring onions add mild sharpness. Removing the seeds and watery center from the tomato helps the topping stay fresh and prevents liquid from pooling on the surface.

This Tex-Mex bean dip can also include fresh coriander, diced jalapeรฑo or pickled chilli slices. Add these ingredients immediately before serving so they retain their color and texture.

Serve the dip with homemade Tortilla Chips and Guacamole when you want a larger snack platter. The flavors also complement the Tex-Mex Fiesta Pizza at a casual party or game-day meal.

Choosing Vegetarian Ingredients

Cheddar does not automatically suit a vegetarian diet. Some manufacturers use animal rennet during production. Choose cheddar made with microbial or vegetarian rennet and check the ingredient label rather than relying on the cheese name.

The recipe contains dairy and lactose because it includes cheddar and sour cream. It can suit an egg-free, gluten-free, nut-free or soy-free diet only when every packaged ingredient meets the necessary requirements. Salsa, guacamole and seasoning blends may carry allergen warnings from shared production facilities.

Portions and Nutrition

One serving equals approximately one-quarter of the complete dip. This portion provides an estimated 275 calories before adding tortilla chips. Sour cream, cheese and guacamole supply most of the fat, while beans provide carbohydrates, fibre and protein.

The sodium content depends strongly on the beans, salsa, olives and cheese. Choose no-salt-added beans and reduced-sodium salsa when you need greater control. Rinsing canned beans can also remove part of their surface sodium.

Storage and Safe Serving

Serve the dip soon after assembling it. Do not leave dairy-based toppings at room temperature for more than two hours. At warm outdoor gatherings, return the dish to the refrigerator sooner.

Cover leftovers and refrigerate them for up to two days. The guacamole may darken and the vegetables may release moisture, so the texture remains best on the first day. Freezing is unsuitable because sour cream, guacamole and fresh tomato can separate after thawing.

Use clean utensils for serving and avoid returning used dipping chips to the dish. The FDA provides more advice in its safe food-handling guidance.

Warm beans, melted cheese and colorful chilled toppings make layered pinto bean dip easy to recognize and enjoyable to share. Its straightforward preparation and flexible garnishes suit everything from Cinco de Mayo celebrations to movie nights and relaxed weekend gatherings.


Basil Pesto Pizza

Basil pesto pizza with fresh mozzarella and pine nuts

Basil Pesto Pizza

Basil Pesto Pizza combines fragrant pesto, creamy fresh mozzarella, toasted pine nuts, and fresh basil on a crisp gluten-free crust.
Couverts4 servings
estimated costs pp $3.25
Deel op Facebook Print Recipe

Equipment

  • Baking sheet or pizza stone
  • Knife
  • Rolling Pin
  • spoon

Ingredients

  • For the Pizza Base
  • 1 gluten-free pizza crust
  • 1 tablespoon extra-virgin olive oil
  • For the Toppings
  • 100 g vegetarian basil pesto
  • 200 g fresh mozzarella cheese sliced
  • 2 tablespoons pine nuts
  • 1 tablespoon fresh basil leaves chopped
  • Salt to taste
  • Black pepper to taste

Instructions

  • Prepare the Pizza Base
  • Preheat the oven to 220ยฐC (425ยฐF).
  • Place the pizza crust on a baking sheet or preheated pizza stone.
  • Brush the crust evenly with the extra-virgin olive oil.
  • Add the Toppings
  • Spread the basil pesto in a thin, even layer over the pizza crust.
  • Arrange the mozzarella slices over the pesto.
  • Sprinkle the pine nuts evenly over the pizza.
  • Season lightly with salt and black pepper.
  • Bake and Serve
  • Bake for 12 to 15 minutes, or until the crust is golden and the mozzarella has melted.
  • Remove the pizza from the oven.
  • Scatter the chopped fresh basil over the top.
  • Allow the pizza to rest for 2 minutes.
  • Cut into four equal portions.
  • Serve immediately.

Notes & Wine Advice

Serving Suggestions

Serve with mixed salad leaves, tomato salad, grilled vegetables, or marinated olives. A few fresh cherry tomatoes can be added after baking for extra colour and acidity.

Recipe Notes

Drain the fresh mozzarella and pat it dry before placing it on the pizza. Excess moisture can make the crust soggy. Use pesto prepared with vegetarian hard cheese because traditional Parmesan may contain animal rennet.

Variations

Add roasted tomatoes, artichoke hearts, courgette, mushrooms, or red onion. Walnuts can replace the pine nuts, while dairy-free pesto and vegan mozzarella can be used for a vegan variation.

Storage

Store leftover pizza in an airtight container in the refrigerator for up to two days. Reheat it in a hot oven or dry frying pan until the crust is crisp and the mozzarella has melted again.

Wine Advice

A crisp Pinot Grigio complements the basil, mozzarella, and pine nuts. A mild Sauvignon Blanc is another refreshing choice.

Nutrition values

Serving: 1 1/4 pizza | Calories: 330 kcal | koolhydraten: 28 g | Eiwitten: 14 g | Vet: 22 g | Verzadigd vet: 8 g | Natrium: 620 mg | Suiker: 3 g
————————————————————————————————–
Course; Cheese / Main Course / Nuts / Oven / Pizza
Cuisine; Italian
Season: Summer

Basil pesto pizza replaces traditional tomato sauce with a fragrant layer of pesto and combines it with fresh mozzarella, pine nuts, and basil. The simple topping allows every ingredient to remain clearly recognisable. A crisp gluten-free crust provides contrast to the creamy cheese, while toasted nuts add texture and a warm, savoury flavour.

An Italian Pizza Without Tomato Sauce

Pesto is traditionally associated with Liguria in northern Italy and commonly contains basil, pine nuts, garlic, hard cheese, and olive oil. Using it as a pizza sauce creates a fresher and more aromatic result than a conventional tomato base.

Pesto has a concentrated flavour and contains plenty of oil, so only a thin layer is needed. Spreading it too generously can make the pizza greasy and overpower the mild mozzarella. Leave a small border around the edge so the crust can become golden and crisp.

Explore more regional dishes among the Italian recipes or find other topping combinations in the pizza collection.

Choosing the Pesto

Homemade pesto provides the freshest basil flavour, but good-quality prepared pesto also works. Check the ingredient list carefully when dietary restrictions apply. Traditional pesto may contain Parmesan or another hard cheese made with animal rennet, which is not suitable for strict vegetarians.

Choose a pesto specifically labelled vegetarian when needed. It should have a fresh green colour and a balanced flavour of basil, garlic, nuts, and cheese. If oil has separated during storage, stir it thoroughly before measuring and spreading.

Pesto can darken when exposed to high heat. Most of it is protected beneath the mozzarella, but the pizza should still be removed once the crust is golden and the cheese has melted. Overbaking can make the herbs taste bitter.

Keeping the Crust Crisp

Fresh mozzarella retains more moisture than pre-shredded pizza cheese. Drain it thoroughly, slice it, and pat each piece dry with kitchen paper. Allowing the slices to rest in a strainer for fifteen minutes removes even more liquid.

Arrange the mozzarella with a little space between the pieces. Covering the entire surface traps moisture and may produce a soft centre. A fully preheated pizza stone gives the best result, although a sturdy metal baking sheet is a practical alternative.

If the gluten-free base is particularly soft, pre-bake it for three to five minutes before adding the pesto. Follow the instructions supplied with the crust because gluten-free products can vary considerably in texture and baking requirements.

Adding Pine Nuts and Fresh Basil

Pine nuts develop a deeper flavour as they toast in the oven. Distribute them evenly so each portion receives some crunch. Watch them closely near the end of baking because their high oil content means they can brown quickly.

Fresh basil is added after the pizza leaves the oven. This protects its colour and delicate aroma. Tear or chop the leaves just before serving and scatter them over the melted mozzarella.

This mozzarella pesto pizza pairs well with mixed salad leaves, fresh tomatoes, grilled vegetables, or marinated olives. Discover more dishes featuring this creamy ingredient in the cheese recipes section.

Variations and Food Safety

Roasted cherry tomatoes provide acidity and colour, while artichoke hearts, mushrooms, courgette, or red onion create a more substantial topping. Walnuts can replace the pine nuts, although the flavour will become earthier.

A vegan variation can be made with dairy-free pesto and vegan mozzarella. Check all labels carefully because pesto, cheese substitutes, and gluten-free crusts may contain unexpected allergens.

Keep mozzarella and opened pesto refrigerated until needed. Prepare the pizza on clean surfaces and refrigerate leftovers promptly. Additional practical information is available in the FDA safe food handling guidance.

Storage and Reheating

Store leftover pizza in an airtight container in the refrigerator for up to two days. Reheat it in a hot oven or dry frying pan until the base is crisp and the mozzarella is thoroughly heated. A microwave is faster but usually produces a softer crust.

Add new basil leaves after reheating because the original garnish may darken during storage. With its aromatic pesto, creamy mozzarella, and crunchy pine nuts, basil pesto pizza makes a simple but flavourful meal for lunch, dinner, or a summer gathering.


Pineapple Shrimp Pizza

Pineapple shrimp pizza with mozzarella, onion and cilantro

Pineapple Shrimp Pizza

Pineapple Shrimp Pizza combines juicy shrimp, sweet pineapple, mozzarella, tomato sauce, red onion, cilantro, and chilli flakes on a crisp gluten-free crust.
Couverts4 servings
estimated costs pp $4.00
Deel op Facebook Print Recipe

Equipment

  • Baking sheet or pizza stone
  • Bowl, medium
  • Knife
  • Paper towels
  • Rolling Pin

Ingredients

Instructions

  • Prepare the Pizza Base
  • Preheat the oven to 220ยฐC (425ยฐF).
  • Place the pizza crust on a baking sheet or preheated pizza stone.
  • Brush the crust evenly with 1 tablespoon extra-virgin olive oil.
  • Spread the tomato sauce in a thin layer over the crust.
  • Prepare the Toppings
  • Pat the shrimp and pineapple dry with paper towels.
  • Place the shrimp in a medium bowl.
  • Add the remaining tablespoon extra-virgin olive oil.
  • Season lightly with salt and black pepper.
  • Toss until evenly coated.
  • Assemble and Bake
  • Arrange the shrimp, pineapple, and red onion evenly over the tomato sauce.
  • Sprinkle the mozzarella over the toppings.
  • Bake for 12 to 15 minutes, or until the crust is golden, the cheese has melted, and the shrimp are opaque and fully cooked.
  • Remove the pizza from the oven.
  • Scatter the cilantro and chilli flakes over the top.
  • Cut into four equal portions.
  • Serve immediately.

Notes & Wine Advice

Serving Suggestions

Serve with a mango salad, citrus-dressed green salad, grilled vegetables, or fresh tropical fruit. Lime wedges can be served alongside the pizza for an extra burst of acidity.

Recipe Notes

Pat the shrimp and pineapple thoroughly dry before adding them to the pizza. Excess moisture can soften the crust. Use raw peeled shrimp of a similar size so they cook evenly, and remove the pizza only when the shrimp are opaque and completely cooked.

Variations

Add sliced bell pepper, jalapeรฑo, mango, or spring onion. Replace the mozzarella with Monterey Jack for a stronger flavour. Cooked shrimp may be used, but add them during the final 5 minutes to prevent overcooking.

Storage

Store leftover pizza in an airtight container in the refrigerator for up to one day. Reheat it in a hot oven or dry frying pan until the crust is crisp and the shrimp are thoroughly heated. Do not repeatedly reheat seafood.

Wine Advice

A chilled Sauvignon Blanc complements the shrimp, pineapple, and cilantro. A dry Riesling or crisp light beer is also suitable.

Nutrition values

Serving: 1 1/4 pizza | Calories: 350 kcal | koolhydraten: 30 g | Eiwitten: 24 g | Vet: 18 g | Verzadigd vet: 7 g | Natrium: 700 mg | Suiker: 7 g
————————————————————————————————–

Pineapple shrimp pizza combines juicy seafood, sweet tropical fruit, melted mozzarella, tomato sauce, red onion, cilantro, and chilli flakes. The result is sweet, savoury, fresh, and gently spicy. A crisp gluten-free crust provides the base for this colourful fusion of Hawaiian-inspired toppings and Italian pizza traditions.

Sweet and Savoury Flavours

Shrimp have a mild flavour that works well with pineapple. The fruit adds sweetness and acidity, while red onion supplies a sharper contrast. Chilli flakes prevent the topping from becoming overly sweet, and fresh cilantro provides a bright finish after baking.

Mozzarella has a mild, creamy flavour that brings the different ingredients together without overpowering the shrimp. Tomato sauce adds savoury depth, but only a thin layer is needed. Too much sauce can dominate the pineapple and make the centre of the crust soft.

Explore more creative combinations among the pizza recipes or find other meal ideas in the shrimp recipes collection.

Preventing a Soggy Crust

Both shrimp and pineapple contain plenty of moisture. Drain the pineapple thoroughly and pat the pieces dry with kitchen paper. The shrimp should also be dried before being coated with olive oil and seasoning.

Arrange the toppings evenly without covering every part of the crust. Leaving small spaces helps moisture escape during baking. A preheated pizza stone produces the crispest base, although a sturdy metal baking sheet also works.

If the gluten-free crust is particularly soft, pre-bake it for three to five minutes before adding the sauce and toppings. This gives it enough structure to support the shrimp, fruit, vegetables, and cheese.

Cooking Shrimp Safely

Use peeled and deveined raw shrimp of approximately the same size. This ensures they cook evenly during the short baking time. The shrimp are ready when they become opaque and firm, with no translucent grey areas remaining.

Avoid using very large shrimp because they may require longer than the crust and cheese. Smaller or medium shrimp are easier to distribute and cook more evenly. If using previously cooked shrimp, add them during the final five minutes so they do not become dry and rubbery.

Keep raw seafood separate from ready-to-eat ingredients and clean knives, bowls, work surfaces, and hands thoroughly. Refrigerate shrimp until needed and store leftovers promptly. Additional information is available in the FDA safe food handling guidance.

Serving This Tropical Pizza

This tropical seafood pizza is particularly suitable for a summer meal, outdoor gathering, or relaxed family dinner. Serve it with mango salad, citrus-dressed greens, grilled vegetables, or fresh tropical fruit. Lime wedges provide extra acidity and can be squeezed over individual slices.

A chilled Sauvignon Blanc complements the fresh cilantro and shrimp while balancing the sweetness of the pineapple. A dry Riesling works well with the chilli flakes, while a crisp light beer is suitable for an informal meal.

For more recipes featuring fish and shellfish, visit the seafood collection.

Variations and Extra Toppings

Add thinly sliced bell pepper, spring onion, jalapeรฑo, or mango for extra colour and flavour. Monterey Jack can replace the mozzarella when a stronger and slightly richer cheese is preferred. A small amount of smoked paprika gives the shrimp a warmer flavour.

For additional heat, increase the chilli flakes or add finely sliced fresh chilli after baking. Avoid using too many extra toppings because they can hide the shrimp and release additional moisture onto the crust.

Dietary Notes and Storage

Use a certified gluten-free pizza crust, tomato sauce, cheese, and seasonings when preparing the recipe for someone who must avoid gluten. The dish is suitable for pescatarians but not for people with shellfish or dairy allergies.

Store leftover pizza in an airtight container in the refrigerator for no more than one day. Reheat it once in a hot oven or dry frying pan until the shrimp are thoroughly heated and the base becomes crisp. Repeated reheating is not recommended.

With its sweet pineapple, savoury shrimp, melted cheese, and gentle chilli heat, pineapple shrimp pizza offers a colourful fusion meal that is especially enjoyable during summer.


Smoky Grilled Veggie Pizza

Grilled veggie pizza with mozzarella, bell pepper and basil

Smoky Grilled Veggie Pizza

Smoky Grilled Veggie Pizza features a crisp barbecue-cooked crust topped with tomato sauce, melted mozzarella, bell pepper, red onion, and fresh basil.
Couverts4 servings
estimated costs pp $2.75
Deel op Facebook Print Recipe

Equipment

  • Grill or barbecue
  • Pizza stone or grilling tray
  • Rolling Pin
  • Spatula or pizza peel
  • Tongs

Ingredients

Instructions

  • Prepare the Pizza Base
  • Preheat the grill to medium-high heat, approximately 200ยฐC (400ยฐF).
  • Roll the pizza dough into an even circle on a lightly floured surface.
  • Brush both sides of the dough with 1 tablespoon extra-virgin olive oil.
  • Carefully place the dough on the grill grates or grilling tray.
  • Grill for 2 to 3 minutes, or until the underside is firm and marked.
  • Turn the pizza base over with tongs or a spatula.
  • Add the Toppings
  • Spread the tomato sauce in a thin layer over the grilled side.
  • Sprinkle the mozzarella evenly over the sauce.
  • Arrange the bell pepper and red onion over the cheese.
  • Finish Grilling
  • Close the grill lid.
  • Cook for 6 to 8 minutes, or until the crust is crisp and the mozzarella has melted.
  • Remove the pizza carefully from the grill.
  • Drizzle with the remaining tablespoon extra-virgin olive oil.
  • Scatter the fresh basil leaves over the top.
  • Season with salt and black pepper.
  • Cut into four equal portions and serve immediately.

Notes & Wine Advice

Serving Suggestions

Serve with grilled vegetables, an arugula salad, marinated olives, or a fresh tomato salad. Place the pizza in the centre of the table and serve it immediately while the crust remains crisp.

Recipe Notes

Make sure the grill is clean and fully preheated before adding the dough. Keep all toppings prepared and within reach because the first side cooks quickly. Use only a thin layer of tomato sauce to prevent the grilled crust from becoming soft.

Variations

Add sliced mushrooms, courgette, chilli flakes, or olives. Provolone can replace part of the mozzarella for a stronger flavour. Pesto may replace the tomato sauce when a fresher, herb-based pizza is preferred.

Storage

Store leftover pizza in an airtight container in the refrigerator for up to two days. Reheat it on the grill, in a hot oven, or in a dry frying pan until the crust is crisp and the cheese has melted again.

Wine Advice

A chilled Pinot Grigio complements the fresh vegetables and smoky crust. Sauvignon Blanc or a refreshing pale ale is also suitable.

Nutrition values

Serving: 1 1/4 pizza | Calories: 320 kcal | koolhydraten: 28 g | Eiwitten: 18 g | Vet: 18 g | Verzadigd vet: 8 g | Natrium: 650 mg | Suiker: 5 g
————————————————————————————————–

Grilled veggie pizza combines a crisp, lightly smoky crust with tomato sauce, melted mozzarella, sweet bell pepper, red onion, and fresh basil. Cooking pizza on a barbecue gives the base attractive grill marks and a flavour that is difficult to reproduce in a conventional oven. It is a practical choice for outdoor cooking, summer gatherings, or a relaxed family dinner.

Why Grill a Pizza?

A hot grill cooks pizza dough quickly and creates a crisp base with a soft, slightly chewy centre. Direct contact with the grill grates adds smoky flavour and distinctive charred lines. Closing the lid after adding the toppings traps heat around the pizza, helping the mozzarella melt while the underside continues to cook.

This technique works well when you want to cook outdoors without heating the kitchen. It also allows pizza to become part of a larger barbecue meal. Browse more ideas in the barbecue recipes collection or explore traditional combinations among the Italian recipes.

Preparing the Dough

Roll the dough into an even circle that fits comfortably on the grill. An irregular shape is not a problem, but the thickness should remain consistent. Thin areas can burn before thicker sections are cooked, while an overly thick base may remain doughy inside.

Brush both sides lightly with olive oil. This prevents sticking, encourages browning, and helps the crust develop a crisp surface. Avoid using too much oil because it can drip onto the flames and cause flare-ups.

Keep the grill grates clean and preheat them thoroughly. When using gluten-free dough, a grilling tray or pizza stone may be easier than placing the soft dough directly on the grates. Different gluten-free doughs behave differently, so follow any specific handling instructions on the packaging.

Work Quickly After Flipping

The first side of the crust only needs two or three minutes. Once it feels firm and releases easily from the grates, turn it carefully with tongs, a spatula, or a pizza peel. The grilled side now becomes the surface for the toppings.

Have the tomato sauce, cheese, and vegetables prepared before the dough goes onto the grill. After turning the crust, you need to add everything quickly. Spread only a thin layer of sauce because excessive moisture can soften the base.

Use clean utensils and preparation surfaces, keep mozzarella refrigerated until needed, and store leftovers promptly. More practical advice is available in the FDA safe food handling guidance.

Balancing the Toppings

Mozzarella provides a mild flavour and smooth melted texture. Thinly sliced bell pepper adds sweetness, while red onion brings a sharper contrast. Slice both vegetables finely so they become tender during the short grilling time.

Fresh basil should be added after cooking. Direct heat can darken the leaves and reduce their aroma. The remaining olive oil is also drizzled over the finished pizza, where its flavour remains fresh and noticeable.

This barbecue vegetable pizza pairs well with arugula salad, grilled courgette, marinated olives, or tomato salad. Find more topping inspiration in the pizza recipes collection.

Variations for the Grill

Add mushrooms, sliced courgette, olives, artichoke hearts, or chilli flakes. Vegetables containing plenty of moisture should be sliced thinly or grilled separately before being added. This prevents them from releasing too much liquid onto the crust.

Pesto can replace the tomato sauce for a fresh herb flavour. Provolone may replace part of the mozzarella when a stronger cheese is preferred. Roasted garlic, Parmesan, or balsamic glaze can be added after grilling.

Storage and Reheating

Store leftover pizza in an airtight container in the refrigerator for up to two days. Reheat it briefly on the grill, in a hot oven, or in a dry frying pan. These methods restore the crisp base more effectively than a microwave.

When reheating on the barbecue, use moderate heat and close the lid for several minutes. Watch the underside carefully because an already-cooked crust can burn quickly. Add fresh basil only after the slice is hot.

With its smoky crust, colourful vegetables, and melted cheese, grilled veggie pizza is a straightforward Italian-inspired meal made especially for outdoor cooking.


New Orleans Muffuletta Pizza

Muffuletta pizza with salami, ham, cheese and olives

New Orleans Muffuletta Pizza

New Orleans Muffuletta Pizza transforms the famous sandwich into a crisp pizza topped with olive tapenade, salami, ham, provolone, mozzarella, olives, and red onion.
Couverts4 servings
estimated costs pp $4.25
Deel op Facebook Print Recipe

Equipment

  • Baking sheet or pizza stone
  • Knife
  • Rolling Pin
  • spoon

Ingredients

For the Pizza Base

For the Toppings

Instructions

Prepare the Pizza Base

  • Preheat the oven to 220ยฐC (425ยฐF).
  • Place the pizza crust on a baking sheet or preheated pizza stone.
  • Brush the crust evenly with 1 tablespoon extra-virgin olive oil.

Add the Toppings

  • Spread the olive tapenade evenly over the pizza crust.
  • Arrange the salami, ham, and provolone over the tapenade.
  • Sprinkle the mozzarella over the meat and cheese.
  • Distribute the green olives, black olives, and red onion evenly over the pizza.
  • Drizzle with the remaining tablespoon extra-virgin olive oil.
  • Season lightly with black pepper.

Bake and Serve

  • Bake for 12 to 15 minutes, or until the crust is golden and the cheese has melted.
  • Remove the pizza from the oven.
  • Allow it to rest for 2 minutes.
  • Cut into four equal portions.
  • Serve hot.

Notes & Wine Advice

Serving Suggestions

Serve with a crisp green salad, tomato salad, pickled vegetables, or a cold lager. Because the pizza is rich and salty, choose a fresh side dish with a light acidic dressing.

Recipe Notes

Drain the olives and tapenade thoroughly to prevent the crust from becoming soggy. Additional salt is usually unnecessary because the salami, ham, cheese, olives, and tapenade already contain plenty. The original vegetarian classification was incorrect because this pizza contains salami and ham.

Variations

Add roasted bell pepper, artichoke hearts, or chopped giardiniera. Mortadella can replace the ham, while a spicy salami gives the pizza extra heat. For a meat-free version, omit the salami and ham and add mushrooms and roasted peppers.

Storage

Store leftover pizza in an airtight container in the refrigerator for up to two days. Reheat it in a hot oven or dry frying pan until the crust is crisp and the meat and cheese are thoroughly heated.

Wine Advice

A chilled Pinot Grigio balances the salty meat, olives, and cheese. A light Chianti or cold lager is also suitable.

Nutrition values

Serving: 1 1/4 pizza | Calories: 450 kcal | koolhydraten: 30 g | Eiwitten: 25 g | Vet: 28 g | Verzadigd vet: 12 g | Natrium: 1480 mg | Suiker: 4 g
————————————————————————————————–

Muffuletta pizza transforms the famous New Orleans sandwich into a crisp, cheese-covered meal. Olive tapenade replaces traditional tomato sauce, while salami, ham, provolone, mozzarella, green olives, black olives, and red onion create a rich and savoury topping. Every slice combines salty meat, melted cheese, sharp olives, and a crisp pizza crust.

Inspired by a New Orleans Classic

The original muffuletta sandwich is closely associated with New Orleans and its Italian immigrant community. It is traditionally made with a round sesame loaf filled with cured meats, cheese, and a strongly flavoured olive salad. This recipe keeps those recognisable fillings but serves them on a pizza base.

The olive tapenade is especially important because it provides the tangy and savoury flavour that distinguishes this pizza from a regular ham-and-salami combination. For more regional inspiration, browse the American recipes collection or explore additional ideas among the pizza recipes.

Managing Strong, Salty Ingredients

Salami, ham, provolone, olives, and tapenade all contain considerable amounts of salt. Additional salt is therefore unnecessary in most cases. Taste the tapenade and olives before assembling the pizza and use black pepper for extra seasoning instead.

Drain the green and black olives thoroughly and pat them dry with kitchen paper. Tapenade can also contain a surprising amount of oil or liquid. If it appears especially wet, allow it to drain briefly before spreading it over the crust. These small steps help prevent a greasy or soggy centre.

Spread the tapenade in a thin layer rather than using it as generously as tomato sauce. Its concentrated flavour can easily overpower the cheese and meat. A small amount distributed evenly across the base is sufficient.

Layering the Toppings

Arrange the ham, salami, and provolone evenly so every portion contains a balanced mixture. Sprinkle the mozzarella over the meat to help hold the topping together. Add the olives and thinly sliced red onion last, where they can remain visible and develop lightly browned edges.

A preheated pizza stone produces the crispest base, although a sturdy metal baking sheet also works. Let the oven become fully hot before baking. If the gluten-free crust is particularly soft, pre-bake it for three to five minutes before adding the tapenade and toppings.

Follow safe food-handling practices when preparing cured meats and cheese. Keep chilled ingredients refrigerated until needed and store leftovers promptly. More information is available in the FDA safe food handling guidance.

Serving Suggestions

This New Orleans olive pizza is rich enough to serve as a complete main course. Pair it with a crisp green salad, tomato salad, pickled vegetables, or crunchy coleslaw. A light acidic dressing helps balance the cured meat, cheese, and olives.

Pinot Grigio works well because its freshness cuts through the rich topping. A light Chianti complements the Italian-style ingredients, while a cold lager suits a relaxed game-day or weekend meal.

For other filling dishes featuring cured meats, explore the meat recipes section.

Variations and Dietary Notes

Chopped giardiniera makes an excellent addition because its pickled vegetables resemble the olive salad found in a traditional muffuletta. Roasted bell pepper and artichoke hearts provide extra colour, while spicy salami or chilli flakes add heat.

Mortadella can replace the ham for a more traditional Italian deli flavour. For a meat-free variation, omit the salami and ham and use sautรฉed mushrooms, roasted peppers, and artichokes. The dietary classifications must then be updated according to the chosen ingredients.

Use certified gluten-free crust, tapenade, salami, ham, and cheese when preparing the recipe for someone who must avoid gluten. Processed meats can contain unexpected binders or flavourings, so checking the packaging remains necessary.

Storage and Reheating

Store leftover pizza in an airtight container in the refrigerator for up to two days. Reheat slices in a hot oven or dry frying pan until the crust is crisp and the meat and cheese are thoroughly heated.

A microwave heats the pizza quickly but usually makes the crust softer. Because the topping already contains plenty of oil, no additional oil is needed during reheating. With its bold olive flavour and generous deli-style topping, Muffuletta pizza offers a distinctive alternative to conventional meat pizzas.


Spicy Beef & Black Bean Fiesta Pizza

Tex-Mex beef pizza with black beans, jalapeรฑos and cheese

Spicy Beef & Black Bean Fiesta Pizza

Spicy Beef & Black Bean Fiesta Pizza combines seasoned ground beef, black beans, jalapeรฑos, red onion, mozzarella, and cheddar on a crisp gluten-free crust.
Couverts4 servings
estimated costs pp $3.50
Deel op Facebook Print Recipe

Equipment

  • Baking sheet or pizza stone
  • Frying pan
  • Knife
  • Rolling Pin
  • spatula

Ingredients

For the Pizza Base

  • 1 gluten-free pizza crust
  • 1 tablespoon extra-virgin olive oil

For the Toppings

  • 200 g ground beef
  • 80 g black beans drained and rinsed
  • 1/2 red onion thinly sliced
  • 2 jalapeรฑos thinly sliced
  • 150 g mozzarella cheese shredded
  • 50 g cheddar cheese shredded
  • 1 tablespoon gluten-free taco seasoning
  • 2 tablespoons tomato sauce
  • 2 tablespoons fresh cilantro chopped

Instructions

Prepare the Pizza Base

  • Preheat the oven to 220ยฐC (425ยฐF).
  • Place the pizza crust on a baking sheet or preheated pizza stone.
  • Brush the crust evenly with the extra-virgin olive oil.

Prepare the Toppings

  • Heat a frying pan over medium heat.
  • Add the ground beef and cook for 5 to 7 minutes, breaking it apart with a spatula, until browned and thoroughly cooked.
  • Drain any excess fat from the pan.
  • Stir the taco seasoning and tomato sauce into the beef.
  • Cook for another 2 to 3 minutes.
  • Remove the pan from the heat.

Assemble and Bake

  • Spread the seasoned beef mixture evenly over the pizza crust.
  • Distribute the black beans, sliced red onion, and jalapeรฑos over the beef.
  • Sprinkle the mozzarella and cheddar evenly over the toppings.
  • Bake for 12 to 15 minutes, or until the crust is golden and the cheese has melted.

Remove the pizza from the oven.

  • Scatter the chopped cilantro over the top.
  • Cut into four equal portions and serve hot.

Notes & Wine Advice

Serving Suggestions

Serve with guacamole, tomato salsa, sour cream, or tortilla chips. A crunchy cabbage salad or charred corn salad also pairs well with the spicy beef topping.

Recipe Notes

Drain the cooked beef before adding the taco seasoning and tomato sauce so the pizza base does not become greasy. Remove the seeds and membranes from the jalapeรฑos for milder heat. Use a certified gluten-free crust, taco seasoning, and tomato sauce when required.

Variations

Replace the ground beef with shredded chicken, turkey, or a plant-based meat substitute. Add sweetcorn, sliced olives, or diced bell pepper. Pepper Jack cheese can replace the cheddar for an even spicier topping.

Storage

Store leftover pizza in an airtight container in the refrigerator for up to two days. Reheat it in a hot oven or dry frying pan until the crust is crisp and the beef is thoroughly heated.

Wine Advice

A chilled Sauvignon Blanc balances the jalapeรฑo heat and rich melted cheese. A fruity Zinfandel or a cold pale ale is also suitable.

Nutrition values

Serving: 1 1/4 pizza | Calories: 400 kcal | koolhydraten: 30 g | Eiwitten: 28 g | Vet: 22 g | Verzadigd vet: 10 g | Natrium: 850 mg | Suiker: 4 g
————————————————————————————————–

Tex-Mex beef pizza brings seasoned ground beef, black beans, jalapeรฑos, red onion, tomato, mozzarella, and cheddar together on a crisp gluten-free crust. It combines the familiar comfort of homemade pizza with the bold spices and colourful ingredients associated with Tex-Mex cooking. Fresh cilantro added after baking gives the rich topping a bright and aromatic finish.

Bold Tex-Mex Flavours

The seasoned beef forms the savoury foundation of this pizza. Taco seasoning adds warmth and depth, while a small amount of tomato sauce keeps the meat moist without making the crust soggy. Black beans provide a soft, creamy contrast and make every portion more substantial.

Jalapeรฑos bring fresh heat that balances the richness of the beef and melted cheese. Their intensity can vary, so taste a small piece before adding them. Removing the seeds and pale inner membranes produces a milder topping, while leaving them intact creates a noticeably spicier result.

For more dishes with warming spices and colourful toppings, explore the Tex-Mex recipes collection or browse other satisfying ideas among the beef recipes.

Preparing the Beef Topping

Brown the ground beef thoroughly before assembling the pizza. Break it into small pieces with a spatula so it can be distributed evenly over the crust. Large clumps make the pizza harder to slice and may cause the toppings to slide away when a portion is lifted.

Drain excess fat from the pan before adding the taco seasoning and tomato sauce. This helps prevent a greasy or softened pizza base. Allow the seasoned mixture to cook for another two or three minutes so the sauce coats the meat and the spices have time to develop.

Ground beef must be cooked and handled safely. Keep raw meat separate from vegetables and other ready-to-eat ingredients, clean all preparation surfaces, and refrigerate leftovers promptly. Consult the FDA safe food handling guidance for additional information.

Cheese, Beans and Vegetables

Mozzarella provides a mild flavour and stretchy texture, while cheddar adds colour and a sharper finish. Mixing the two cheeses gives the pizza a balanced topping without overwhelming the seasoned beef. Sprinkle them evenly so the beans, onions, and jalapeรฑos remain in place after baking.

Rinse and drain the black beans thoroughly before using them. Patting them dry removes additional moisture that could soften the crust. Slice the red onion thinly so it becomes tender during the relatively short baking time.

This spicy black bean pizza can be served with guacamole, tomato salsa, sour cream, tortilla chips, or a crunchy cabbage salad. Charred sweetcorn also makes a colourful side dish. Discover more homemade combinations in the pizza recipes section.

Variations for Different Tastes

Replace the ground beef with shredded chicken, ground turkey, or a plant-based meat substitute. Sweetcorn, sliced olives, diced bell pepper, or pickled jalapeรฑos can be added for extra colour and texture. Pepper Jack cheese provides more heat, while mild cheddar creates a family-friendly version.

For a fresher finish, add diced avocado, chopped tomato, or extra cilantro after baking. These ingredients should not be baked because avocado may become bitter and fresh tomato can release too much liquid onto the crust.

Storage and Dietary Notes

Use a certified gluten-free pizza crust, taco seasoning, and tomato sauce when preparing the recipe for someone who must avoid gluten. Check every label carefully because spice mixtures may contain wheat or be processed where cross-contact is possible.

Store leftovers in an airtight container in the refrigerator for up to two days. Reheat slices in a hot oven or dry frying pan until the crust is crisp and the beef is thoroughly heated. Add fresh cilantro after reheating for the best flavour.

With its hearty beef, creamy beans, spicy peppers, and two melted cheeses, Tex-Mex beef pizza is particularly suitable for game day, Cinco de Mayo, family dinners, parties, or a relaxed weekend meal.