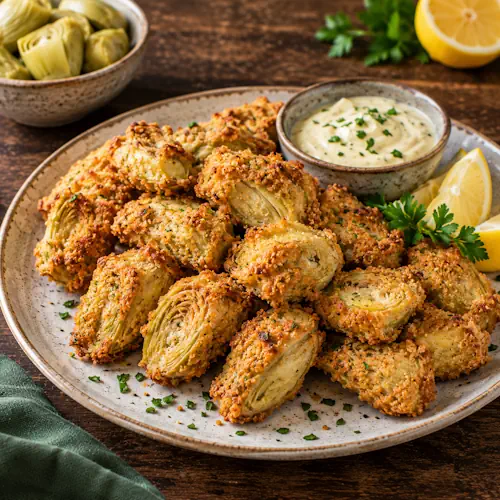
Tender artichoke hearts coated with Dijon mustard, almond flour and crushed pork rinds, then air fried until crisp and golden. A savoury low-carb appetizer or side dish that is also delicious served over a fresh salad.
Whisk the egg and Dijon mustard together in a medium bowl.
Combine the crushed pork rinds and almond flour in a separate shallow dish.
Dip each artichoke heart into the egg mixture, then coat thoroughly with the pork rind mixture.
Arrange half of the coated artichoke hearts in the ungreased air fryer basket in a single layer.
Air fry for 7 minutes, until crisp and golden.
Transfer the cooked artichoke hearts to a large serving plate and repeat with the remaining artichokes.
Serve warm.
Notes & Wine Advice
Serving Suggestions
Serve these crispy artichoke hearts warm as an Appetizer, Amuse or Side Dish. They are also delicious scattered over a fresh salad, where the crisp coating provides a contrast to the leafy vegetables.
Recipe Notes
Drain the artichoke hearts thoroughly before coating them. Removing excess moisture helps the egg mixture and crumb coating adhere more evenly. Cook them in batches rather than overcrowding the Airfryer.
Variations
For extra flavour, season the almond flour and pork rind mixture with black pepper, garlic powder or dried herbs. The artichokes are already seasoned, so taste before adding extra salt.
Storage Advice
Store leftover cooked artichoke hearts in an airtight container in the refrigerator for up to 3 days. Reheat them in the air fryer until thoroughly hot and crisp. Microwaving is possible but will produce a softer coating.
Wine Advice
Artichokes can be challenging with wine, but a fresh Sauvignon Blanc works well with their distinctive vegetable flavour and the Dijon mustard. A crisp Pinot Grigio is another suitable choice for this light, savoury dish.
Crispy Air Fryer Artichoke Hearts transform tender preserved artichokes into a crunchy Appetizer or side dish. Instead of conventional breadcrumbs or flour, the coating combines crushed pork rinds with almond flour. Dijon mustard mixed with egg provides flavour while helping the coating adhere to the artichokes.
Why Use Artichoke Hearts?
Using artichoke hearts packed in water removes much of the preparation normally required for fresh artichokes. They are already tender, so the purpose of cooking them in the Airfryer is primarily to heat them and create a crisp exterior.
Drain them thoroughly before coating. Excess moisture can prevent the egg and crumb mixture from adhering properly and may reduce the crispness of the finished coating.
Creating the Crispy Coating
The coating is made from crushed pork rinds and almond flour rather than traditional breadcrumbs. Pork rinds provide crunch and savoury flavour, while almond flour helps create a more complete coating around each piece.
The egg and Dijon mustard mixture acts as the wet layer. Dip each artichoke heart thoroughly before transferring it to the dry coating so that the pork rind mixture adheres evenly.
Cooking in the Air Fryer
The artichokes are cooked at 180°C for approximately 7 minutes per batch. Because the artichoke hearts themselves are already tender, the cooking time is relatively short.
Arrange them in a single layer and avoid overcrowding the basket. Air circulation around each piece is important for creating the crisp exterior that distinguishes these from simply heated artichoke hearts.
A Low-Carb Alternative
Replacing breadcrumbs with pork rinds and almond flour keeps the coating relatively low in carbohydrates. This makes the recipe suitable for the Low Carb category while still providing a substantial crisp coating.
Because almond flour is made from nuts, however, this recipe is not suitable for a nut-free diet. Always check packaged ingredients such as Dijon mustard and pork rinds when preparing the recipe for specific dietary requirements.
Serving as an Appetizer
The individual pieces make an easy Amuse or finger-food appetizer. Serve them warm on a platter, either on their own or with a suitable dipping sauce.
They can also be combined with other Vegetables to create a varied appetizer platter. Their crisp coating provides a particularly useful contrast to fresh or lightly cooked vegetables.
Serving with Salad
Another option is to serve the warm artichoke hearts over a fresh Salad. Their crunchy coating can take the place of croutons while adding a more substantial savoury element.
Add them immediately before serving so the coating remains crisp. A simple fresh dressing works better than a very heavy dressing that could quickly soften the coating.
Preparing for Entertaining
These artichoke hearts work well as part of the food for a Party or Birthday. Prepare the coating ingredients ahead, then bread and air fry the artichokes close to serving time.
If several batches are required, keep the cooked pieces warm while the remaining artichokes are in the air fryer. Avoid covering them tightly because trapped steam can soften the coating.
Storage and Reheating
Leftover artichoke hearts can be stored in an airtight container in the refrigerator for up to 3 days. Their coating will soften during refrigeration, but reheating in the air fryer can restore much of the original crispness.
Arrange leftovers in a single layer when reheating and heat until thoroughly hot. Avoid reheating them repeatedly because this can dry out the coating and the artichoke hearts.
Food Safety
The coating contains raw egg before cooking, so avoid cross-contamination between coated and cooked artichokes. Wash utensils and surfaces that have contacted the raw egg mixture. Refrigerate leftovers promptly after serving. For current guidance about safe preparation, cooking and storage, consult the U.S. Food and Drug Administration food-safety information.
Crispy Air Fryer Artichoke Hearts provide a simple way to turn preserved artichokes into a warm, crunchy Snack or side dish. With Dijon mustard, almond flour and pork rinds providing plenty of flavour and texture, they need very little additional seasoning before serving.
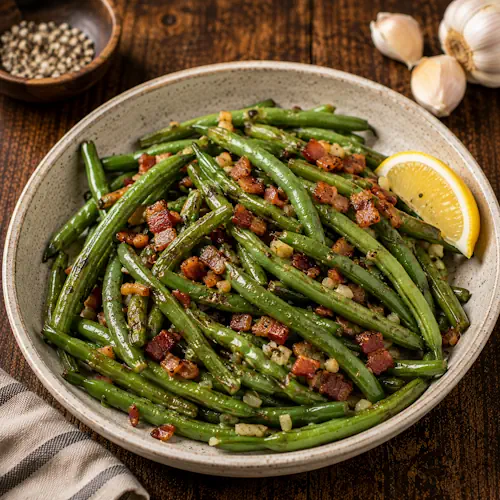
Tender air-fried green beans tossed with butter, crispy bacon, garlic, black pepper, and a squeeze of fresh lemon. A quick savoury vegetable side dish ready in minutes.
Preheat the air fryer to 190°C (374°F) for 3 minutes.
Toss the green beans with the melted butter, salt, and black pepper in a medium mixing bowl.
Transfer the green beans to the ungreased air fryer basket and cook for 5 minutes.
Add the diced bacon, toss, and cook for another 4 minutes.
Add the minced garlic, toss again, and cook for 1 final minute.
Transfer the green beans to a medium serving dish.
Squeeze the lemon wedge over the beans and toss gently.
Serve warm.
Notes & Wine Advice
Serving Suggestions
Serve these green beans warm as a simple Side Dish with chicken, beef, pork, or another favourite main course. They fit especially well alongside recipes from the Chicken, Beef, or Pork collections. The combination of bacon, garlic, butter, and lemon also makes them suitable for a Family Dinner.
Variations
For a stronger bacon flavour, make sure the bacon is finely diced so it becomes evenly distributed among the beans. You can add a little more fresh lemon juice just before serving for a brighter finish. For a meat-free variation, omit the bacon and use the basic cooking method for a simple dish from the Vegetables collection.
Storage and Reheating
Allow leftover green beans to cool and transfer them to a covered container in the refrigerator. Reheat them briefly in the Airfryer until thoroughly heated. Short reheating helps preserve their texture better than prolonged cooking.
Wine Advice
A fresh Sauvignon Blanc is a good partner for the green beans, garlic, bacon, and lemon. Its acidity balances the butter and bacon while complementing the fresh lemon finish. Explore suitable wines at René’s Wijnbeleving.
Garlic Bacon Green Beans turn a simple bag of fresh green beans into a quick and flavourful Side Dish. Instead of boiling the beans in water, they are cooked in the Airfryer with butter, bacon, garlic, and seasoning. A squeeze of fresh lemon at the end brings the flavours together and provides a fresh contrast to the savoury bacon and butter.
The recipe is particularly useful when you want a vegetable accompaniment without using another pan on the stove. The green beans take only 10 minutes to cook, with the ingredients added in stages so that each one receives the appropriate amount of heat.
Preparing Fresh Green Beans
Start with fresh green beans and trim the ends before cooking. Keeping the beans whole gives them enough structure to withstand the high heat of the air fryer while still becoming tender. After trimming, make sure the beans are reasonably dry so the butter and seasoning can coat their surfaces.
The beans are first tossed with melted butter, salt, and freshly ground black pepper. Butter adds richness and helps the beans brown lightly during cooking. Because bacon is added later and also contributes salt, there is no need to add additional seasoning during the final stages unless you taste the finished dish and decide it needs it.
Cooking Green Beans in the Air Fryer
Preheat the air fryer to 190°C (374°F) for 3 minutes. Once hot, place the seasoned beans directly into the ungreased basket. They cook by themselves for the first 5 minutes, allowing them to begin softening before the bacon is introduced.
After those first 5 minutes, add the diced bacon and toss everything together. The beans and bacon then cook for another 4 minutes. Cutting the bacon into small pieces helps it cook quickly and distributes its savoury flavour throughout the dish.
Adding Garlic at the Right Time
Fresh garlic can become bitter when exposed to high heat for too long. That is why the minced garlic is not added at the beginning. Instead, it goes into the basket for only the final minute of cooking. This is enough time to soften the garlic and release its aroma without unnecessarily scorching it.
This staged cooking method is simple but useful. The green beans receive the longest cooking time, the Bacon is given enough time to cook, and the garlic gets only the brief burst of heat it needs.
Finishing with Fresh Lemon
Once the beans are cooked, transfer them to a serving dish and squeeze a fresh lemon wedge over the top. Lemon may seem like a small addition, but its acidity balances the richness of both the butter and bacon. Toss the beans after adding the juice so the flavour is distributed throughout the dish.
The finished beans can be served alongside many different main courses. Try them with recipes from the Chicken, Beef, or Pork collections. They can also be included as one of several warm Vegetables at a larger meal.
A Quick Family Side Dish
Because the recipe requires only a handful of ingredients and approximately 10 minutes of actual cooking, it works particularly well for a Family Dinner. The air fryer also keeps the preparation contained in one basket, apart from the bowl used for seasoning the beans.
The combination is straightforward but balanced. Green beans provide freshness and texture, bacon brings savoury flavour, butter adds richness, garlic contributes aroma, and lemon gives the finished dish a brighter edge. This makes the recipe useful throughout the year rather than limiting it to a particular season.
Storage and Food Safety
Because this recipe contains cooked bacon, refrigerate leftovers promptly in a covered container. Reheat only the portion you plan to eat and warm it until thoroughly heated. The beans will gradually soften during storage, so they are at their best when eaten freshly cooked.
For current information about safely preparing bacon, vegetables, leftovers, and other foods at home, consult the FDA food safety guidance. Garlic Bacon Green Beans are a practical way to transform fresh green beans into a warm, savoury Airfryer side dish without adding unnecessary preparation or cooking time.
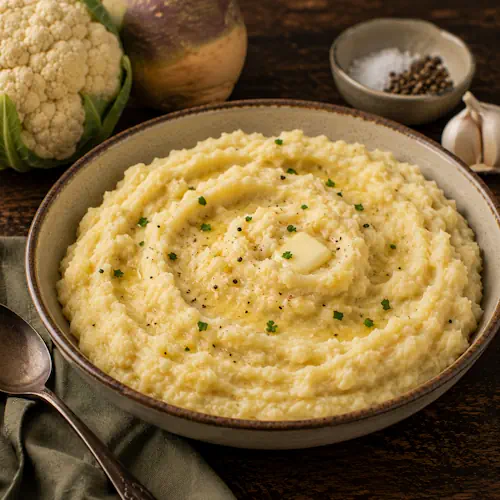
A smooth and creamy low-carb mash made with air-fried cauliflower, swede and garlic, blended with butter, cream cheese and almond milk. A flavourful vegetable alternative to traditional mashed potatoes and an easy side dish for many meals.
Melt 1½ tablespoons of the butter and toss it with the cauliflower, swede and ½ teaspoon salt in a large bowl.
Transfer the vegetables to the ungreased air fryer basket and cook for 5 minutes.
Toss the vegetables and cook for another 5 minutes.
Add the garlic and cook for a further 5 minutes, until the vegetables are tender.
Transfer the cooked vegetables to a blender or food processor.
Add the remaining butter, remaining salt, black pepper, cream cheese and almond milk.
Blend or pulse until smooth and creamy.
Transfer to a large serving dish and serve warm.
Notes & Wine Advice
Serving Suggestions
Serve this creamy mash warm as a Side Dish in place of traditional mashed potatoes. It works particularly well alongside roasted or grilled dishes and provides an easy way to add more Vegetables to a meal.
Recipe Notes
Cut the cauliflower and swede into relatively small, evenly sized pieces so they become tender at approximately the same time. Make sure both vegetables are completely tender before blending, otherwise the finished mash may remain slightly coarse.
Variations
For the loaded version suggested in the original recipe, stir cooked bacon crumbles and grated Cheddar cheese through the finished mash. Return it to the heat for another minute or two until the cheese has melted. This variation will change the dietary categories of the finished dish.
Storage Advice
Allow leftover mash to cool and transfer it to an airtight container. Refrigerate for up to 3 days. Reheat until thoroughly hot before serving, stirring well to restore the creamy consistency.
Wine Advice
A fresh Sauvignon Blanc works well with the cauliflower, garlic and creamy flavours. A fuller Chardonnay is another good choice, particularly when serving the mash with a richer main course.
Creamy Cauliflower & Swede Mash offers a vegetable-based alternative to traditional mashed potatoes. Cauliflower and swede are cooked until tender in the Airfryer, then blended with butter, cream cheese, almond milk and roasted garlic. The result is a smooth and comforting Side Dish with fewer carbohydrates than a conventional potato mash.
Combining Cauliflower and Swede
Cauliflower has a mild flavour and becomes soft enough to blend smoothly after cooking. Swede has a firmer texture and a slightly sweet, earthy flavour, giving the mash more body than cauliflower would provide on its own.
Cutting both Vegetables into relatively small pieces helps them cook evenly. The swede should be diced particularly carefully because it generally takes longer to soften than cauliflower.
Cooking the Vegetables in the Air Fryer
The vegetables are coated with melted butter and salt before being placed in the air fryer. Cooking them without water concentrates their flavour rather than boiling it away.
After the first 5 minutes, toss the vegetables so they cook more evenly. Garlic is added later because it requires less cooking time and could become overly dark if included from the beginning.
Creating a Smooth Mash
Once the cauliflower, swede and garlic are completely tender, transfer them to a blender or food processor. Butter and cream cheese provide richness, while unsweetened almond milk loosens the mixture enough to produce a creamy consistency.
Blend only until the texture is as smooth as you prefer. If the mixture seems too firm, a small additional amount of almond milk can be incorporated gradually.
A Low-Carb Alternative to Mashed Potatoes
Cauliflower is frequently used in place of potatoes when reducing carbohydrates. Combining it with swede produces a more substantial mash while keeping the dish suitable for the Low Carb category.
This version also contains no wheat-based ingredients. When preparing it for someone who must avoid gluten or wheat, check packaged products such as almond milk and cream cheese to confirm that the brands used meet their dietary requirements.
Serving with Main Dishes
The creamy texture makes this mash useful anywhere you would ordinarily serve mashed potatoes. It can accompany roasted meat, poultry or vegetables and works particularly well when there is a sauce or gravy to spoon over the top.
For a vegetarian meal, combine it with roasted vegetables or another substantial Vegetarian main dish.
Making a Loaded Version
The original recipe suggests turning the mash into a richer loaded version by adding cooked bacon crumbles and grated Cheddar cheese. Once stirred through, cook the mash for another minute or two until the cheese has melted.
This produces a much richer side dish and adds smoky and savoury flavours. Keep in mind that adding bacon means the finished version is no longer vegetarian.
Preparing Ahead
The mash can be prepared before the rest of the meal and refrigerated once cooled. Store it in an airtight container and use within 3 days.
When reheating, stir the mash thoroughly. If it has thickened during refrigeration, a small splash of almond milk can help restore its original creamy consistency.
Food Safety
The recipe contains butter and cream cheese, so refrigerate leftovers promptly after cooling and keep them chilled until reheating. Heat leftover mash thoroughly before serving again. For current information about safe food preparation and refrigerated storage, consult the U.S. Food and Drug Administration food-safety information.
Creamy Cauliflower & Swede Mash combines two versatile vegetables with garlic, butter and cream cheese to create a comforting alternative to mashed potatoes. Whether served with a simple family meal or as part of a larger dinner, it provides a creamy Vegetables side without relying on potatoes.
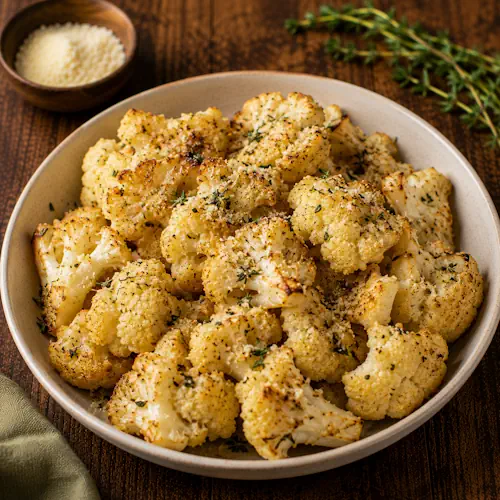
Tender air-fried cauliflower coated with melted butter, Parmesan cheese, thyme, and garlic. A simple savoury side dish with lightly crisp edges and plenty of flavour.
Preheat the air fryer to 180°C (356°F) for 3 minutes.
Combine the melted butter, Parmesan cheese, thyme, garlic powder, and salt in a large mixing bowl.
Add the cauliflower florets and toss until evenly coated.
Place half of the cauliflower mixture in the ungreased air fryer basket.
Cook for 3 minutes, shake the basket, and cook for another 3 minutes.
Transfer the cooked cauliflower to a large serving bowl.
Repeat the cooking process with the remaining cauliflower.
Serve warm.
Notes & Wine Advice
Serving Suggestions
Serve this cauliflower warm as a simple Side Dish with chicken, beef, pork, or fish. The Parmesan and thyme make it particularly suitable alongside recipes from the Chicken, Beef, Pork, or Fish collections.
Variations
For more garlic flavour, slightly increase the garlic powder. You can also add a little extra grated Parmesan shortly before serving. If you prefer softer cauliflower, simply extend the cooking time by a few minutes. For lightly browned edges, keep the florets reasonably small and avoid overcrowding the air fryer basket.
Storage and Reheating
Store leftover cauliflower in a covered container in the refrigerator for up to 3 days. Reheat it briefly in the Airfryer until thoroughly heated. This helps restore some of the lightly crisp texture.
Wine Advice
A fresh Sauvignon Blanc works well with cauliflower, Parmesan, thyme, and garlic. Its acidity provides a pleasant contrast to the butter and cheese. Explore suitable wines at René’s Wijnbeleving.
Parmesan Thyme Cauliflower is an easy way to turn fresh cauliflower into a flavourful Side Dish. Instead of roasting the cauliflower in a conventional oven, this recipe uses the Airfryer. The hot circulating air cooks the small florets quickly while allowing the edges to become lightly browned.
The seasoning is deliberately simple. Melted butter adds richness, Parmesan brings a savoury cheese flavour, dried thyme adds an aromatic note, and garlic powder provides extra depth. A small amount of salt brings everything together without overwhelming the natural flavour of the cauliflower.
Preparing the Cauliflower
Start with one large head of cauliflower and divide it into relatively small florets. Keeping the pieces similar in size helps them cook at approximately the same speed. Large pieces may remain firm in the centre while smaller pieces are already cooked, so an even size produces the best result.
Once cut, the cauliflower can be added directly to the butter and seasoning mixture. If you rinse the cauliflower first, dry it thoroughly. Excess water can dilute the butter mixture and reduce browning during air frying.
Coating the Cauliflower
Combine the melted butter with grated Parmesan cheese, dried thyme, garlic powder, and salt in a large bowl. Add the cauliflower and toss thoroughly. Try to distribute the mixture across all the florets rather than allowing most of the Parmesan and seasoning to remain at the bottom of the bowl.
The Parmesan is particularly useful here because it adds both flavour and texture. During cooking, small amounts of cheese on the surface of the cauliflower can brown, giving the finished vegetables a more savoury character. You can find more dishes using cheese in the Cheese collection.
Air Frying in Batches
The cauliflower is cooked in two batches. Although placing everything in the basket at once would be faster, overcrowding reduces the circulation of hot air. Cooking half at a time gives the florets more room and helps them cook more evenly.
Cook the first batch for 3 minutes at 180°C (356°F), then shake the basket. Continue cooking for another 3 minutes before transferring the cauliflower to a serving bowl. Repeat exactly the same process with the remaining batch.
This gives a total cooking time of approximately 12 minutes for the complete recipe. If your cauliflower florets are larger or you prefer them particularly tender, add a little extra cooking time. Check them regularly rather than automatically adding several minutes at once.
A Versatile Vegetable Side Dish
The mild flavour of cauliflower makes this recipe easy to combine with many different meals. It works particularly well with Chicken, Beef, Pork, and Fish. It can also be served with several other Vegetables for a larger meal.
Because cauliflower itself is relatively neutral, the Parmesan and thyme are what give this version its character. The combination remains mild enough to accompany strongly seasoned proteins without competing with them.
Serving and Storing
Parmesan Thyme Cauliflower is best served immediately while the florets are warm and the Parmesan coating still has some texture. Transfer each cooked batch to the serving bowl and serve once the second batch is ready.
Leftovers can be refrigerated in a covered container and reheated briefly in the air fryer. Avoid reheating for too long because cauliflower becomes increasingly soft with additional cooking.
For current guidance about safely handling, storing, and reheating prepared foods and vegetables, consult the FDA food safety guidance. With its short ingredient list and quick cooking method, Parmesan Thyme Cauliflower is a practical addition to your collection of Airfryer recipes.
Tender strands of spaghetti squash tossed with a creamy avocado, egg, Parmesan, and chicken broth sauce, then finished with crispy bacon and fresh parsley. A lighter, low-carb variation inspired by Italian carbonara.
Preheat the air fryer to 190°C (374°F) for 3 minutes.
Rub the olive oil over both halves of the spaghetti squash.
Place the squash in the ungreased air fryer basket, cut-side down, and cook for 25 minutes.
Meanwhile, blend the avocado, chicken broth, egg, Parmesan cheese, and salt until smooth. Set aside.
Cook the bacon in a large frying pan over medium heat for 5 minutes, until crispy.
Transfer the bacon to paper towels and let cool for 5 minutes, then crumble.
Transfer the cooked squash to a cutting board and let cool for 5 minutes, until easy to handle.
Use a fork to gently pull the spaghetti-like strands from the squash.
Transfer the squash strands to the same frying pan.
Add the avocado mixture and parsley and cook over medium heat for 2 minutes, tossing until the squash is evenly coated and the egg mixture is thoroughly cooked.
Add the crumbled bacon and toss gently.
Transfer to a large serving dish and serve warm.
Notes & Wine Advice
Serving Suggestions
Serve Avocado Squash Carbonara warm as a lighter alternative to traditional pasta. It works well as a Dinner or alongside a fresh vegetable dish from the Vegetables collection. For a larger meal, combine it with a simple Salad.
Variations
For extra Parmesan flavour, sprinkle a little grated cheese over each serving. You can also increase the parsley for a fresher finish. For a more substantial version, add extra crispy Bacon. Keep the basic avocado sauce simple so it remains creamy without overpowering the spaghetti squash.
Storage and Reheating
Store leftovers in a covered container in the refrigerator. Because the recipe contains cooked egg, chicken broth, bacon, and avocado, refrigerate it promptly. Reheat gently in a Stove Top pan until thoroughly heated. The avocado sauce may darken slightly during storage, so this dish is best eaten freshly prepared.
Wine Advice
A crisp Sauvignon Blanc is a good match for the creamy avocado, Parmesan, parsley, and bacon. Its fresh acidity cuts through the richness while remaining light enough for the spaghetti squash. Explore suitable wines at René’s Wijnbeleving.
Avocado Squash Carbonara takes inspiration from Italian carbonara but replaces conventional pasta with spaghetti squash and adds ripe avocado to the sauce. The result is a creamy, savoury dish that combines vegetables, egg, Parmesan cheese, and crispy bacon. Using spaghetti squash makes this recipe a useful choice when you want the familiar idea of carbonara in a lighter Vegetables-based meal.
The spaghetti squash is prepared in the Airfryer, which eliminates the need to roast it for a long period in a conventional oven. Once cooked, the flesh separates naturally into thin strands when scraped gently with a fork. These strands provide the foundation of the dish and hold the creamy avocado mixture surprisingly well.
Preparing the Spaghetti Squash
Start with a spaghetti squash weighing approximately 700 g. Cut it in half and remove the seeds before rubbing both halves with olive oil. Place them cut-side down in the air fryer basket. Cooking the squash at 190°C (374°F) for approximately 25 minutes should make the flesh tender enough to separate into strands while still retaining some texture.
After cooking, allow the squash to cool for about 5 minutes. This short resting period makes it much easier and safer to handle. Use a fork to scrape gently along the flesh rather than digging deeply into it. Long, loose strands are preferable because they give the finished dish more of the character associated with Pasta.
Making the Avocado Carbonara Sauce
While the squash cooks, prepare the sauce. Ripe avocado provides much of the creaminess, while chicken broth loosens the mixture. Egg and grated Parmesan provide the elements that connect the recipe to carbonara-style cooking.
Blend the avocado, chicken broth, egg, Parmesan, and salt until smooth. A ripe avocado is particularly important because a firm avocado will not produce the same creamy texture. The sauce should be smooth enough to coat the squash strands without becoming watery.
Crispy Bacon for Savoury Flavour
Cook the bacon separately in a large frying pan until crisp. After cooking, transfer it to paper towels and allow it to cool before crumbling. The bacon provides saltiness and a contrasting crisp texture against the soft squash and avocado sauce.
Using the same frying pan for the final stage also keeps preparation simple. Once the spaghetti squash has been scraped into strands, transfer it directly to the pan in which the bacon was cooked. This makes the recipe a practical combination of Airfryer and Stove Top cooking.
Finishing the Carbonara
Add the avocado mixture and fresh parsley to the spaghetti squash and toss everything over medium heat for approximately 2 minutes. Because the sauce contains raw egg, this final heating stage is important. Toss continuously so the sauce coats the squash evenly while the egg cooks rather than forming large scrambled pieces.
Once thoroughly heated, add the crumbled bacon. The finished dish should be creamy rather than wet, with the avocado and Parmesan coating the individual strands of squash.
A Low-Carb Carbonara Variation
Traditional carbonara is associated with Italian cooking and normally relies on pasta as its foundation. This version deliberately moves away from that formula by replacing the pasta with spaghetti squash and incorporating avocado. It should therefore be considered a carbonara-inspired variation rather than an authentic Italian carbonara.
The combination works particularly well as a Dinner. It can be served by itself or accompanied by a simple Salad. Parmesan, bacon, and avocado make the dish rich enough that elaborate accompaniments are unnecessary.
Storage and Food Safety
This recipe is at its best immediately after preparation because avocado gradually changes colour and spaghetti squash softens during storage. Refrigerate leftovers promptly in a covered container and reheat them thoroughly before serving.
Particular care should be taken with the egg mixture. It should be heated thoroughly during the final cooking stage rather than merely stirred into warm squash. For current guidance about the safe preparation of eggs, poultry products, leftovers, and other foods, consult the FDA food safety guidance.
Avocado Squash Carbonara ultimately combines several familiar ingredients in an unusual way: tender spaghetti squash, creamy avocado, Parmesan, egg, parsley, and crisp bacon. It provides a distinctive alternative for anyone exploring Low Carb recipes while retaining the creamy, savoury qualities that inspired the dish.
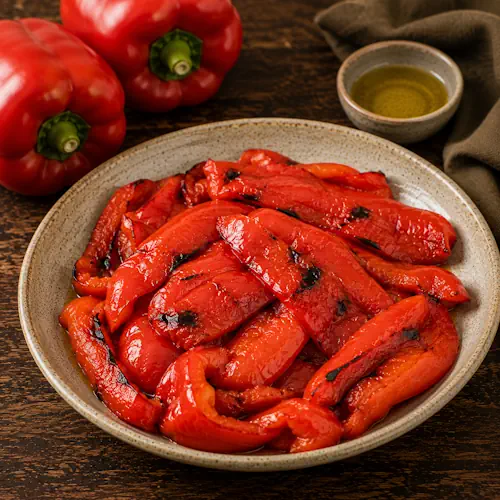
Sweet red capsicums roasted in the air fryer until tender and lightly charred, then steamed and peeled for a soft, silky texture. An easy basic recipe for salads, pizzas, eggs, frittatas, appetizers and countless other dishes.
Toss the red capsicum sections with the olive oil in a small bowl.
Arrange the capsicum sections in the ungreased air fryer basket.
Air fry for 12 minutes.
Turn the capsicum sections and cook for another 12 minutes, until tender and roasted.
Transfer the roasted capsicums to a small metal bowl.
Cover tightly with plastic wrap and leave to steam for 15 minutes.
Remove the capsicums from the bowl and peel away and discard the skins.
Serve immediately or cool for use in other recipes.
Notes & Wine Advice
Serving Suggestions
Use these roasted red peppers as a simple Side Dish or add them to salads, pizzas, sandwiches, devilled eggs and frittatas. They can also be chopped and used as a colourful topping for an Appetizer or incorporated into sauces and dips.
Recipe Notes
Do not skip the steaming stage after roasting. Covering the hot peppers for 15 minutes traps steam around the skins and makes them considerably easier to peel. A little blackening on the skins from the Airfryer is perfectly fine because the skins are removed before serving.
Different Capsicum Colours
The same Basic recipe can be used with green, yellow, orange, white or purple capsicums. Different colours vary in sweetness and flavour, and combining several colours creates an attractive mixture of roasted Vegetables.
Storage Advice
Allow the peeled roasted peppers to cool completely before transferring them to an airtight container. Refrigerate and use within 3 to 4 days. Keep them chilled until needed and use clean utensils when removing portions from the container.
Wine Advice
A fresh Sauvignon Blanc works well when the roasted peppers are served in a salad or alongside fresh vegetables. A Pinot Grigio is another suitable choice, particularly when the peppers are served as part of a light Mediterranean-style dish.
Air Fryer Roasted Red Peppers are a simple way to prepare sweet, tender peppers without buying jars of pre-roasted vegetables. Fresh red capsicums need only olive oil before being cooked in the Airfryer. After roasting, a short steaming period loosens the skins so they can be peeled away easily, leaving soft and flavourful roasted peppers.
Why Roast Red Capsicums?
Roasting changes both the flavour and texture of fresh capsicums. The flesh becomes softer and sweeter, while lightly charred areas add a deeper roasted flavour. This makes roasted peppers useful in dishes where raw capsicum would be too crisp or assertive.
Because the recipe contains only capsicums and olive oil, it is also a versatile Basic recipe that can be prepared before deciding exactly how the finished peppers will be used.
Preparing the Peppers
Remove the tops and bottoms of the capsicums, then cut along the natural rib sections. Remove the seeds and inner membranes so the pieces are relatively flat and can cook evenly.
Tossing the pieces with olive oil gives them a light coating that encourages roasting without making them greasy. No additional seasoning is necessary at this stage because the finished peppers can later be seasoned according to the dish in which they are used.
Roasting in the Air Fryer
Arrange the capsicum sections in the basket so hot air can circulate around them. They are cooked for 12 minutes before being turned and cooked for another 12 minutes.
The skins may become dark or blistered during cooking. This is desirable because the outer skins will later be removed, while the flesh underneath becomes tender and develops its characteristic roasted flavour.
Why Steam the Peppers?
Immediately after roasting, transfer the hot peppers to a metal bowl and cover it tightly with plastic wrap. The heat trapped inside creates steam, which loosens the skins from the flesh.
After approximately 15 minutes, the skins should peel away much more easily. Discard the skins and retain the soft roasted flesh for serving or adding to another recipe.
Using Different Colours
Red is only one option. Green, yellow, orange, white and purple capsicums can also be roasted using the same technique. Each colour offers slightly different flavour characteristics, so using a mixture can make a dish more interesting.
A colourful selection also works particularly well when the roasted peppers are served as Vegetables on a platter or incorporated into a fresh salad.
Ways to Use Roasted Peppers
Once prepared, roasted peppers can be used in numerous recipes. Slice them for a Salad, place them on pizza, chop them into egg dishes or add them to sandwiches and wraps.
They can also be blended into sauces and dips or served simply with herbs and seasoning as a Side Dish. Their soft texture makes them particularly useful when a recipe needs pepper flavour without the crunch of raw capsicum.
A Versatile Vegetable Recipe
With only two ingredients, the finished peppers naturally fit a wide range of dietary requirements. They contain no dairy products, eggs, wheat or animal ingredients and can therefore be useful when preparing food for guests with different preferences.
The recipe is also suitable for the Low Carb category and can be incorporated into many vegetarian or vegan meals.
Preparing Ahead
Roasted peppers are particularly convenient to prepare ahead because they can be chilled after peeling. Once completely cool, transfer them to an airtight container and refrigerate until needed.
This makes it easy to prepare a batch for use across several meals. Add them to salads cold, allow them to come closer to room temperature for an appetizer platter or incorporate them into cooked dishes.
Food Safety
Cool the roasted peppers promptly after peeling if they are not being served immediately. Store them covered in the refrigerator and use clean utensils when handling them. For current information about preparing and storing fresh produce safely, consult the U.S. Food and Drug Administration food-safety information.
Air Fryer Roasted Red Peppers are an economical and flexible alternative to store-bought roasted capsicums. Once you have prepared a batch, they can bring colour, sweetness and roasted flavour to everything from Pizza and salads to appetizers, egg dishes and vegetable sides.
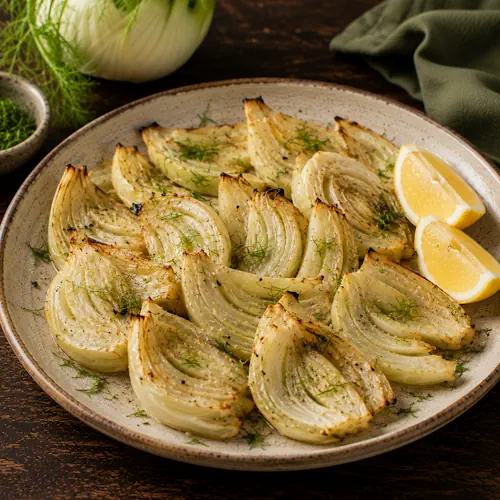
Tender air-fried fennel with lightly roasted edges, olive oil and fresh lemon. Heating softens fennel’s distinctive anise flavour, creating a simple low-carb vegetable side dish that pairs especially well with chicken, fish and other savoury main courses.
Brush both sides of the fennel slices with olive oil and season evenly with salt.
Arrange the fennel slices in the ungreased air fryer basket.
Air fry for 8 minutes, until tender and lightly roasted.
Transfer the fennel to a medium serving dish.
Squeeze the lemon wedges over the warm fennel and garnish with the chopped fennel fronds.
Serve warm.
Notes & Wine Advice
Serving Suggestions
Serve the fennel warm as a Side Dish alongside chicken, fish or another savoury main course. The fresh lemon works particularly well with the mild anise flavour of the roasted fennel. It can also be served with other roasted Vegetables.
Recipe Notes
Slice the fennel into similarly sized pieces so they cook evenly. Fennel has a pronounced anise or liquorice flavour when raw, but this becomes noticeably milder and sweeter during cooking. Do not discard the fronds, as they make a fresh and flavourful garnish.
Variations
Add freshly ground black pepper, garlic or dried herbs before cooking for extra flavour. A little grated Parmesan can be added shortly before serving for a richer version, although this will change the dietary suitability of the original recipe.
Storage Advice
Allow leftover fennel to cool before transferring it to an airtight container. Refrigerate for up to 3 days. Reheat in the Airfryer until thoroughly hot, or enjoy the cooked fennel cold as part of a salad.
Wine Advice
A fresh Sauvignon Blanc pairs well with the lemon and herbal character of the fennel. A crisp Pinot Grigio is another suitable choice, especially when the fennel is served alongside fish or chicken.
Air Fryer Roasted Fennel with Lemon turns a vegetable known for its distinctive anise flavour into a mild, tender and versatile Side Dish. The fennel is simply brushed with olive oil, seasoned with salt and cooked in the Airfryer before being finished with fresh lemon juice and chopped fennel fronds.
What Happens to Fennel When It Is Cooked?
Raw fennel has a crisp texture and a pronounced flavour often compared with anise or liquorice. Cooking changes both characteristics. The slices become tender while the strong aromatic flavour softens and becomes noticeably sweeter.
This transformation makes cooked fennel useful for people who find the flavour of raw fennel too assertive. Roasting also produces lightly browned edges that add another layer of flavour without requiring complicated seasoning.
Preparing the Fennel
Remove the feathery fronds before slicing the bulb, but keep some of them for garnishing the finished dish. Slice the bulb into similarly sized sections so the pieces cook at approximately the same rate.
The fennel requires only a thin coating of olive oil. Brush both sides of each slice rather than pouring a large quantity of oil into the basket. A small amount of salt is enough to season the Vegetables while allowing their natural flavour to remain prominent.
Cooking Fennel in the Air Fryer
The air fryer provides intense circulating heat that cooks the fennel quickly. At 180°C, the slices need approximately 8 minutes to become tender and lightly roasted.
Arrange the slices so air can circulate around them rather than packing them tightly together. If your air fryer has a smaller basket, cooking in two batches may produce a more even result.
Why Add Lemon?
Fresh lemon provides acidity that balances the natural sweetness that develops as fennel cooks. It also complements the remaining herbal notes without masking them.
Squeeze the lemon over the fennel immediately after cooking while the slices are still warm. Finish with the reserved chopped fronds for extra fennel aroma and a fresh contrast to the roasted bulb.
A Simple Vegetable Side Dish
This recipe uses only fennel, olive oil, lemon and salt, making it a useful Basic recipe for preparing fennel. Its uncomplicated seasoning allows it to accompany many different main dishes.
It is particularly good alongside Chicken, where the lemon and fennel provide freshness against roasted or grilled poultry. It can also accompany fish, seafood or a vegetarian main course.
Using Fennel in a Low-Carb Meal
Fennel is naturally relatively low in carbohydrates, and the recipe contains no flour, breadcrumbs or added sugar. This makes the finished dish suitable for the Low Carb category.
The simple ingredient list also means the original recipe contains no dairy, eggs, wheat, nuts or animal-derived ingredients, making it suitable for a broad range of dietary preferences.
Serving Ideas
Serve the fennel straight from the air fryer while it is warm and tender. It can form part of a larger plate of roasted vegetables or accompany a protein-based main course.
Cooked fennel can also be cooled and incorporated into a Salad. In that case, a little additional lemon juice can be added before serving to refresh the flavour.
Adding Other Flavours
The basic recipe is easy to adapt. Freshly ground black pepper, garlic or Mediterranean herbs can be added before air frying. Parmesan can be sprinkled over the fennel for a richer variation.
When adding extra ingredients, remember that the uncomplicated combination of fennel and lemon is part of the appeal of the original recipe. Strong seasonings can quickly dominate the vegetable’s delicate flavour after cooking.
Storage and Reheating
Store leftover cooked fennel in an airtight container in the refrigerator for up to 3 days. It can be reheated in the air fryer for a few minutes until thoroughly hot.
Alternatively, serve leftovers cold or at cool room temperature as part of a vegetable platter or salad. Add a fresh squeeze of lemon just before serving if the flavour needs brightening.
Food Safety
Wash the fennel thoroughly before preparing it, particularly between the layers where soil can sometimes collect. Refrigerate cooked fennel promptly if it is not being eaten immediately. For current guidance on washing, preparing and storing fresh produce safely, consult the U.S. Food and Drug Administration food-safety information.
Air Fryer Roasted Fennel with Lemon is a straightforward way to turn fresh fennel into a tender and aromatic vegetable side. The short ingredient list keeps the flavour clean, while air frying mellows the fennel and fresh lemon provides the finishing touch.
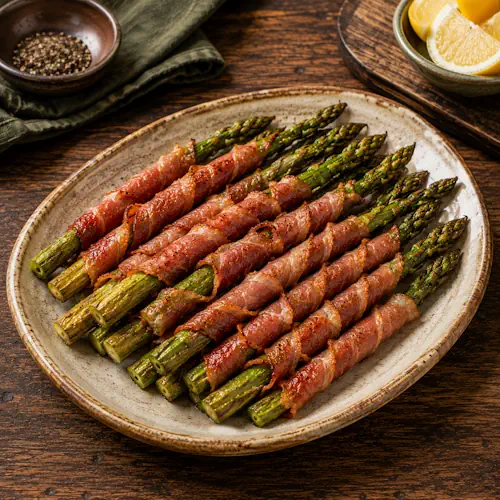
Tender asparagus spears wrapped in salty prosciutto and air fried until crisp. With only two ingredients, this simple low-carb recipe makes an easy appetizer, side dish or savoury snack.
Spiral-wrap one strip of prosciutto around each asparagus spear, starting at the bottom and stopping before the tip.
Preheat the air fryer to 200°C for 3 minutes.
Arrange the wrapped asparagus in the ungreased air fryer basket.
Air fry for 6 minutes.
Shake the basket to turn and redistribute the asparagus.
Cook for another 6 minutes, until the asparagus is tender and the prosciutto is crisp.
Transfer to a plate and serve warm.
Notes & Wine Advice
Serving Suggestions
Serve the asparagus warm as an Appetizer, Amuse or Side Dish. It pairs particularly well with chicken, fish or a larger selection of Vegetables.
Recipe Notes
Use thick asparagus spears so they remain tender but firm while the prosciutto becomes crisp. There is no need to add salt because the prosciutto already provides plenty of seasoning. Leave the asparagus tips uncovered when wrapping for an attractive presentation.
Variations
A squeeze of fresh lemon can be added immediately before serving for extra freshness. Freshly ground black pepper also works well, but additional salt is generally unnecessary. For the crispiest result, avoid overcrowding the Airfryer basket.
Storage Advice
Allow leftovers to cool before transferring them to an airtight container. Refrigerate for up to 3 days. Reheat briefly in the air fryer until thoroughly hot and the prosciutto has become crisp again.
Wine Advice
A fresh Sauvignon Blanc pairs well with the green flavour of asparagus and provides a crisp contrast to the salty prosciutto. A dry Pinot Grigio is another suitable choice, particularly with the Italian character of the dish.
Crispy Prosciutto-Wrapped Asparagus combines fresh asparagus with thin slices of Italian prosciutto to create a remarkably simple Appetizer or side dish. The asparagus becomes tender in the Airfryer, while the prosciutto tightens around each spear and develops crisp edges.
A Simple Two-Ingredient Recipe
The recipe requires only asparagus and prosciutto. Because prosciutto is naturally salty and intensely savoury, there is no need for additional salt, oil or complicated seasoning.
This simplicity also allows the flavour of the asparagus to remain prominent. The fresh vegetable flavour balances the richness and saltiness of the cured Pork.
Choosing the Asparagus
Thick asparagus spears work particularly well for this recipe. Very thin asparagus can become overly soft before the prosciutto has enough time to become crisp.
Trim away the woody ends before wrapping. The tender upper portion of each spear should remain intact, including the tip, which is deliberately left uncovered by the prosciutto.
Wrapping with Prosciutto
Slice the prosciutto lengthwise to create 18 strips, one for each asparagus spear. Starting near the bottom, wrap each strip around the asparagus in a spiral.
Stop wrapping before reaching the tip. This keeps some of the green asparagus visible and prevents the delicate tip from being completely enclosed by the cured meat.
Cooking in the Air Fryer
The wrapped asparagus cooks at 200°C for approximately 12 minutes in total. After the first 6 minutes, shake the basket so the spears change position and cook more evenly.
During cooking, the asparagus becomes tender while the prosciutto loses moisture and becomes crisp. No oil is required because the prosciutto contains enough fat to crisp naturally in the hot circulating air.
An Italian-Inspired Side Dish
Prosciutto gives the recipe a clear Italian character. The combination of cured ham and fresh vegetables is simple enough to accompany a wide variety of main courses.
Serve the spears alongside grilled or roasted chicken, fish or other Vegetables. They also work well as part of a Mediterranean-style meal.
Serving as an Appetizer
Because each asparagus spear forms an individual portion, the recipe is particularly convenient for serving as an Amuse or finger-food appetizer. Arrange the spears on a large platter and serve them while still warm.
The simple presentation also makes them suitable for a Party or other gathering where food needs to be easy to pick up without cutlery.
A Low-Carb Combination
Neither asparagus nor prosciutto contributes a large amount of carbohydrate, making this recipe suitable for the Low Carb category. There is no breadcrumb coating, pastry or added sugar in the original recipe.
When preparing the dish for specific dietary requirements, check the label of the prosciutto. Ingredients and processing methods can vary between brands, particularly where allergens or additives are a concern.
Preparing Ahead
The asparagus can be trimmed and wrapped in prosciutto several hours before cooking. Keep the prepared spears covered in the refrigerator until you are ready to air fry them.
Cooking them shortly before serving gives the best texture. The prosciutto is at its crispiest directly from the air fryer, while the asparagus remains warm and tender.
Storage and Reheating
Store leftover cooked asparagus in an airtight container in the refrigerator for up to 3 days. The prosciutto will soften during storage, but a brief reheating in the air fryer can restore much of its crisp texture.
Arrange leftovers in a single layer when reheating and heat only until thoroughly hot. Excessive reheating can dry out both the prosciutto and asparagus.
Food Safety
Keep the prosciutto refrigerated until preparation and return any unused portion promptly to the refrigerator. Wash and trim the asparagus before wrapping. For current guidance about safe handling, preparation and refrigerated storage of foods, consult the U.S. Food and Drug Administration food-safety information.
Crispy Prosciutto-Wrapped Asparagus is a straightforward way to turn fresh Vegetables into a savoury appetizer or side dish. The salty, crisp prosciutto provides all the seasoning these tender asparagus spears need.
Try this dish next to a juicy steak to take the place of a traditional potato side. The garlic and butter transform the meaty-textured radish into a fantastic recipe — without the guilt of a high carb count.
To provide the best experiences, we use technologies like cookies to store and/or access device information. Consenting to these technologies will allow us to process data such as browsing behavior or unique IDs on this site. Not consenting or withdrawing consent, may adversely affect certain features and functions.
Functional
Always active
The technical storage or access is strictly necessary for the legitimate purpose of enabling the use of a specific service explicitly requested by the subscriber or user, or for the sole purpose of carrying out the transmission of a communication over an electronic communications network.
Preferences
The technical storage or access is necessary for the legitimate purpose of storing preferences that are not requested by the subscriber or user.
Statistics
The technical storage or access that is used exclusively for statistical purposes.The technical storage or access that is used exclusively for anonymous statistical purposes. Without a subpoena, voluntary compliance on the part of your Internet Service Provider, or additional records from a third party, information stored or retrieved for this purpose alone cannot usually be used to identify you.
Marketing
The technical storage or access is required to create user profiles to send advertising, or to track the user on a website or across several websites for similar marketing purposes.
To provide the best experiences, we use technologies like cookies to store and/or access device information. Consenting to these technologies will allow us to process data such as browsing behavior or unique IDs on this site. Not consenting or withdrawing consent, may adversely affect certain features and functions.
Functional
Always active
The technical storage or access is strictly necessary for the legitimate purpose of enabling the use of a specific service explicitly requested by the subscriber or user, or for the sole purpose of carrying out the transmission of a communication over an electronic communications network.
Preferences
The technical storage or access is necessary for the legitimate purpose of storing preferences that are not requested by the subscriber or user.
Statistics
The technical storage or access that is used exclusively for statistical purposes.The technical storage or access that is used exclusively for anonymous statistical purposes. Without a subpoena, voluntary compliance on the part of your Internet Service Provider, or additional records from a third party, information stored or retrieved for this purpose alone cannot usually be used to identify you.
Marketing
The technical storage or access is required to create user profiles to send advertising, or to track the user on a website or across several websites for similar marketing purposes.