
BBQ Ribs and Dry Spice Rub

BBQ ribs combine tender pork, smoky homemade spice rub, rich tomato barbecue sauce, and slow grilling into a classic comfort food recipe packed with bold barbecue flavor. The dry seasoning creates deep savory crust while the sauce caramelizes beautifully during the final grilling stage.

This barbecue rib recipe remains popular because the homemade spice blend gives the pork deep smoky richness while slow cooking keeps the meat tender and juicy. Chili powder, garlic, cumin, soy sauce, and Worcestershire sauce create bold layered flavor throughout the ribs.

BBQ ribs with smoky homemade spice rub

The popularity of BBQ ribs continues to grow because dry spice rubs help build flavorful bark around the meat while preserving moisture during long cooking times. Refrigerating the ribs after seasoning also allows the spices to penetrate more deeply into the pork.

Another reason this pork rib recipe works so well is the balance between smoky spices and sweet tangy sauce. Brown sugar softens the chili heat while tomato sauce creates rich glossy barbecue flavor.

Slow grilling creates tender juicy pork texture

The low indirect grilling process gives these smoky pork ribs their tender texture while allowing the barbecue sauce to caramelize slowly around the outside. Long cooking times also help break down connective tissue inside the ribs.

If you enjoy rich barbecue pork recipes, you may also like our Smoky BBQ Baby Back Ribs, another flavorful rib recipe packed with slow-cooked barbecue flavor.

Texture plays an important role in this recipe. The dry spice rub forms flavorful crust around the ribs while the inside remains juicy and tender during grilling.

Brushing the sauce onto the ribs near the end of cooking creates sticky glossy coating while preventing the sugars inside the sauce from burning too early.

Perfect barbecue pork recipe for outdoor grilling

These BBQ ribs work perfectly for summer cookouts, backyard parties, family dinners, and weekend grilling because the smoky pork flavor and tender texture create classic barbecue comfort food.

The ribs pair beautifully with baked beans, coleslaw, roasted potatoes, corn on the cob, cornbread, pickles, macaroni salad, or extra barbecue sauce served on the side.

Proper food handling remains important whenever preparing pork and marinades. Pork should always stay refrigerated before cooking and should be cooked thoroughly before serving. For additional meat preparation and barbecue safety guidance, visit the FDA.

Ultimately, BBQ ribs deliver tender pork texture, smoky spice rub richness, sticky barbecue sauce, and slow-cooked comfort food flavor in a satisfying recipe perfect for barbecue lovers.
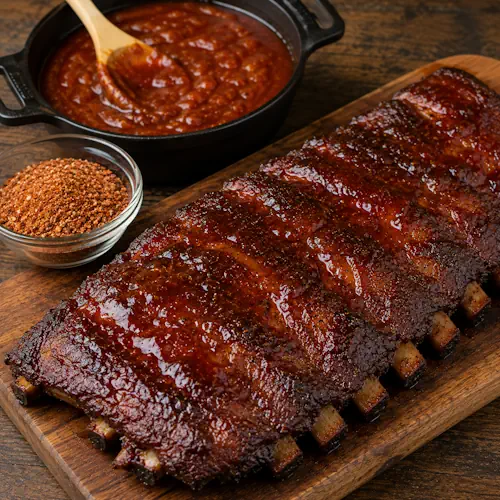
BBQ ribs served on a rustic wooden table with smoky pork ribs and homemade barbecue sauce

BBQ Ribs with Smoky Dry Spice Rub

Tender pork ribs coated in smoky homemade seasoning and rich barbecue sauce.
Couverts4 servings
Total time 9 hours 15 minutes
estimated costs pp $8.95 per person
Deel op Facebook Print Recipe

Equipment

  • Baking sheet
  • grill
  • Mixing bowl
  • Saucepan
  • Whisk

Ingredients

Instructions

  • Combine chili powder, garlic, onion powder, cumin, salt, and seasoning salt in a bowl.
  • Whisk until evenly mixed.
  • Rub half of the spice mixture all over the rib roast.
  • Place the meat on a baking sheet, cover, and refrigerate for 4 to 6 hours.
  • Combine the remaining spice mixture, onion flakes, brown sugar, chopped tomato, tomato sauce, Worcestershire sauce, soy sauce, and a small amount of water in a saucepan.
  • Cook over low heat for 3 to 5 hours while stirring occasionally.
  • Prepare a grill for indirect heat and lightly grease the grates.
  • Place the ribs on the grill and cover.
  • Cook for 3 to 5 hours until tender.
  • Brush the sauce over the ribs during the final minutes of cooking.

Notes & Wine Advice

Notes

Allowing the ribs to marinate in the dry spice rub creates deeper smoky barbecue flavor throughout the pork.

Serve Tip

Serve these ribs with baked beans, coleslaw, cornbread, roasted potatoes, or grilled vegetables.

Variations

Add honey, chipotle powder, bourbon, cayenne pepper, or smoked paprika for deeper smoky richness and heat.

Wine Advice

A bold Cabernet Sauvignon pairs beautifully with the smoky pork and rich barbecue sauce.

Nutrition values

Calories: 540 kcal | koolhydraten: 24 g | Eiwitten: 42 g | Vet: 30 g | Verzadigd vet: 11 g | Natrium: 1120 mg | Suiker: 16 g
————————————————————————————————–
Cuisine; American
Season: Summer
Diets; High-Protein
Occasions Game Day / Summerpartys

Grilled Steak Salad with Asian Dressing.

Grilled Steak Salad with Asian Dressing.

Deel op Facebook Print Recipe

Ingredients

Instructions

  • Coat steak evenly with soy sauce and steak seasoning.
  • Cover and refrigerate at least 1 hour to overnight.
  • Preheat an outdoor grill for medium-high heat.
  • Grease grill lightly.
  • Place steak on grill and cook for 6 minutes per side.
  • Steak should be firm, reddish-pink, and juicy in the center.
  • For the best results, temperature should be 130 degrees F.
  • Remove steak from heat, sprinkle with lemon juice and cover with foil.
  • Set aside for 10 minutes, then cut into strips.
  • In a small bowl, stir together olive oil, sesame oil, rice vinegar, sugar, garlic powder, and red pepper flakes.
  • In a separate bowl, toss together, cucumber, tomato, avocado, carrot, lettuce, red onion and the steak strips.
  • Pour rice vinegar dressing over salad.
  • Sprinkle with sesame seeds to serve.
————————————————————————————————–
Course; Barbecue / Beef / Salad
Cuisine; Asia

Sirloin Steak with Garlic Butter.

Sirloin Steak with Garlic Butter.

Deel op Facebook Print Recipe

Ingredients

Instructions

  • Preheat an outdoor grill for high heat.
  • Melt butter in a saucepan, over medium-low heat.
  • Add garlic powder and minced garlic; sauté.
  • Set aside.
  • Season each side of the steaks with salt and pepper.
  • Grill steaks 4-5 minutes per side.
  • Place steaks on warmed plates and lightly brush with garlic butter.
  • Rest for 2-3 minutes before serving.
————————————————————————————————–
Course; Barbecue / Beef

New York Strip Chicago Style

New York Strip Chicago Style

Deel op Facebook Print Recipe

Ingredients

Instructions

  • Stir together, olive oil, garlic, sugar, cinnamon and apricot preserves.
  • Mix thoroughly to avoid preserves from sticking together.
  • Cut shallow slashes on both sides of the steaks, using a knife.
  • Season with salt and pepper.
  • Add steaks to the sauce, coat entirely.
  • Cover with plastic wrap, and refrigerate for 1 hour.
  • Preheat grill for high heat.
  • Grease the grill grate.
  • Discard the sauce and place steaks on the hot grill.
  • Cook for 10 minutes, turning occasionally.
————————————————————————————————–
Course; Barbecue / Beef

Marinated Flank Steak

Marinated Flank Steak

Deel op Facebook Print Recipe

Ingredients

Instructions

  • Prepare marinade by adding, oil, vinegar, lemon juice, soy sauce, Worcestershire sauce, mustard, and garlic into a bowl.
  • Season with ground black pepper.
  • In a shallow glass dish, add the steak and pour marinade over it, coating it entirely.
  • Cover, and refrigerate for 6 hours.
  • Preheat grill for medium-high heat.
  • Preheat grill for medium-high heat.
  • Lightly grease the grill grate.
  • Discard the marinade and place steaks on the grill.
  • Grill meat for 5 minutes per side.
————————————————————————————————–
Course; Barbecue

Basic Bitch Banana Bread

Basic Bitch Banana Bread

If there’s one quick-and-easy baked good you can bring to a PTA or sorority fundraiser, it’s banana bread. This is the loaf that was meant for popped collars, pearls, that picnic basket that looks like Dorothy’s, and anyone named Karen. Or anyone named Dorothy, for that matter. Sounds basic enough. All you need are overly ripe bananas and a few other pantry staples to whip up a moist and dense delight that even banana haters typically enjoy. Walnuts are completely optional, though they’re not something I ever turn down because nuts are supposed to be good for your cognitive function and I need all the help I can get. What’s Dorothy’s last name again? Topeka?
Couverts1 loaf
Deel op Facebook Print Recipe

Ingredients

Instructions

  • Preheat the oven to 350ºF.
  • Grease a 9 by 5-inch loaf pan with nonstick spray and line with parchment paper.
  • Line a baking sheet with parchment paper.
  • Peel 4 bananas and place them on the prepared baking sheet.
  • Roast for 20 minutes.
  • Remove from the oven and transfer the bananas to a medium bowl; keep the oven on.
  • Using a potato masher, mash until smooth.
  • You should have about 1½ cups mashed banana.
  • Set aside to cool.
  • In a large bowl, whisk together the flour, baking powder, baking soda, salt, and cinnamon to combine and set aside.
  • In the bowl of a stand mixer fitted with the paddle attachment, cream the butter and light brown sugar until light and fluffy.
  • Add the eggs, one at a time, beating well after each addition.
  • Add the mashed bananas and vanilla.
  • Add half the flour mixture, followed by the buttermilk.
  • Add the remaining flour mixture.
  • Remove the bowl from the stand mixer and stir in the walnuts and chocolate, if using.
  • Pour the batter into the prepared loaf pan.
  • Peel the remaining banana and slice in half lengthwise.
  • Press the two halves into the top of the batter, cut-side up.
  • Bake for 1 hour, until a toothpick inserted into the center of the loaf comes out clean.
  • Remove from the oven and let cool completely.
  • Slice and serve.

Notes & Wine Advice

Banana bread is the perfect treat to make if you need to use the bananas that you forgot about on your counter.
The riper the bananas get, the sweeter they become. Roasting the bananas brings out even more flavor.
Banana bread freezes very well. Slice into portions and freeze individually. When you’re in a rush, you can grab a piece from the freezer and pop it in the microwave for 30 seconds for a quick breakfast or snack.
————————————————————————————————–
Course; Bread / Cake / Fruit

Blue-Ribbon Blueberry Muffins

Blue-Ribbon Blueberry Muffins

When it comes to blueberry muffins, I pledge Epsilon Alpha Tau (EAT). In fact, I’ll be hazed ten times over for just a morsel of streusel topping. But the things I’d do for just a muffin top (and not one that grows on my own body), well, that’s best suited for a different type of book. It’s between me and the Muffin Man, and frankly, I don’t kiss and tell. But I do share recipes, and this one for a standard, albeit orgasmic, blueberry muffin will replace Grandma’s or anything you have been working from since you learned how to bake. The ratio of fruit vs. cakey goodness is award-winning, if I do say so myself. Like I’m actually tempted to take a trip to Party City and buy a ribbon every time I make these. Sorry, not sorry.
Deel op Facebook Print Recipe

Ingredients

Instructions

  • Preheat the oven to 350ºF.
  • Grease 16 muffin cups with nonstick spray.
  • In a large bowl, whisk together the all-purpose flour, whole-wheat flour, baking powder, baking soda, and salt to combine and set aside.
  • In the bowl of a stand mixer fitted with the paddle attachment, cream the butter and granulated sugar until light and fluffy, about 5 minutes.
  • Add the eggs one at a time, beating well after each addition.
  • Add the vanilla, lemon zest, lemon juice, and sour cream.
  • Reduce the mixer speed to low and slowly add half the flour mixture, mixing until fully incorporated.
  • Add the buttermilk and mix to combine.
  • Add the remaining flour mixture and mix to combine.
  • Remove the bowl from the stand mixer and fold in the blueberries with a rubber spatula.
  • Scoop the batter into the prepared muffin cups, dividing it evenly.
  • Sprinkle with raw sugar.
  • Bake for 30 to 35 minutes, rotating the pan halfway through, until the muffins are cooked through and golden.
  • Transfer the pans to a wire rack for at least 5 minutes, then remove from the pan and transfer to the wire rack to cool completely.

Notes & Wine Advice

If you want to be really fussy, you can reserve about ½ cup of the blueberries and place them on top of the batter after you’ve filled your muffin tins. This will ensure you get the pretty look of the blueberries bursting on top of the muffins.
————————————————————————————————–

Cinnamon Rolls with Stupid Amounts of Cream Cheese Frosting

Cinnamon Rolls with Stupid Amounts of Cream Cheese Frosting

They say there’s nothing like a well-balanced, nutritious breakfast to start your day, to which I say, “To hell with that.” Breakfast is the best excuse to eat dishes that are practically dessert, all before ten a.m. and minus the guilt. Cinnamon rolls are a gooey and excellent way to ignore the food pyramid and go hog wild on cream cheese frosting, which, frankly, should cover the entire food pyramid. Because have you eaten anything that doesn’t taste better with more cream cheese frosting? No, you haven’t.
Couverts9
Deel op Facebook Print Recipe

Ingredients

FOR THE ICING

Instructions

  • In the bowl of a stand mixer fitted with the dough hook, combine the warm water, yeast, and 2 tablespoons of the granulated sugar.
  • Let stand for 5 minutes, until the yeast is frothy.
  • Add 5 tablespoons of the melted butter, the vanilla, and the egg and mix to combine.
  • In a large bowl, stir together the flour, 6 tablespoons of the granulated sugar, and the salt to combine.
  • With the mixer on low speed, gradually add the flour mixture and mix until the dough pulls away from the side of the bowl and forms a ball, about 5 minutes.
  • Continue to mix until the dough is shiny and elastic, about 5 minutes.
  • Transfer the dough to a greased bowl and let rise in a warm spot until doubled in size, about 1 hour.
  • Meanwhile, in a medium bowl, combine the remaining ½ cup granulated sugar with the light brown sugar, cinnamon, and salt.
  • Set aside.
  • Grease a 12-inch cast-iron skillet with nonstick spray.
  • On a lightly floured surface, roll out the dough to a 16 by 14-inch rectangle.
  • Depending on the climate, you may need to add additional flour to make the dough thicker.
  • Spread the remaining melted butter over the surface of the dough and sprinkle with the cinnamon-sugar mixture.
  • Starting from one long side, roll the dough into a tight log.
  • Cut a 1-foot-long piece of unflavored dental floss.
  • Slide it under the cinnamon roll log and cross the ends over the top to cut the log into 2½-inch-thick rolls.
  • If you do not have floss, use a serrated knife, wiping the blade clean after each cut.
  • Place the cinnamon rolls in the prepared cast-iron skillet and cover with plastic wrap.
  • Let rise in a warm place for 30 minutes.
  • Preheat the oven to 325ºF.
  • Bake the cinnamon rolls for 45 minutes, until cooked through.
  • Remove from the oven and let rest for 10 minutes.
  • Meanwhile, make the icing: In the bowl of a stand mixer fitted with the paddle attachment, beat the cream cheese and butter until combined.
  • Gradually add the confectioners’ sugar, vanilla, milk, and salt and beat until light and fluffy.
  • Spread the icing over the cinnamon rolls and serve warm.

Notes & Wine Advice

LITERALLY CAN’T EVEN
Make these cinnamon rolls your own. Switch up the spices by adding some ground coriander, ginger, or nutmeg. Fold in some orange zest for a fresh kick, or top with chopped nuts or dried fruits. And who could forget chocolate!
JUST THE TIPS
If you prefer a smaller cinnamon roll, simply cut the rolls into 1-inch pieces, use two 12-inch cast-iron skillets, and bake for 35 minutes.
————————————————————————————————–
Course; Breakfast

Lumberjack Boyfriend–Approved Apple Cider Doughnuts

Lumberjack Boyfriend–Approved Apple Cider Doughnuts

The arrival of apple cider doughnut season is meant to be sung from the rooftops at Kesha “Praying” scream-note levels of enthusiasm. They’re the sole reason why you dress your boyfriend up as a lumberjack and bring him to an orchard, other than Instagram opportunities, of course. I’m not sure what it is about the hot, flaky, sugary bag that can probably solve world peace or decode the root cause of Lana del Rey’s many moods (which I relate to oh-so-much), but I’m always here for it, first in line, weathering the elements of public transportation to get there. On the off chance I’m not willing to make the trek north from Manhattan, this recipe totally suffices. Just be sure to document your efforts on social media, or it may not be worth the effort.
Couverts12
Deel op Facebook Print Recipe

Ingredients

Instructions

  • Preheat the oven to 350ºF.
  • Grease two 6-cavity doughnut pans with nonstick spray.
  • In a small saucepan, heat the apple cider over high heat until it has reduced to ½ cup, about 10 minutes.
  • Cool completely.
  • In a large bowl, whisk together the flour, baking powder, salt, 1 teaspoon of the cinnamon, and the nutmeg to combine.
  • In the bowl of a stand mixer fitted with the paddle attachment, cream the butter, light brown sugar, and ½ cup of the granulated sugar until light and fluffy, about 4 minutes.
  • Add the eggs, one at a time, beating well after each addition.
  • Add the vanilla and beat to combine.
  • On low speed, add half of the flour mixture, followed by the reduced apple cider.
  • Add the remaining flour mixture and beat until the batter comes together.
  • Transfer the batter to a large piping bag and pipe it into the prepared doughnut pans so the cavities are about two-thirds full.
  • Bake until golden brown and cooked through, 12 to 15 minutes, rotating the pans halfway through.
  • Remove from the oven and let cool in the pans for 10 minutes.
  • Transfer to a wire rack set over a baking sheet.
  • In a shallow bowl, combine the remaining ½ cup granulated sugar and the remaining 1 teaspoon cinnamon.
  • Brush the doughnuts all over with the melted butter and dip them into the cinnamon-sugar mixture, coating the doughnuts fully.
  • Serve immediately.

Notes & Wine Advice

These doughnuts make buying a doughnut pan worth it. No need to go to the apple orchard for fresh apple cider doughnuts this year!
For added apple flavor, we’ve cooked down the apple cider into an apple cider concentrate to get the most bang for our buck.
————————————————————————————————–
Course; Breakfast / Cake

One Hot Pair

One Hot Pair

Buttermilk Currant Scones with Homemade Raspberry Jam
When two become one,you don’t get just an amazing Spice Girls song. Scones and jam go together likepeas and carrots, except way less disgusting. And ever since I rocked ayin-yang necklace in second grade, my life is all about balance. This dynamicduo is something I can house at Guinness World Record levels of consumption,which can be said about pretty much everything in this book. The onlydifference is that scones are way too easy on the palate, as if you’reswallowing pillows of layered goodness. And for someone who is in a chronicstate of sleep deprivation, swallowing pillows (and not pills) apparentlyresonates with me. (If I can’t sleep on them, I may as well eat them, right?)
Couverts8
Deel op Facebook Print Recipe

Ingredients

FOR THE RASPBERRY JAM

FOR THE SCONES

Instructions

  • Preheat the oven to 375ºF.
  • Line a baking sheet with parchment paper.
  • First make the raspberry jam: In a small saucepan, combine the raspberries, sugar, lemon juice, and salt.
  • Bring to a boil over high heat, stirring until the sugar has dissolved.
  • Skim off any light-colored foam around the sides and discard.
  • Cook, stirring occasionally, until thickened and the temperature reaches 220ºF, 12 to 15 minutes.
  • Remove from the heat.
  • Strain through a fine-mesh sieve to remove some or all of the seeds, if desired.
  • Ladle into a mason jar and cool completely.
  • Make the scones: In a large bowl, combine the cake flour, baking powder, baking soda, salt, and granulated sugar.
  • Add the butter and, using a pastry blender or your fingers, blend the butter into the flour until it is in pea-size pieces.
  • Create a well in the center of the bowl and add the eggs, buttermilk, and vanilla.
  • Using a fork, mix the ingredients until they are just combined into a shaggy dough.
  • Add the currants, if using, and knead until combined.
  • Lightly flour a work surface and roll the dough out into a 1-inch-thick round using a rolling pin.
  • Cut into 8 wedges.
  • Put the wedges on the prepared baking sheet.
  • Brush with buttermilk and sprinkle with raw sugar.
  • Bake for 20 to 25 minutes, until golden brown and crisp.
  • Serve warm, with the raspberry jam.

Notes & Wine Advice

The raspberry jam will keep in the jar in the fridge for up to 1 month. Freeze your scones before baking for a quick make-ahead treat. Simply take the scones out of the freezer while the oven is preheating and place on a baking sheet. Add a couple of minutes to the baking time to account for the scones being partially frozen.
————————————————————————————————–
Course; Bread / Breakfast